
Viewing a transcript
A transcript is a collection of annotations on numerous layers corresponding to a single audio file, plus transcript attributes like when the audio file was originally recorded. In APLS, each transcript has a single main participant and corresponds to a section of that participant’s sociolinguistic interview. Each transcript has its own Transcript page in APLS.
On this page, we use the term transcript for the underlying data in the APLS corpus, and Transcript page for the webpage you can use to view transcript data.
Because the Transcript page provides the most easily digestible view of how data is organized in APLS, we’ll discuss a lot of data-organization concepts on this documentation page (especially in the section on viewing layer data). If you need a refresher on the basics, check out the Data organization in LaBB-CAT page.
As we’ll cover below, there are a few ways to access individual Transcript pages. The easiest is the Transcripts page at https://apls.pitt.edu/labbcat/transcripts. Go to that page and select a transcript to view.
On this page
- What you can do on the Transcript page
- Reading the transcript
- Listening to the transcript
- Navigating to other transcripts
- Viewing layer data
- Selecting layers to display
- Creating permalinks
- Viewing transcript attributes
- Viewing participant information
- Searching the transcript/participants
- Downloading audio
- Exporting the transcript
- Opening utterances in Praat
- Accessing Transcript pages
What you can do on the Transcript page
- Read the transcript
- Follow along with the transcript as you listen
- Navigate to other transcripts in the same interview
- View annotations on different layers
- Create permalinks for individual lines or words in the transcript
- View the transcript’s attributes
- Find more information on participants in the transcript
- Search the transcript or its participants for linguistic patterns
- Download the transcript audio in wav or mp3 formats
- Export the entire transcript to various file formats
- Open individual lines of the transcript in Praat
Page layout
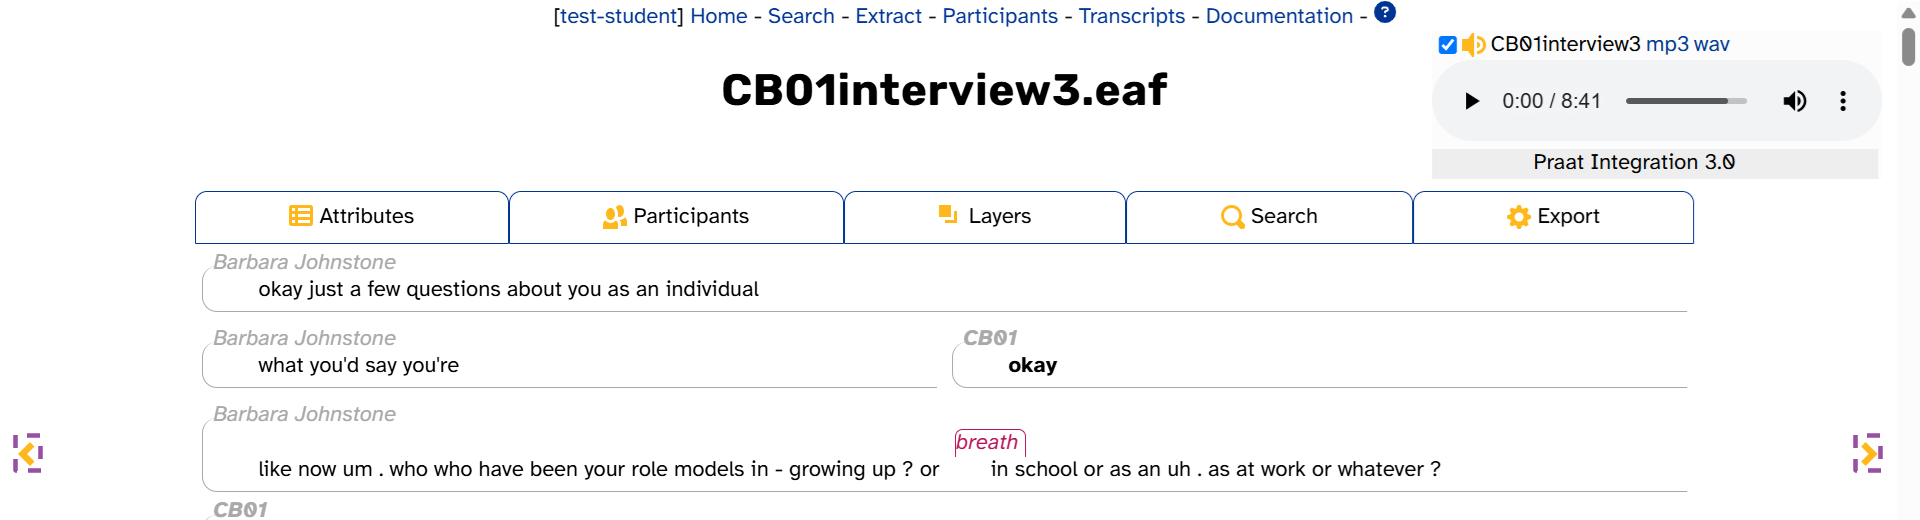
Individual Transcript pages have two sections, plus some elements that stay in the same place as you scroll down the page. This is highlighted in the following image, which displays the top of the Transcript page for CB01interview3.eaf:
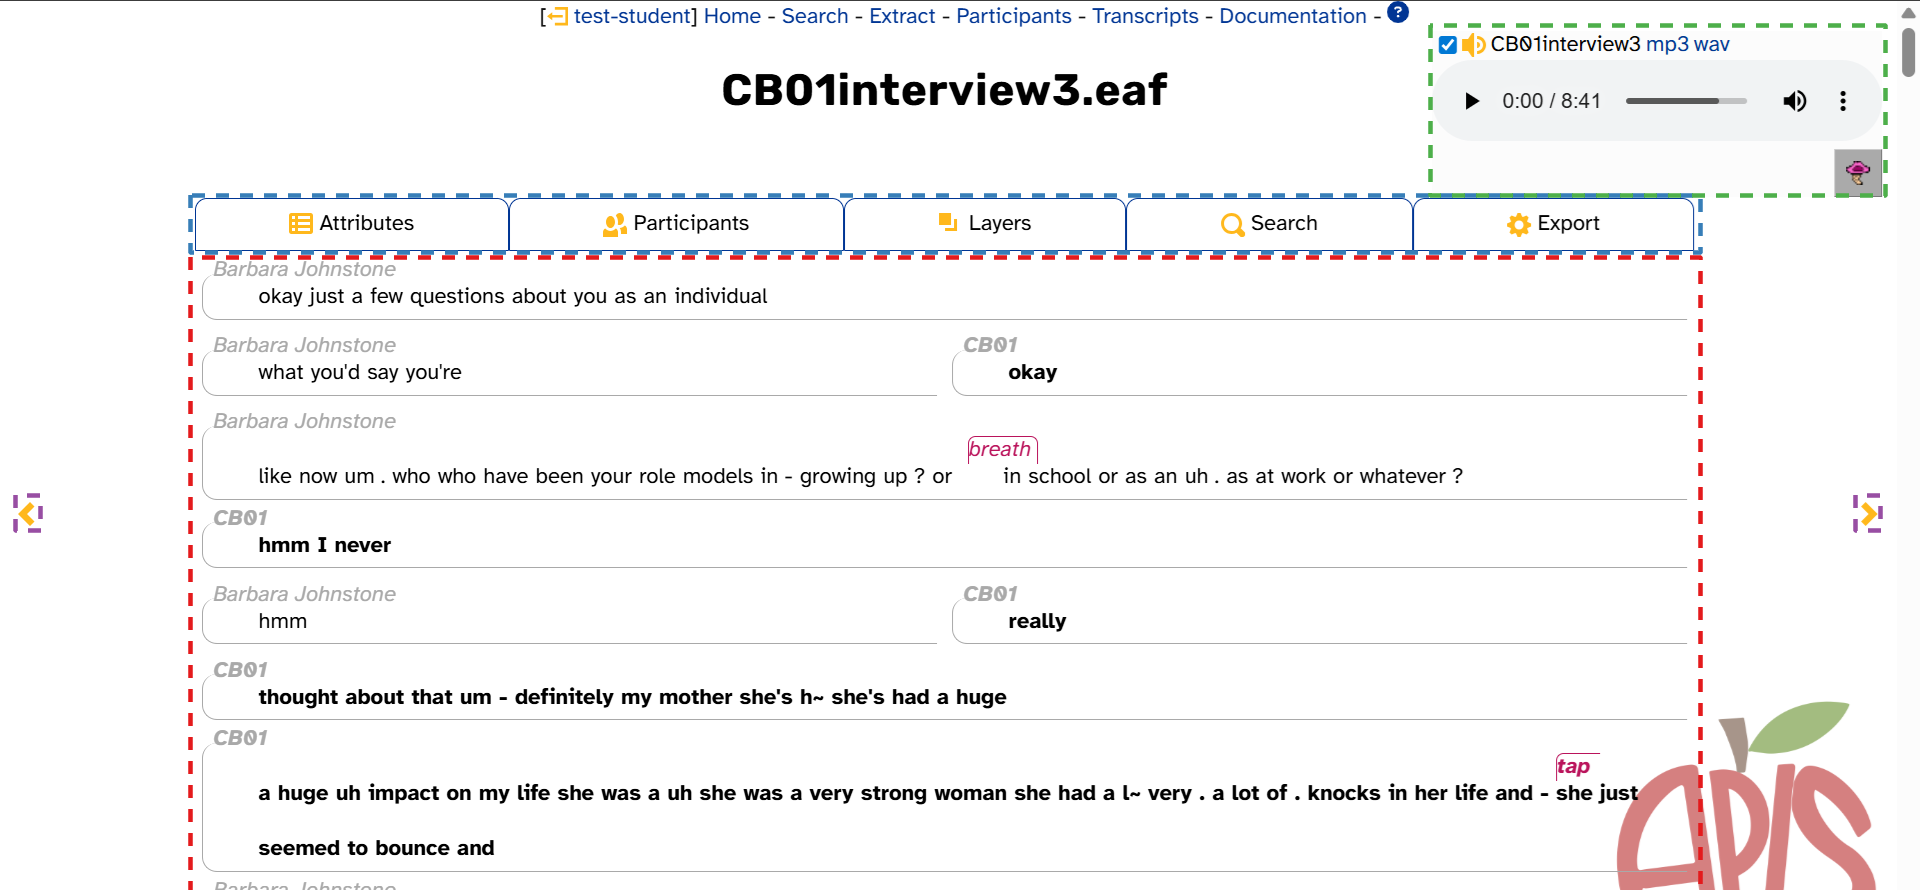
- The transcript body (highlighted in red above), which continues all the way down the page. This is where you can…
- The transcript header (highlighted in blue above). The expandable tabs each have their own function:
- Attributes: View the transcript’s attributes
- Participants: Find more information on participants in the transcript
- Layers: Select which layers to display in the transcript body
- Search: Search the transcript or its participants for linguistic patterns
- Export: Export the entire transcript to various file formats
- The media player (highlighted in green above), which stays in the same place as you scroll down the page. This is where you can:
- The navigation arrows (highlighted in purple above). This is where you can:
- Navigate to other transcripts in the same interview
Word menu
Not displayed in the image above is the word menu. This pops up when you click on a word in the transcript body. Some of the functions in the word menu require installing the Praat integration. Here’s what the word menu looks like without the Praat integration (left) or with it (right):
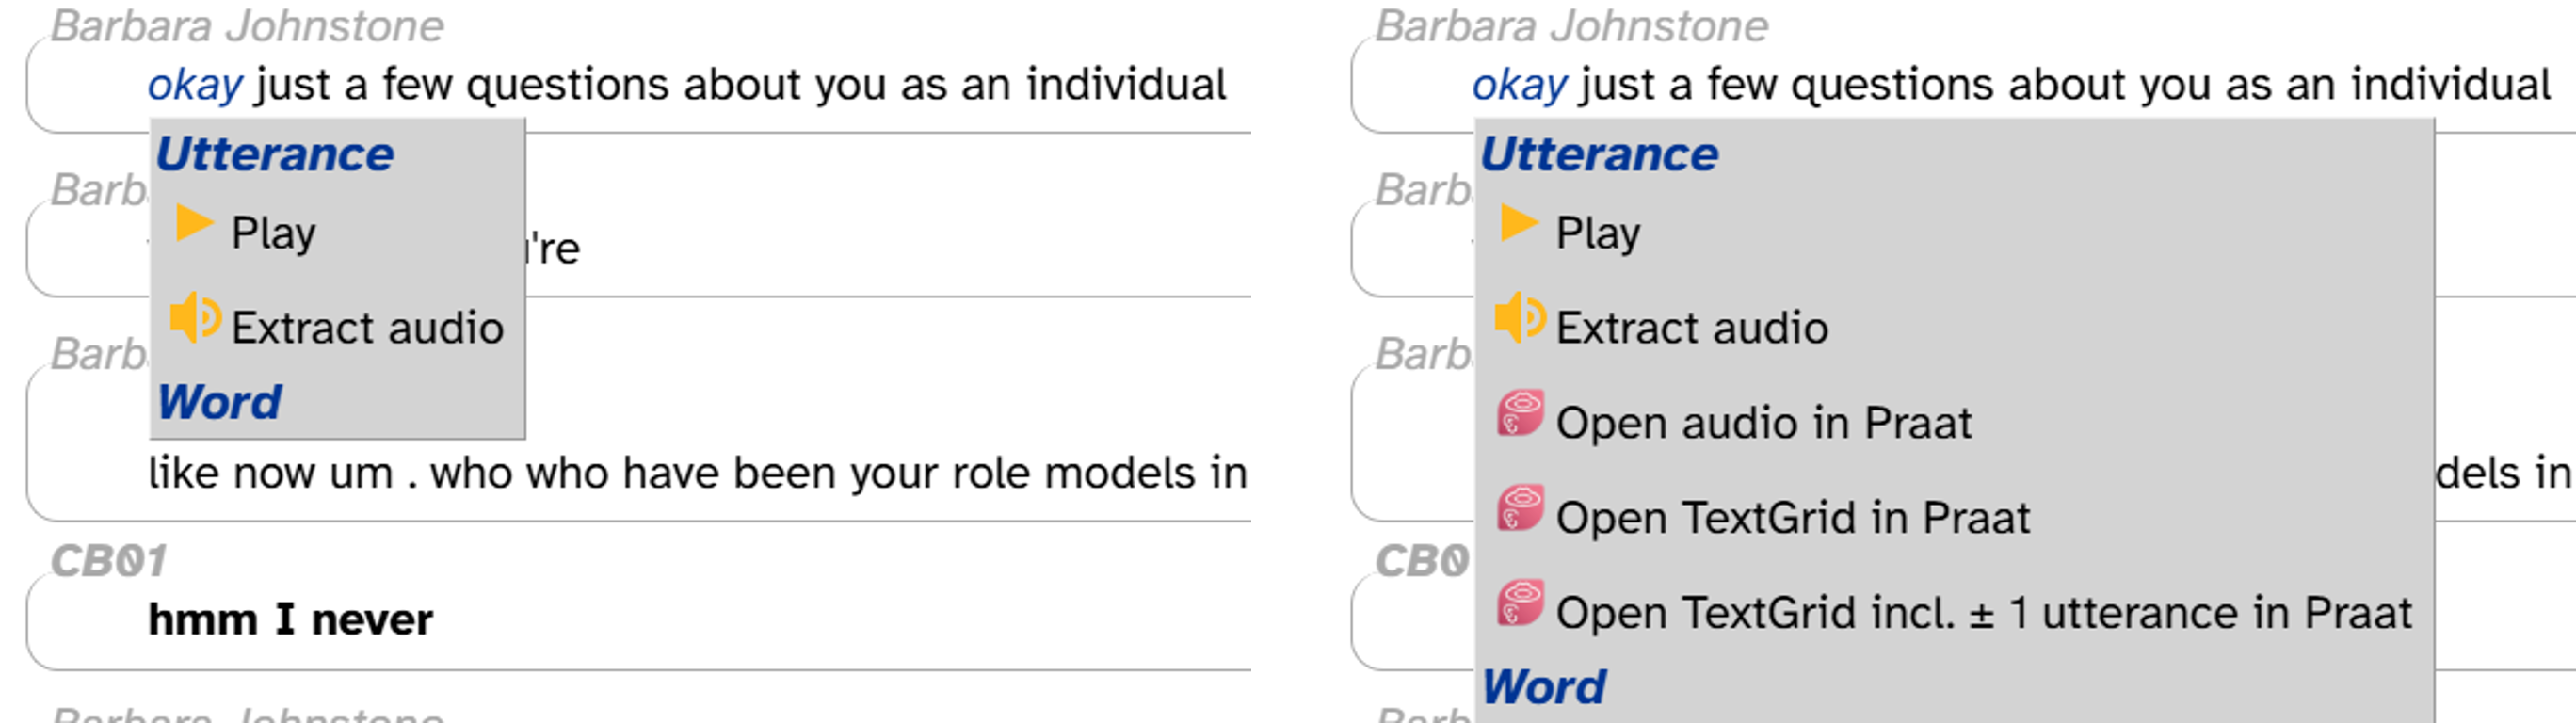
The word menu is where you can…
- Create permalinks for individual lines or words in the transcript
- Play individual lines of the transcript
- Download audio for individual lines
- Open individual lines in Praat (if you’ve installed the Praat integration)
Reading the transcript
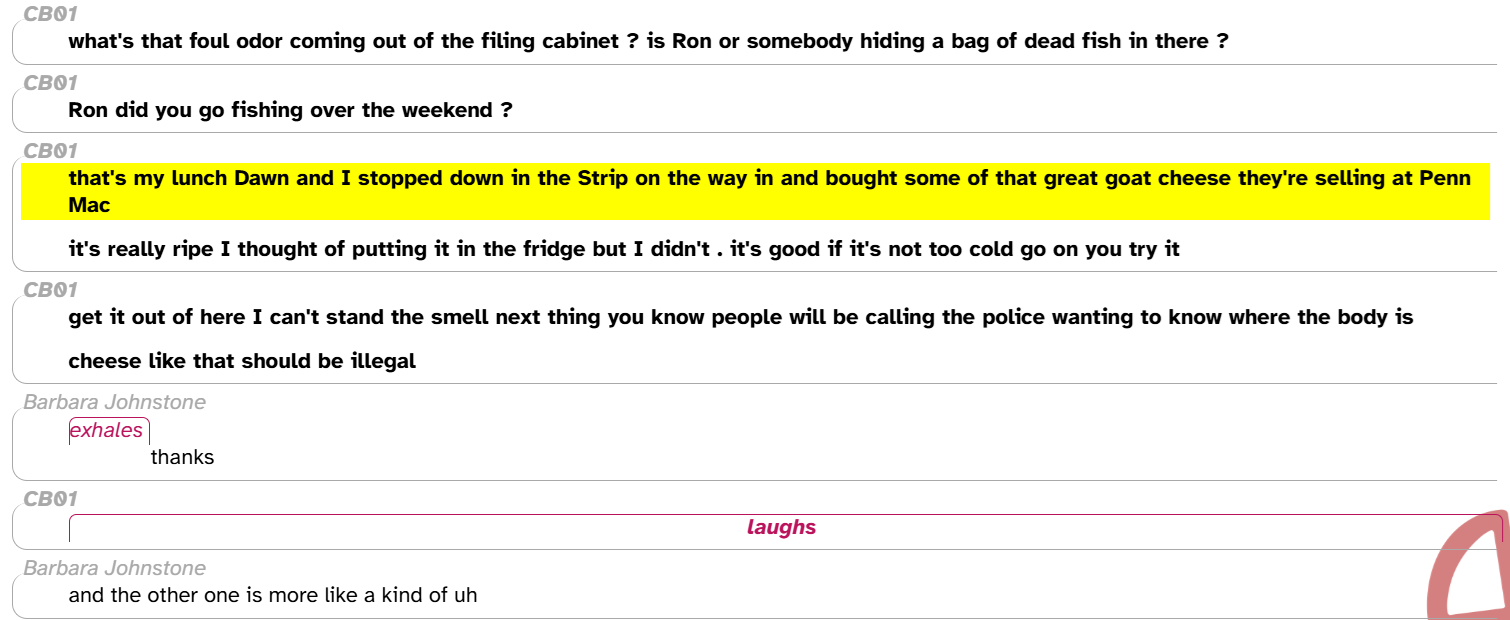
The transcript body displays the content of the transcript over time. For example, here’s the first few lines of CB01interview3.eaf:

Every line in the transcript corresponds to a conversational turn or continuous utterance in the audio recording (see below) The participant who is speaking in a particular turn is shown in italic gray text above the turn. In the example above, the interviewer Barbara Johnstone is speaking in the first turn. If there’s overlapping speech, participants’ turns are shown side-by-side; this is the case in the second line above, where Barbara Johnstone and CB01 overlap one another. Bold text is used for CB01’s words and the CB01 speaker code, since CB01 is the main participant in this transcript (that is, the interviewee). Finally, the text in magenta italics represents noises, whether produced by a participant (e.g., breathing, smacking lips) or not (e.g., banging, car horns).
When you’re reading the transcript, you’ll also notice some bits of punctuation in participants’ turns:
.for short pauses,-for long pauses?for questions or question intonation~for an incomplete or hesitated word___for redactions
Decisions about where to place turn boundaries, what counts as a pause, what is an incomplete word, and what should be redacted are made by trained transcribers in accordance with the APLS transcription convention.
One thing you won’t notice are periods for the end of sentences. Although we’re used to breaking up written language into sentences, this is actually not that common in normal spontaneous speech.
As we’ll discuss below, this isn’t a typical transcript like you might see in other contexts—it’s annotations on layers.
Listening to the transcript
You can listen to the transcript audio using the media player at the top right of the screen (highlighted in green below):
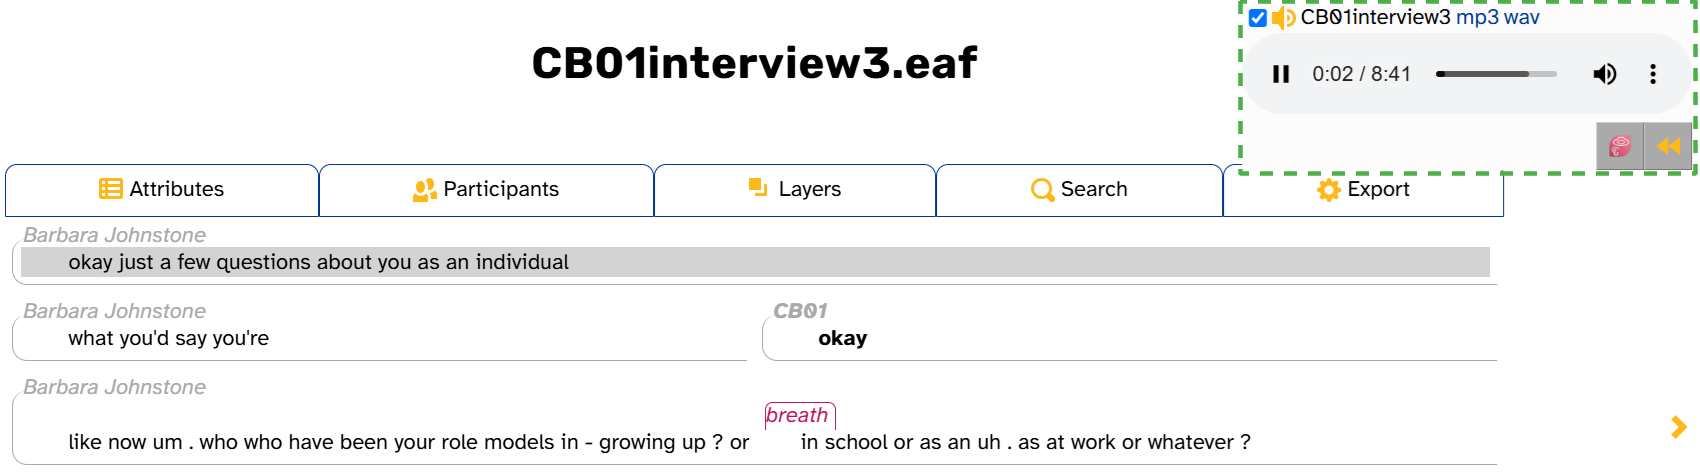
The media player works just like you’d expect. You can play and pause, click on the progress bar to jump to a timestamp, adjust or mute the volume, and (depending on your browser) adjust the playback speed. Once you start playing audio, a ![]() button will appear that rewinds the audio by 1 second per click. As the image shows, while the audio is playing, the transcript body will highlight the line that you’re hearing.
button will appear that rewinds the audio by 1 second per click. As the image shows, while the audio is playing, the transcript body will highlight the line that you’re hearing.
These screenshots were taken from Google Chrome. Your media player may look a little different if you have a different browser.
If you click on the progress bar, the transcript body will also scroll up or down to display the part of the transcript corresponding to that timestamp.
You can also play an individual line of the transcript through the word menu: click on any word in the line, then click Play. The audio will stop at the end of the line, but you can click the play button on the media player to continue.
There are two other parts of the media player that we cover below (since they’re not related to listening to the transcript):
- The mp3 and wav links, which download the audio file in those file formats
- The
 icon, which is related to the Praat integration
Navigating to other transcripts
The navigation arrows (highlighted in purple below) allow you to move to the previous or next transcript in the interview. These arrows are hidden if you are looking at the first or last transcript in the interview.
On the Transcript page for
CB01interview3.eaf, click the “previous” button. This will load the Transcript page forCB01interview2.eaf. Then, click the “next” button to go back toCB01interview3.eaf.
To view transcripts not in the same interview, visit the Transcripts page.
Viewing layer data
Everything you see is data
In APLS, everything you see in the transcript body is data: annotations on layers. (These data structures are what make APLS so powerful—it turns audio recordings into structured linguistic data, allowing us to search, export, and measure the entire corpus in a fraction of the time.) Even when you think you’re just reading the transcript, you’re actually viewing layer data!
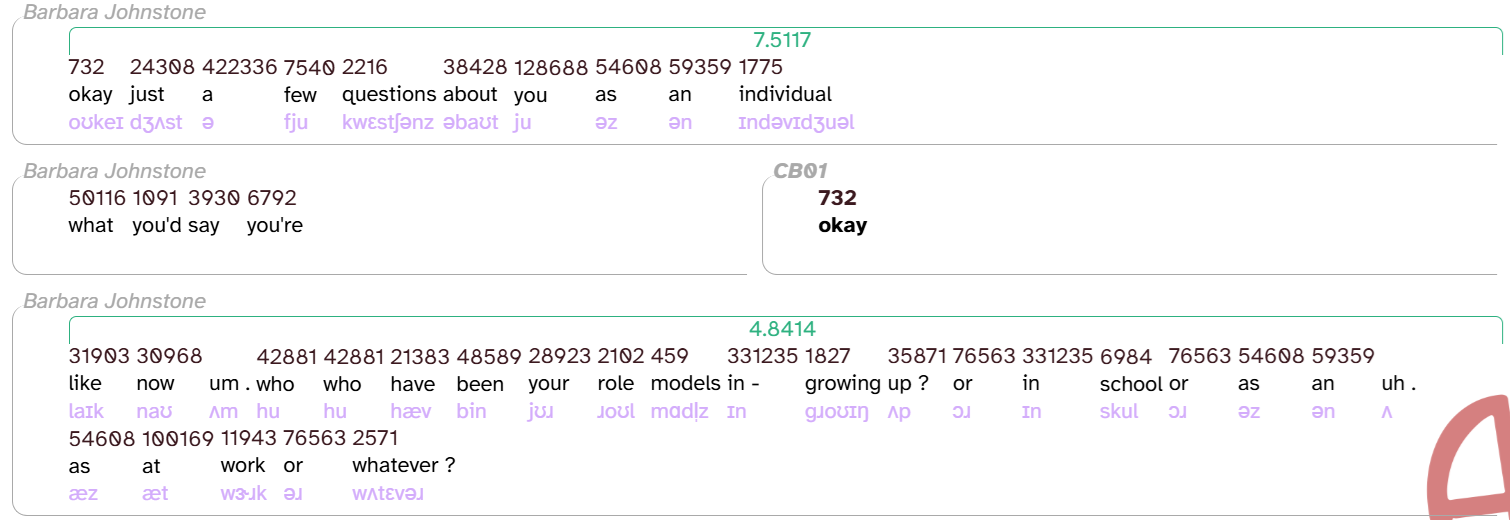
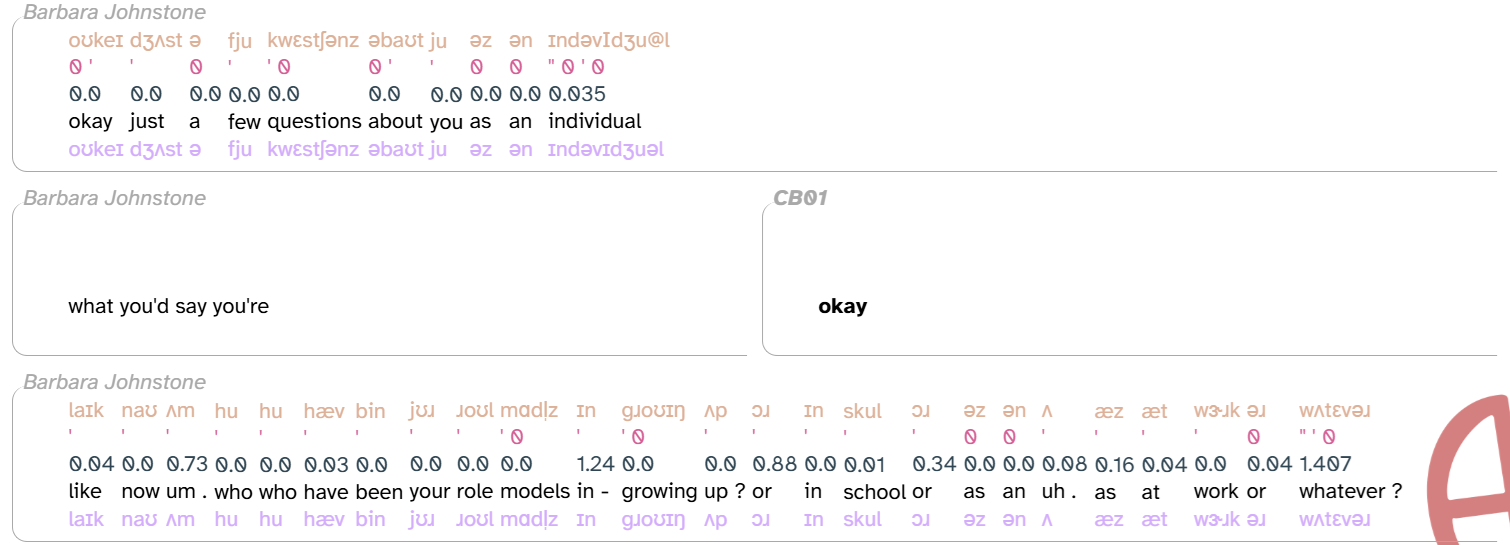
When the Transcript page is first loaded, three layers are displayed in the transcript body: word (colored black), noise (colored magenta), and comment (colored purple). Each line consists of at least one word or noise annotation. For example, let’s look at the following lines from CB01interview3.eaf:
As you can see, the first line includes several word annotations and one noise annotation, the last Barbara Johnstone line includes only word annotations, and the last CB01 line includes only a noise annotation.
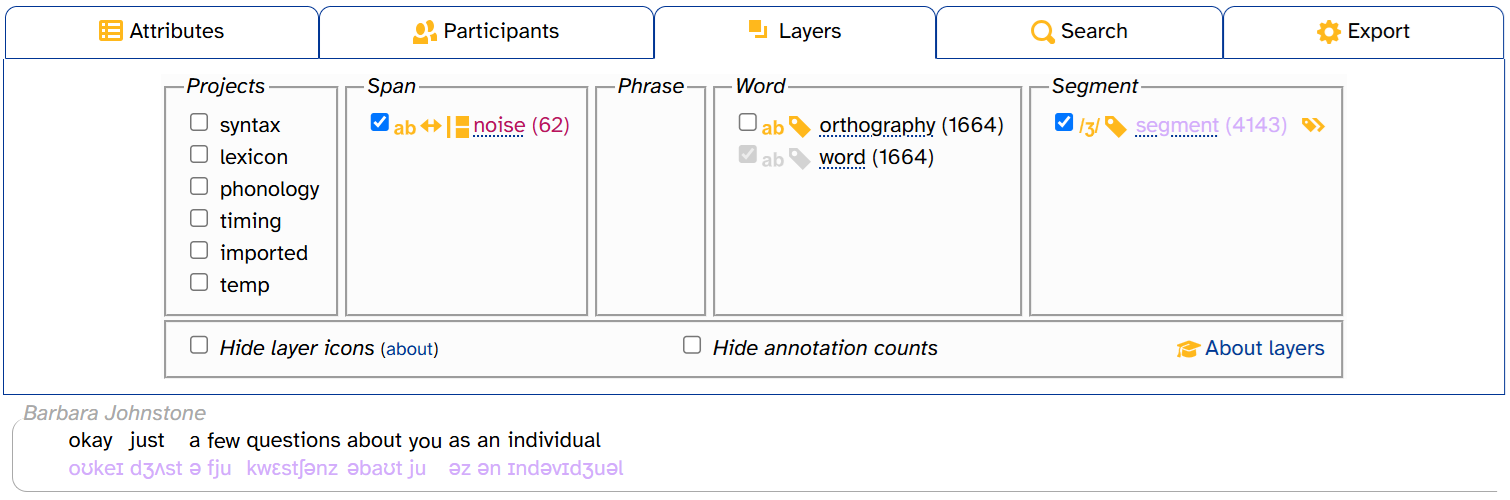
You can customize which layers are displayed using the layer picker, discussed below. For example, here are the first few lines of CB01interview3.eaf again, now with the following layers selected: speech_rate (teal), frequency_from_celex (chocolate), word (black), and segment (lavender).
turns and utterances
There are actually two more layers that the transcript body displays implicitly: turn and utterance. These layers divide up the timing of a transcript based on when participants are speaking. A turn is the timespan that contains everything within a single  shape. Each turn contains one or more utterances, which are displayed as individual lines in the transcript. Let’s look at
 CB01reading1.eaf as an example:
The first two turns each contain one utterance. The next two turns each contain two utterances. The first utterance (that’s my … Penn Mac) in the third turn is long enough that the text wraps, but you can see that that’s is closer in height to Mac than Mac is to it’s (the first word of the next utterance). If you ever need to figure out where an utterance begins or ends, you can use the word menu’s utterance permalink function to highlight the entire utterance:
These layers are based on how transcribers chose to divide the original transcription files into lines. While this is subject to guidelines from the APLS transcription convention, in practice there’s room for variation between transcribers. When the transcription file is uploaded to APLS, the lines from the original transcript form the utterance layer. Then, turns are formed by combining utterances from the same participant that are adjacent (i.e., don’t have a pause between them).
Elsewhere in APLS, turns and utterances show up in anchoring searches, exporting search results, and phrase layers.
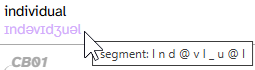
Annotation tooltips
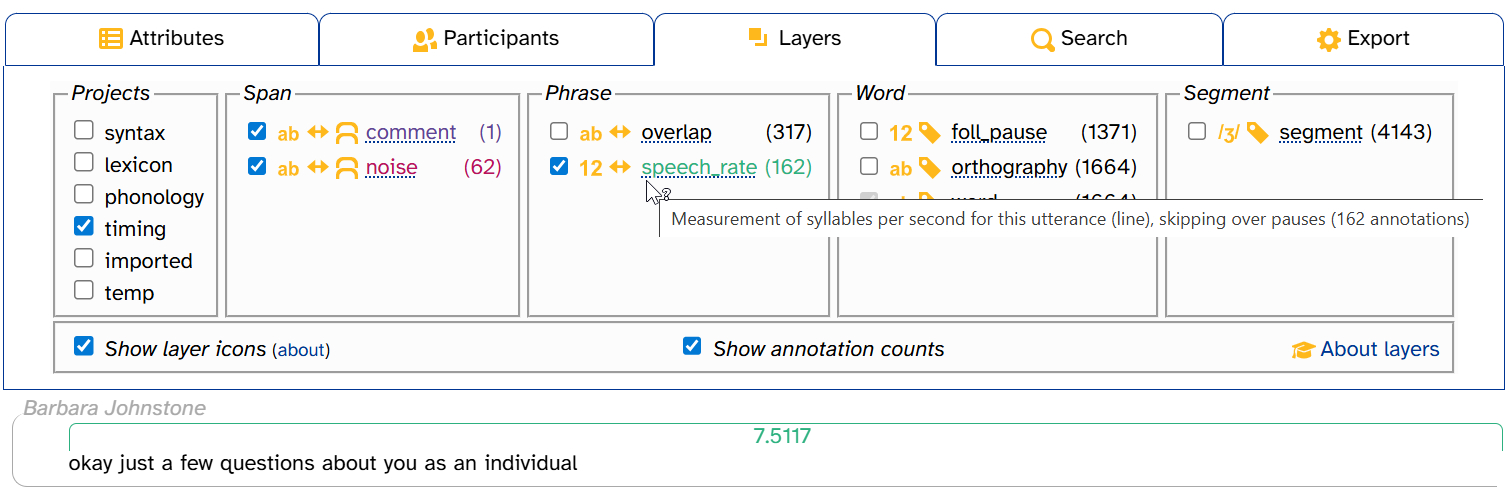
More information about layers and annotations is available in tooltips, which pop up when you hover over different parts of the transcript body. Here’s what that looks like for the first line of CB01interview3.eaf, with the following layers selected: speech_rate, frequency_from_celex, word, and segment.
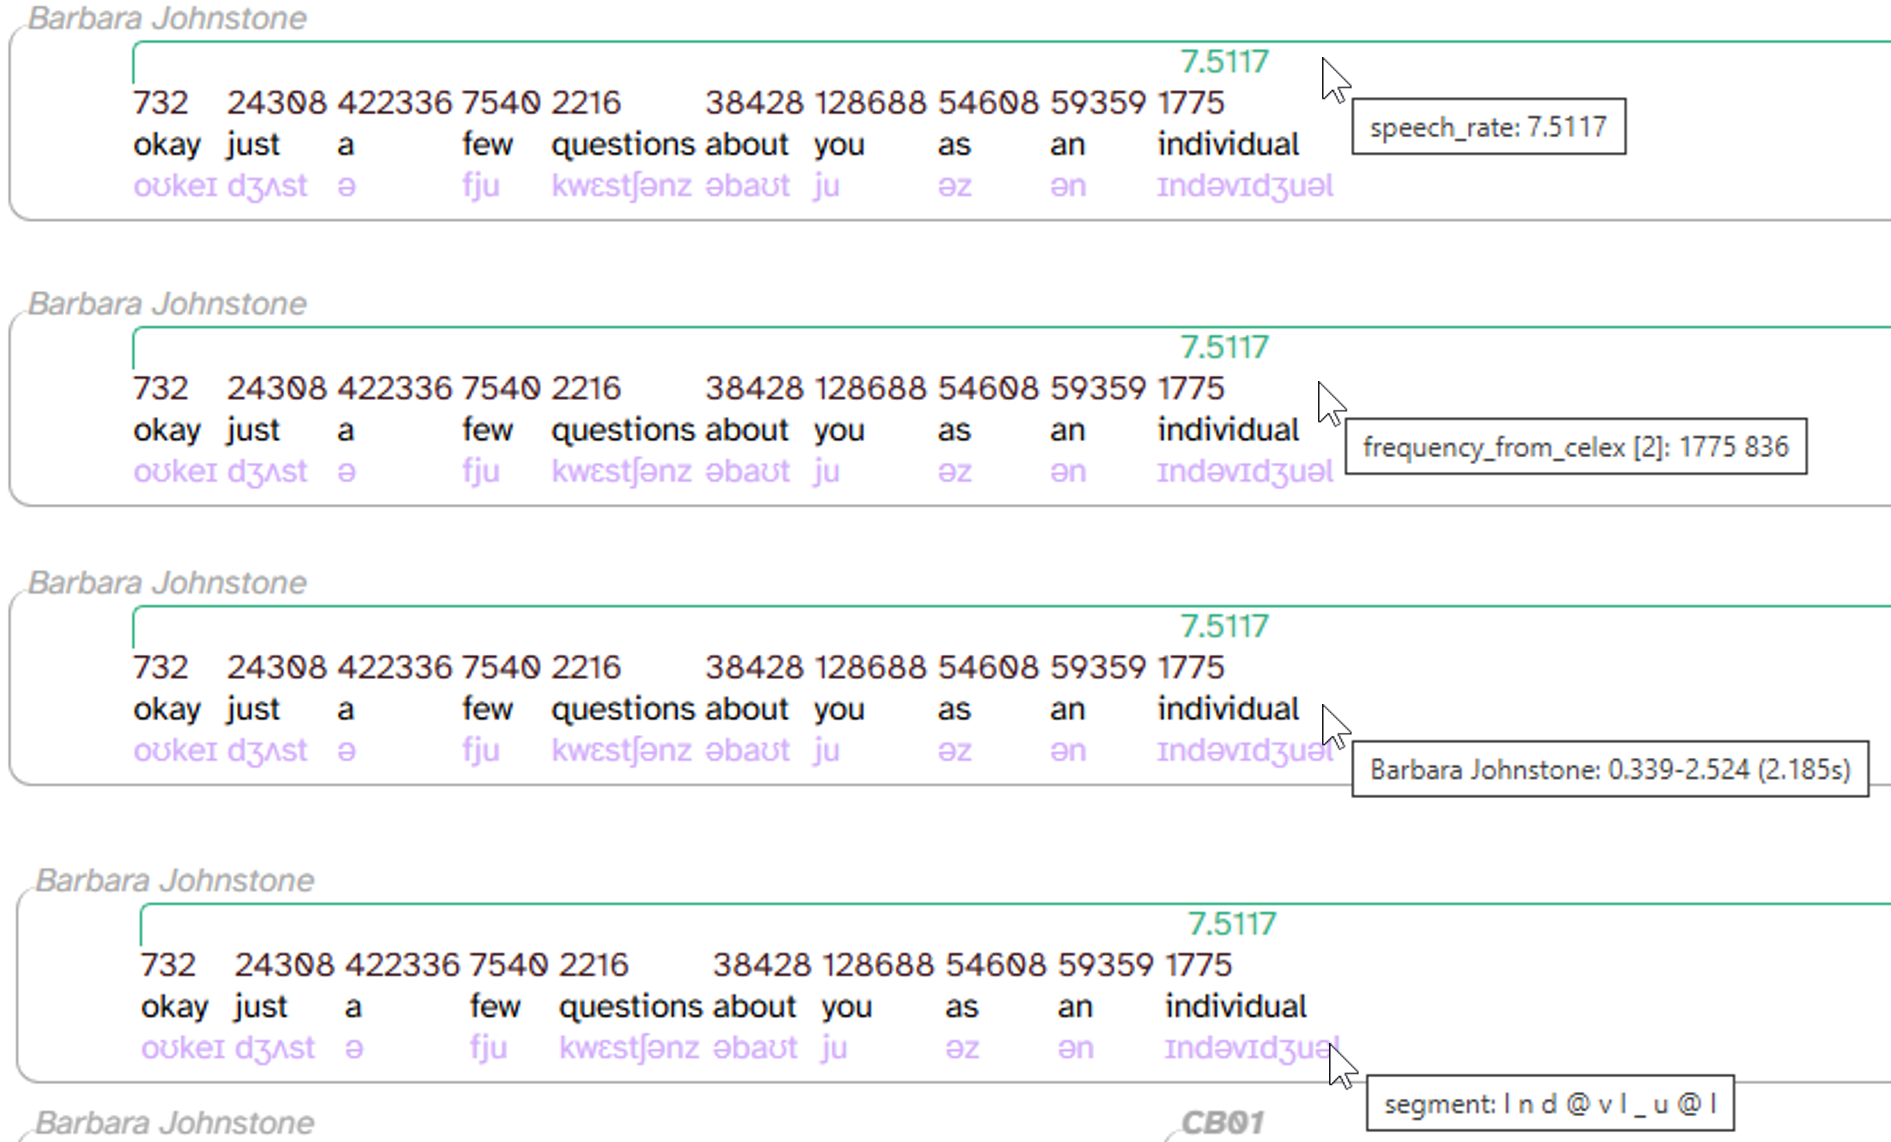
Let’s break down what we’re seeing in these tooltips:
- word layer (3rd image from the top): information about the line (utterance). Specifically, the participant (here,
Barbara Johnstone), the start/end times (0.339-2.514), and the duration ((2.185s)) - All other layers: the layer name (
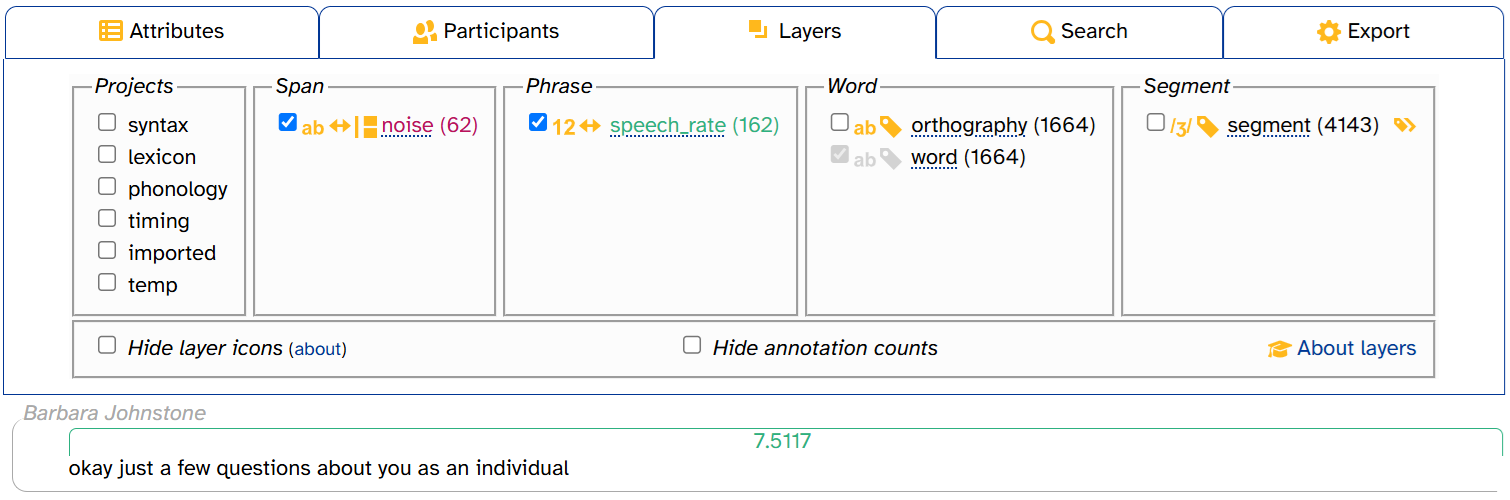
speech_rate,frequency_from_celex,segment) and information about the annotation(s)- For example, the speech_rate for this line is 7.5117 syllables per second. This matches the
7.5117annotation showing in the transcript body.
- For example, the speech_rate for this line is 7.5117 syllables per second. This matches the
Those are the most important things you can see in the tooltip. These tooltips also touch on some concepts that are covered later on this documentation page:
- frequency_from_celex shows
[2], followed by two different counts,836 1775- This means the word individual has two peer annotations on the frequency_from_celex layer.
- Normally, we could only see one of the two annotations in the transcript body (
1775). However, when we hover over this annotation, its peer pops up above it (836). This tells us these are vertical peers (see below).
- segment shows
I n d @ v I _ u @ l- The spaces in between these symbols are a hint that there are actually 10 individual annotations on this layer. That’s because segment has a smaller scope (see below).
- Compared to the annotation in the transcript body (
ɪndəvɪdʒuəl), some of the symbols match (e.g.,n,v,u) but others don’t (e.g.,Ivs.ɪ,_vs.dʒ). This is because segment, as a phonological layer, uses the DISC phonemic alphabet.
The next line in CB01interview3.eaf demonstrates one more type of information we can get from tooltips:
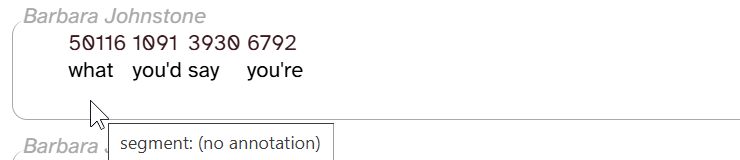
There’s nothing in the space where we would expect a segment annotation, but we can still hover over this empty space. Sure enough, the tooltip shows segment: (no annotation). We’ll get into missing annotations below.
Finally, tooltips show up elsewhere on the Transcript page: the layer picker and the Attributes tab.
Layer scope
Let’s return to the first few lines of CB01interview3.eaf with the speech_rate, frequency_from_celex, word, and segment layers enabled:
As you can see from the previous image, some annotations are “wider” than others: speech_rate annotations take up an entire line and frequency_from_celex annotations take up an entire word. While there are usually multiple segment annotations per word, the Transcript page shows them as a single string to save space (though they’re separated by spaces in the tooltip that appears when you hover over the annotation). Differences between layers in how “wide” an annotation can be is captured by layers’ scope. For more information about layer scope, see the layer typology documentation page.
Missing annotations
Also apparent from the previous image: not all words (and lines) have annotations on all layers. The words um and uh (in the last line) don’t have frequency_from_celex annotations, because the CELEX corpus is text-based (and um & uh generally don’t appear in text). The middle line doesn’t have any segment annotations, because the HTK algorithm, which APLS uses to find the timing of speech sounds, can’t handle overlapping speech. And because the timing of segment annotations is used to calculate speech rate, the middle line also doesn’t have any speech_rate annotations.
In these particular examples of missing annotations, we can come up with good reasons for why they’re missing. Much more rarely, you might find missing annotations where the fact that they’re missing seems random. If you want to understand why an annotation is missing, consult the layer field guide, which—among other things—describes situations where you can expect missing data in a layer.
Segment-dependent layers
There’s a whole category of layers like speech_rate where you can expect missing annotations in an utterance if there aren’t any segment annotations: segment-dependent layers. For example, here’s the first 3 lines of CB01interview3.eaf again, this time with phonemes (colored tan), stress (salmon), foll_pause (slate gray), word (black), and segment (lavender):
Again, the middle line doesn’t have segment annotations because of the overlapping speech. As a result, the remaining layers—all of which (except word) are segment-dependent—don’t have annotations on this line either.
Horizontal and vertical peers
The phonemes layer has a one-to-one relationship with its scope (word). That is, for each word in the corpus, there can be only one phonemes annotation (or none, if it’s missing). On the other hand, some layers allow for peers, where there’s a several-to-one relationship with the scope. There are two types of peers:
- Horizontal peers: Multiple annotations divide the timespan of their scope.
- Denoted by
 in the layer picker
- Denoted by
- Vertical peers: Multiple annotations occupy an identical timespan.
- Denoted by
 in the layer picker
- Denoted by
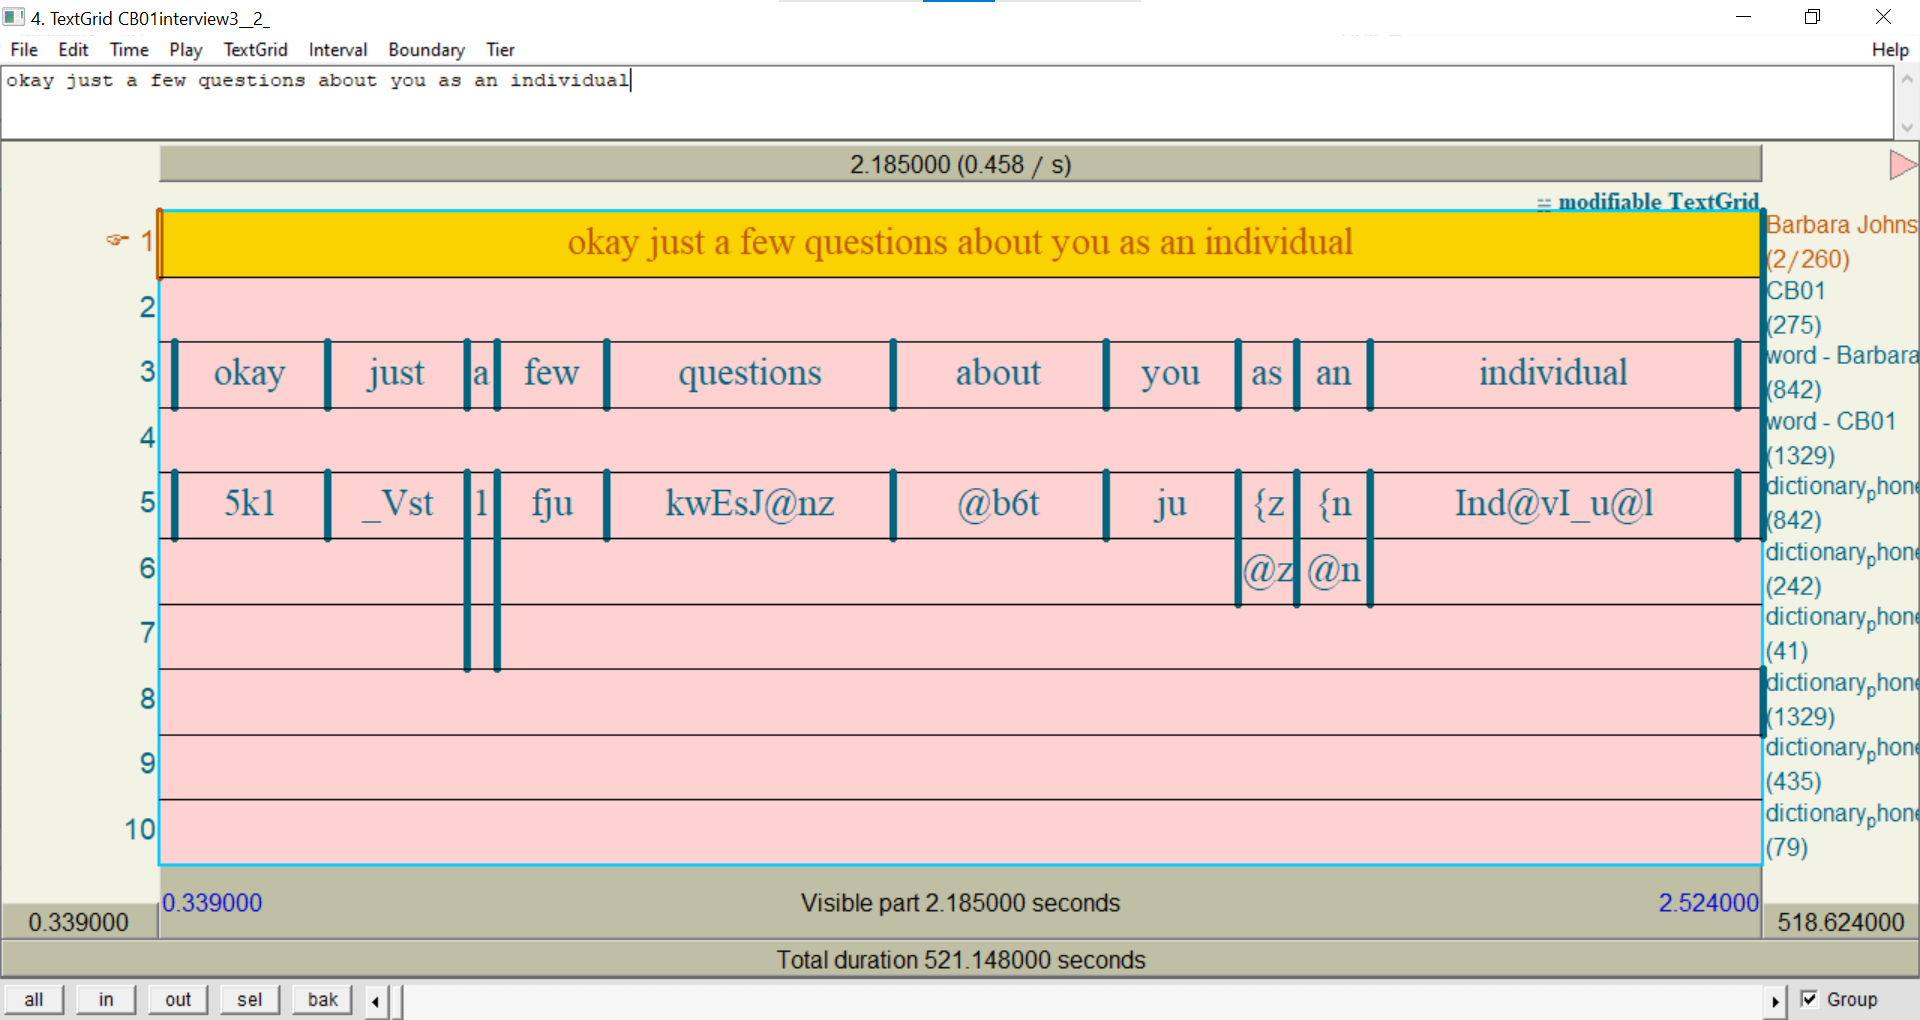
For example, here’s the first line of CB01interview3.eaf, this time with the following layers:
- dictionary_phonemes (colored yellow green): allows vertical peers
- phonemes (tan): allows neither
- syllables (kelly green): allows horizontal peers
- word (black): allows neither
These layers are all part of the process that APLS uses to find segment annotations, using only the original transcription and the audio file as inputs:
- APLS takes the word as originally transcribed (word), strips out pause/question markers, and makes it lowercase. This normalized form makes it easier to look words up in dictionaries like CELEX and Unisyn for the purpose of finding phonemic representations, word frequencies, etc.
- This is the word’s orthography annotation.
- APLS uses the word’s orthography annotation to look up phonemic representation(s) in the CELEX dictionary (for example, okay as /oʊkeɪ/). Some words have more than one phonemic representation (for example, an can be /æn/ with a full vowel or /ən/ with a reduced vowel).
- dictionary_phonemes annotation(s).
- APLS uses HTK to estimate where each segment begins and ends in the word based on the audio file. If there are multiple phonemic representations, HTK picks the one that better matches the audio file.
- segment annotation(s)
- APLS combines the word’s segment annotations into a single string of characters. Unlike dictionary_phonemes, there’s only one
- phonemes annotation
- APLS uses orthography to look up the word’s syllables (including stress) in the CELEX dictionary (for example, okay as /oʊ-ˈkeɪ/). Then, APLS combines groups of segment annotations into one string of characters per syllable (for example, okay as /oʊ/ and /ˈkeɪ/).
- syllables annotation(s)
- (Other segment-dependent layers)

As you can see, some words’ syllables labels have spaces in them (for example, 0oʊ ˈkeɪ for the word okay). This indicates horizontal peers dividing the word’s timespan. By contrast, there are no spaces on the dictionary_phonemes or phonemes layer, since these layers don’t allow horizontal peers. You can also hover over a word to bring up a tooltip:
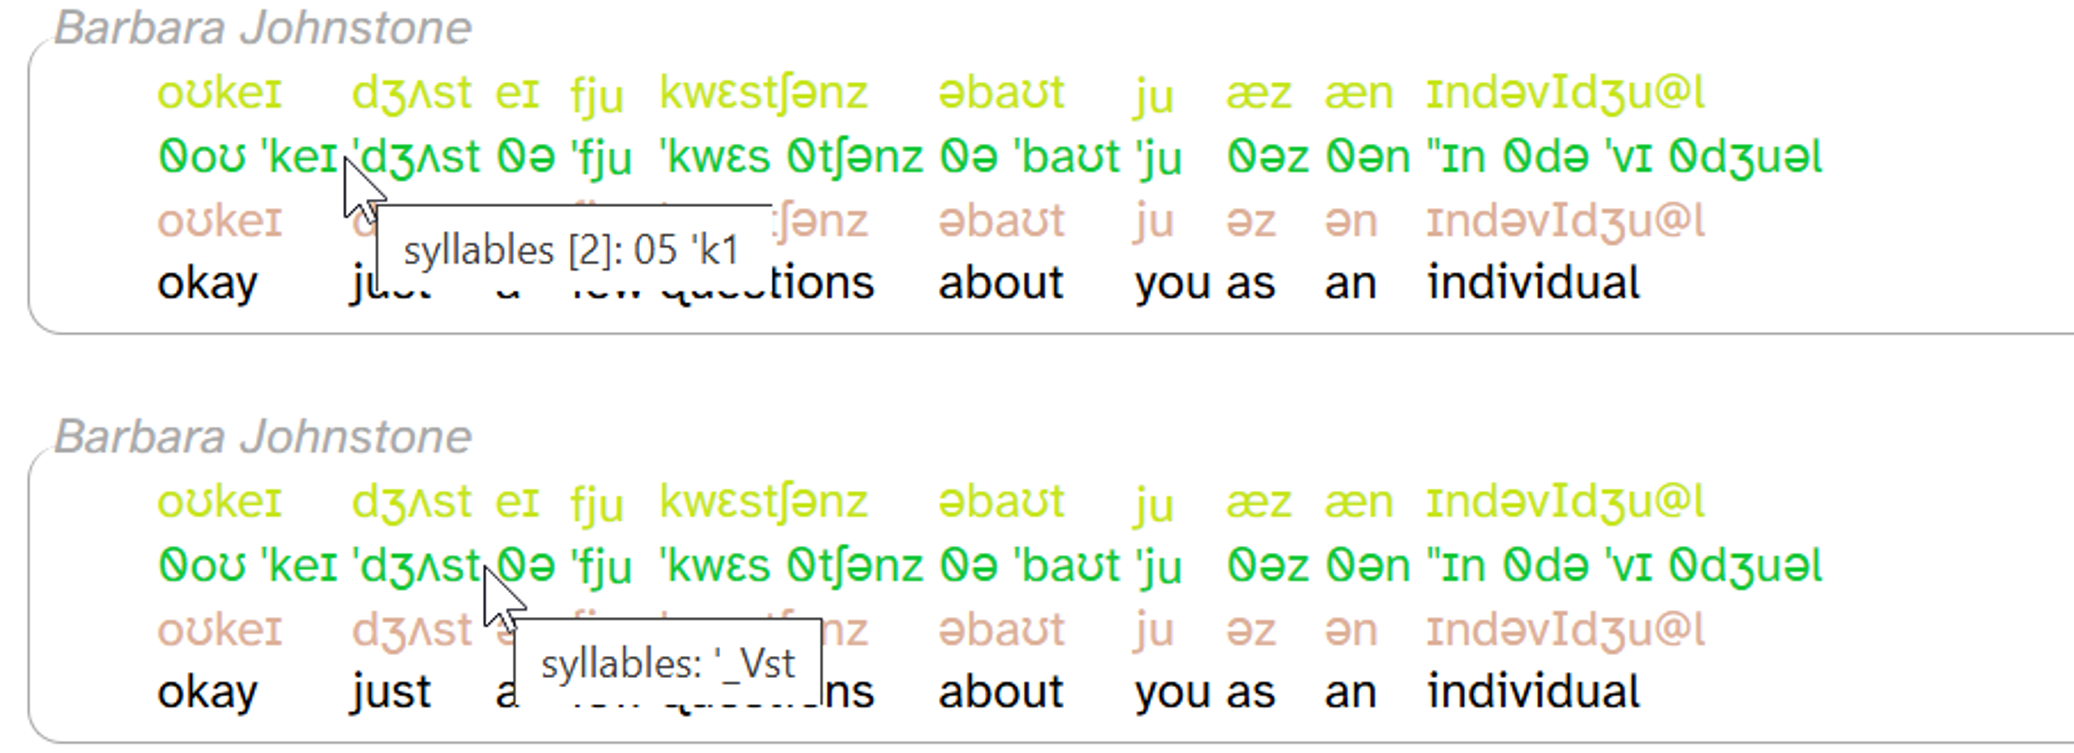
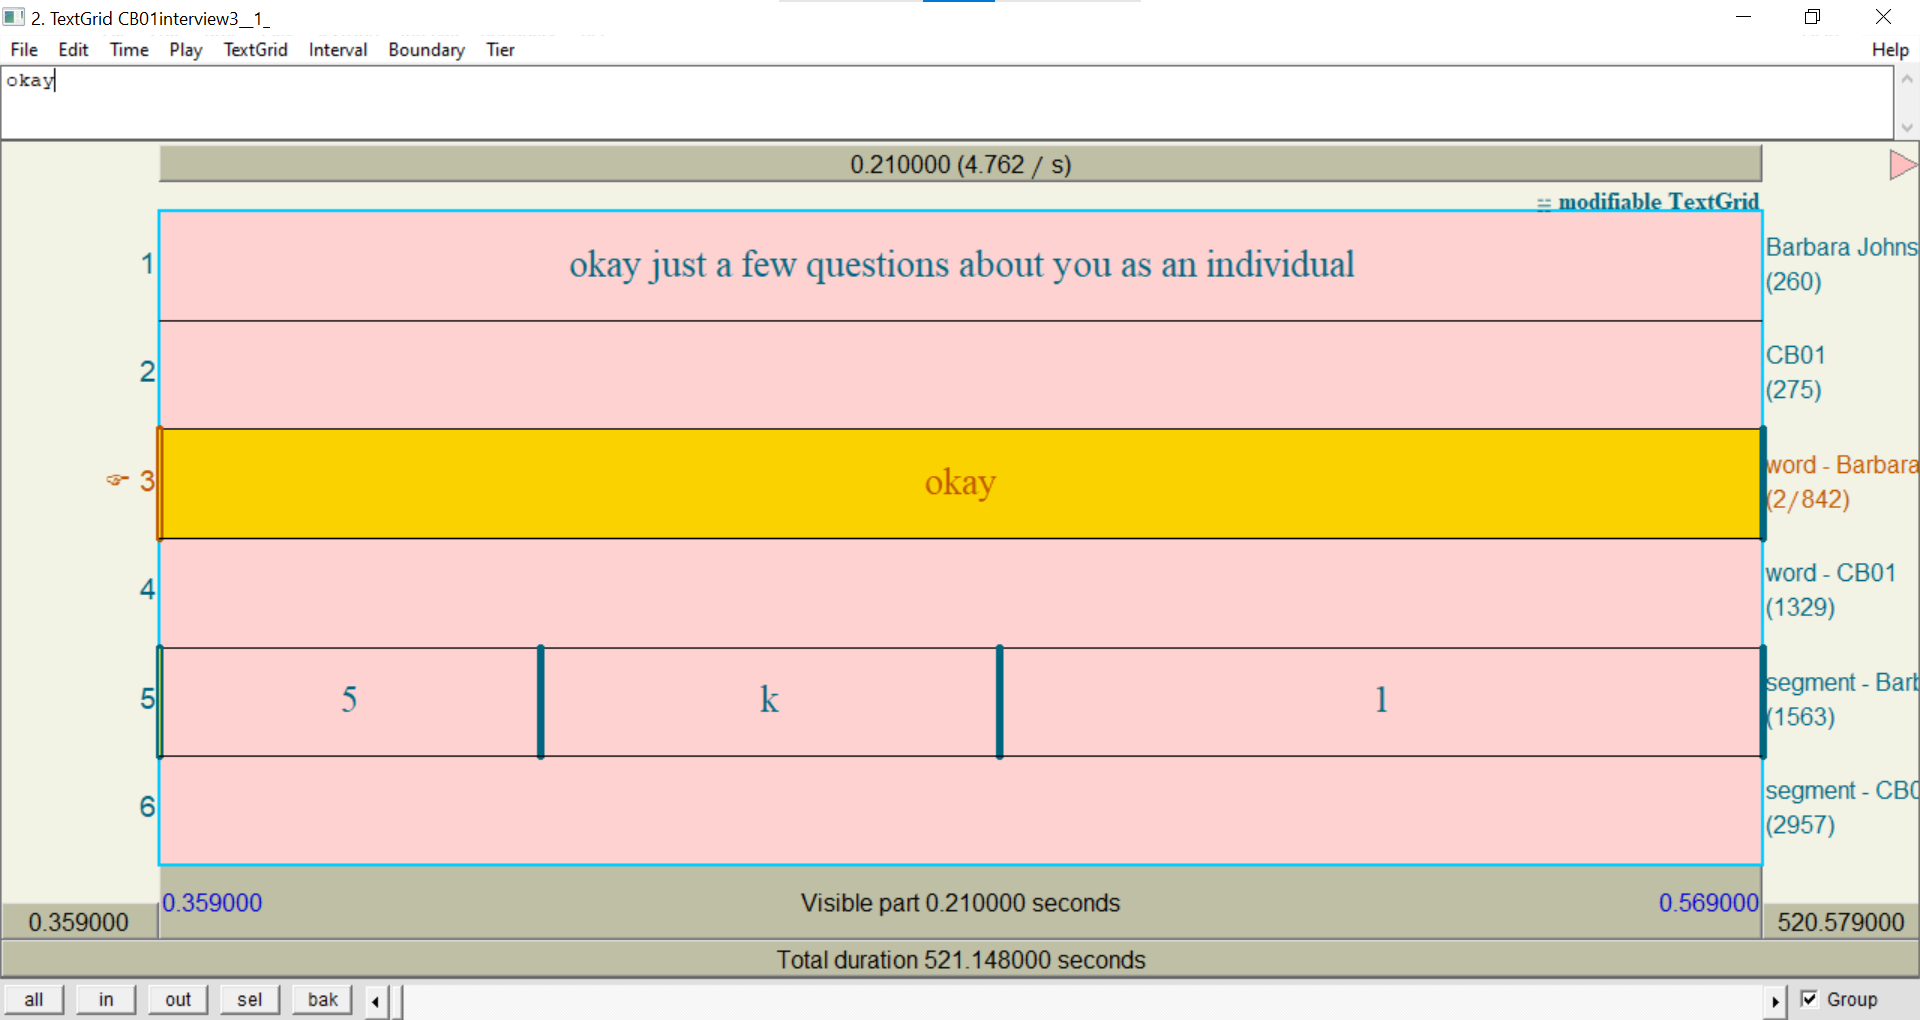
As you can see, the tooltip for okay includes [2] followed by two separate annotations (05 'k1), while the tooltip for just includes only one label ('_Vst).
Vertical peers are harder to see at a glance than horizontal peers. There aren’t visual cues that dictionary_phonemes allows vertical peers, or that a, as, and an have vertical peers for dictionary_phonemes, but none of the other words. To find this out, you can hover over the word’s dictionary_phonemes annotation, which makes vertical peers pop up above the annotation (if any for that word) and also shows a tooltip:
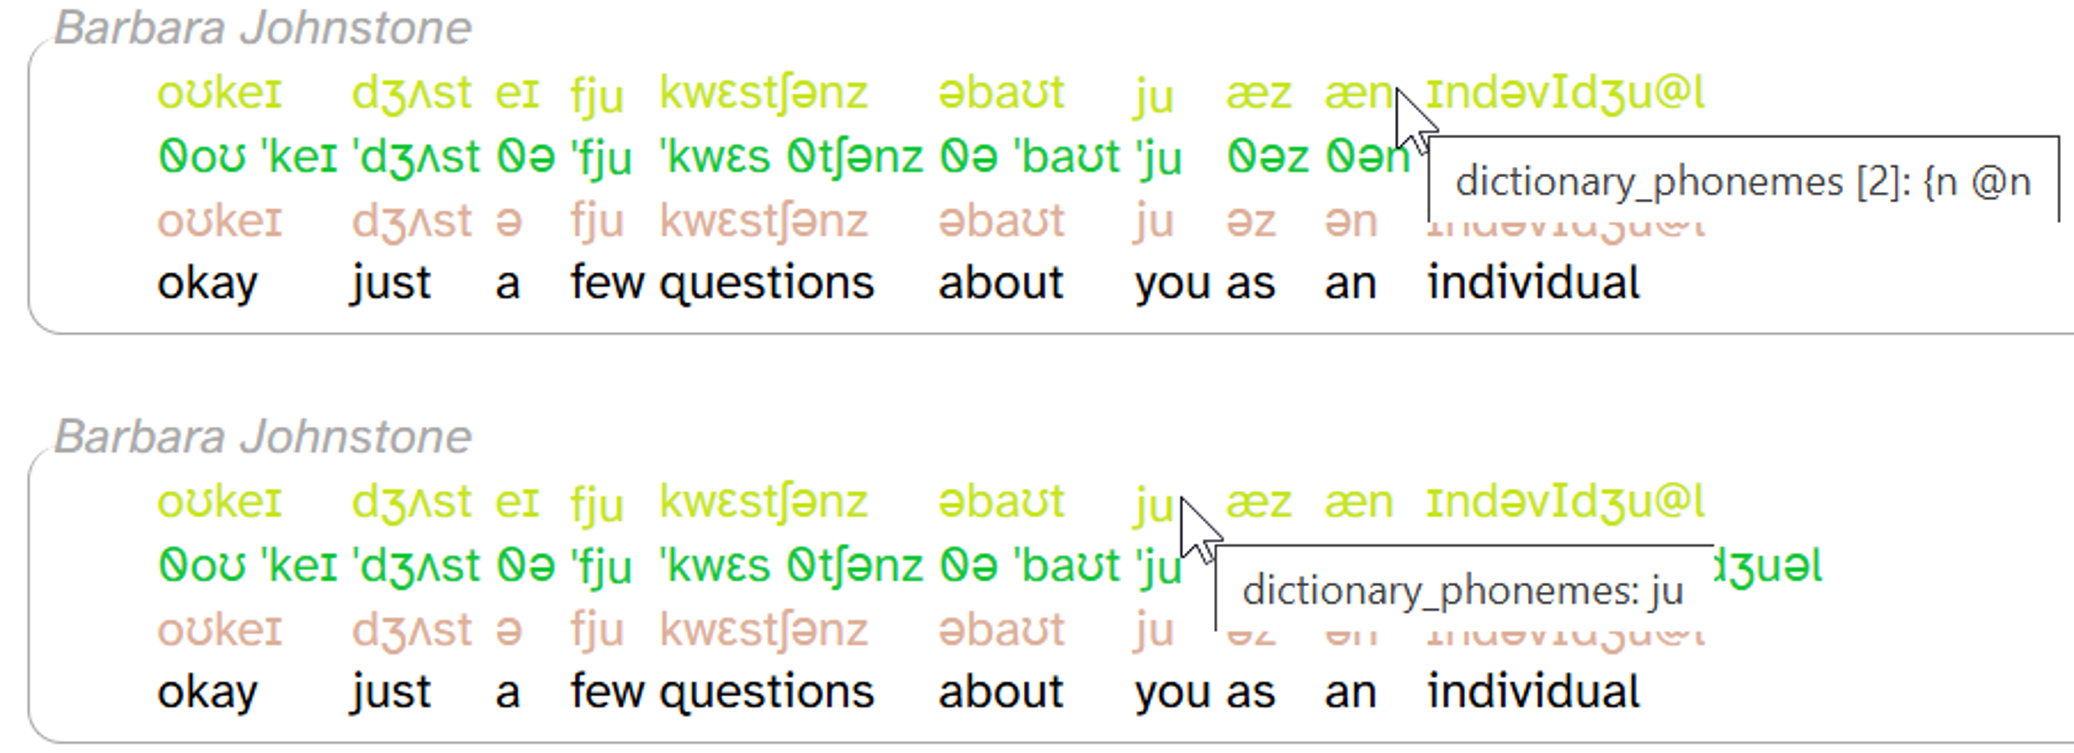
As you can see, hovering over æn causes ən to pop up, but hovering over ju doesn’t pop anything up. This indicates that an has two dictionary_phonemes annotations (æn and ən), but you has just one (ju).
The vertical peers popup is only for layers with word scope. For span/phrase layers that allow vertical peers (comment, noise), all vertical peers are displayed. There are currently no segment layers that allow vertical peers.
All of this is easier to visualize if you export the transcript or the utterance to a Praat TextGrid. Here’s what that first line looks like with those layers:
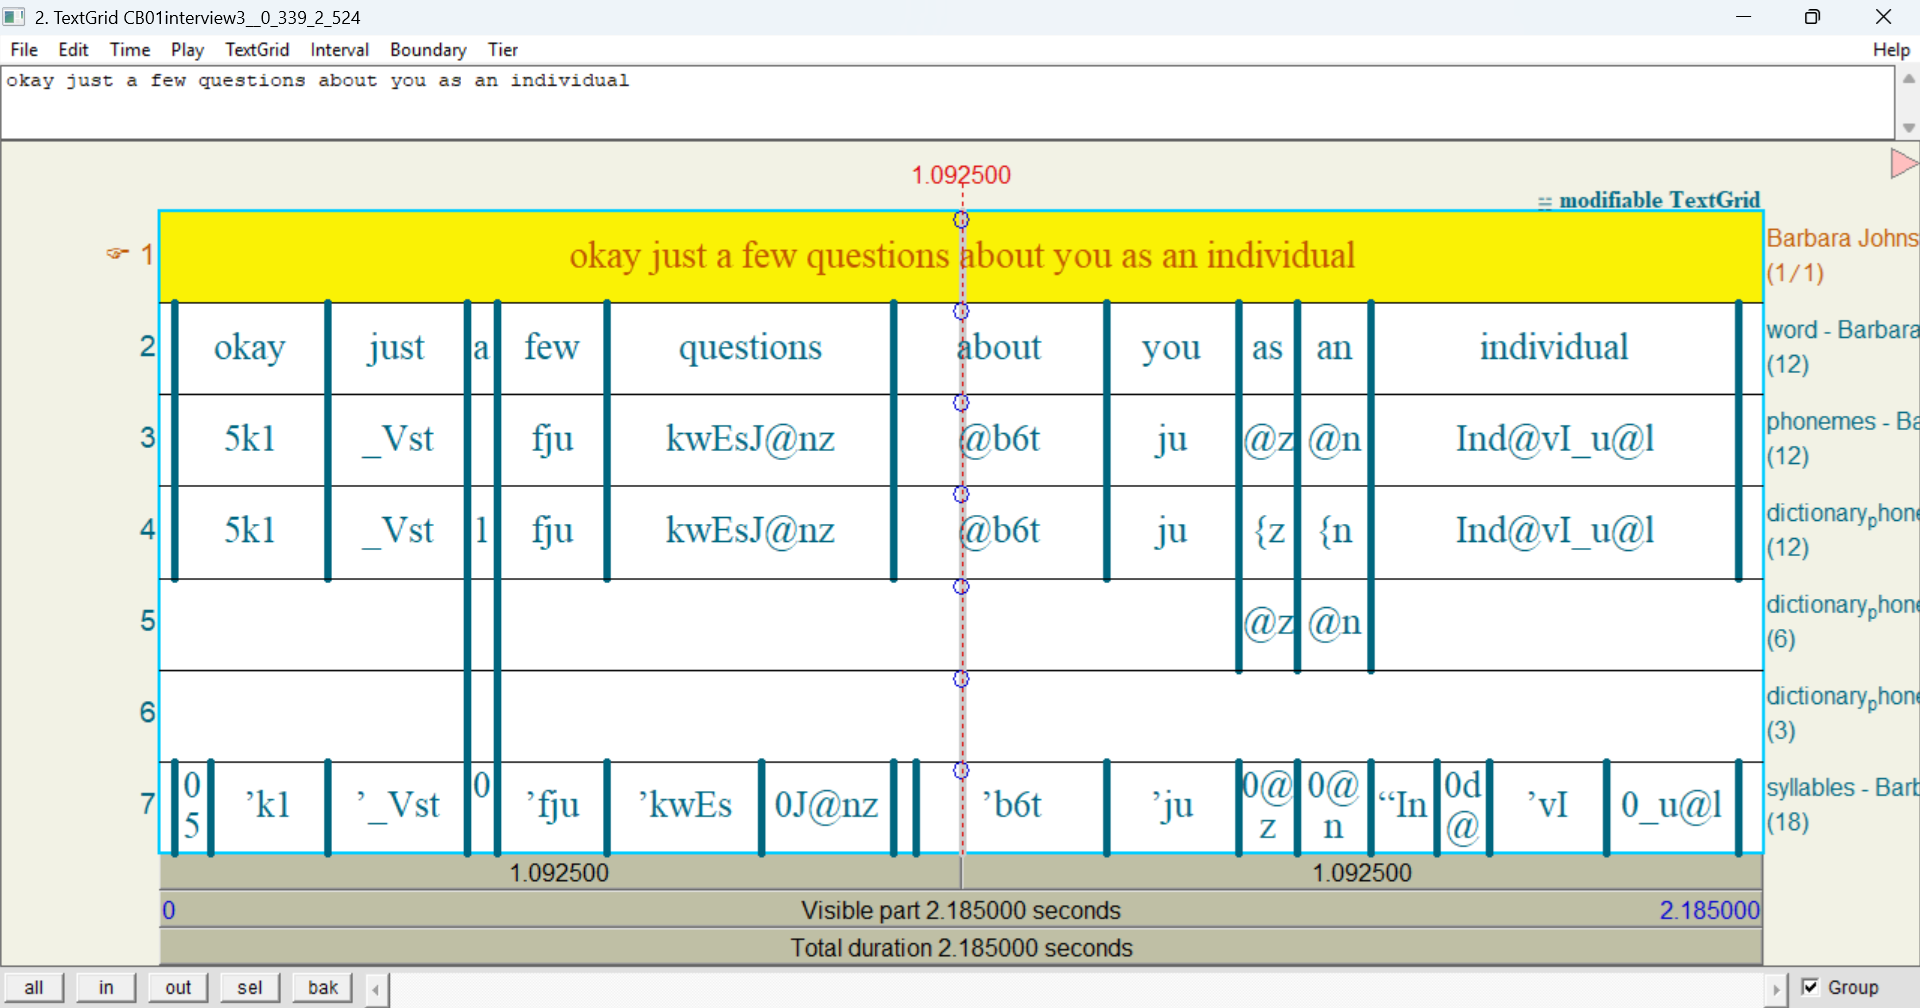
In this image:
- There is just one tier apiece for word, phonemes, and syllables. This means none of these layers have vertical peers in the utterance.
- There are 3 tiers for dictionary_phonemes. This means at least one word in this utterance has 3 vertical peers.
- The words with multiple dictionary_phonemes intervals are a (with 3 annotations), as (2 annotations), and an (2 annotations). All the other words have just one dictionary_phonemes interval.
- All the intervals for phonemes and dictionary_phonemes are exactly as wide as the corresponding word. This means neither of these layers have horizontal peers in the utterance.
- Some intervals for syllables are narrower than the corresponding word. These are horizontal peers.
You can read the layer typology documentation page for more information about horizontal and vertical peers.
Phonological layers and DISC
Phonological layers like phonemes describe speech sounds. The transcript body displays phonological annotations using the International Phonetic Alphabet (IPA). For example, the first word of CB01interview3.eaf (okay) has a phonemes annotation that is displayed as oʊkeɪ:

However, APLS stores these annotations internally in the DISC phonemic alphabet, not in IPA. DISC creates a one-to-one mapping between sounds and symbols like the IPA, but unlike the IPA, DISC only uses symbols that appear on a standard QWERTY keyboard. While the IPA is widely-recognized among linguists, many IPA characters are hard for end-users to input and difficult for computers to store. For a full list of IPA-to-DISC mappings, see the phonemic transcription documentation page.
As a result, IPA is used by APLS only for displaying phonological layers in the transcript body. If you’d prefer DISC in the transcript body, you can change that using the layer picker. As mentioned above, when you hover over a phonological annotation in the transcript body, you’ll see a tooltip with its DISC representation. In addition, exported transcripts and utterances represent phonological layers in DISC.
Elsewhere in APLS, DISC is used for searching phonological layers and exporting search results. In fact, phonological layers are just one data type, and DISC is just one notation system. For more information, see the layer typology documentation page.
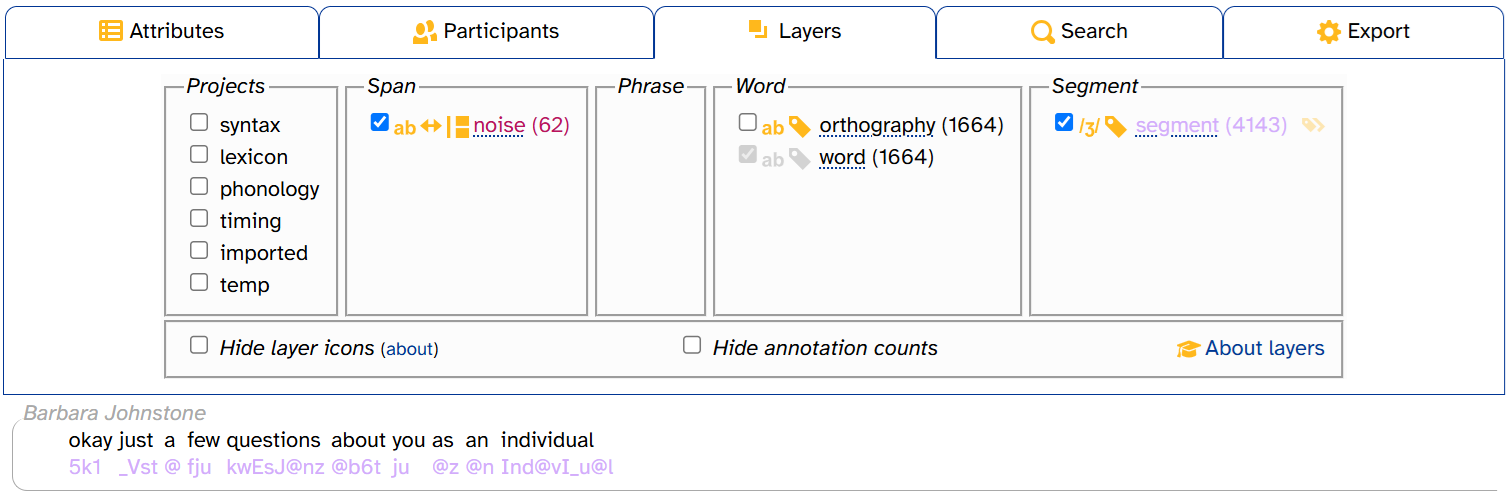
Selecting layers to display
Clicking on the Layers tab in the transcript header brings up the layer picker. (There are also layer pickers on the Transcripts, Search, and Search results pages, all slightly different in appearance.) The layer picker controls which layers are displayed in the transcript body and displays information about layers and annotations. Here’s what the layer picker looks like when you load the Transcript page for CB01interview3.eaf, plus the first line of the transcript:
Let’s break down what we’re looking at:
- Layer checkboxes (one highlighted in red) toggle layers on and off.
- Projects (highlighted in blue) make more layer checkboxes appear.
- Layer icons (one highlighted in green) indicate layer properties.
- Annotation counts (one highlighted in purple) indicate the number of annotations on that layer in that transcript.
If you select a phonological layer like segment, the icon ![]() pops up to the right of its checkbox:
pops up to the right of its checkbox:

- The IPA/DISC toggle (highlighted in orange) affects how annotations are displayed on phonological layers.
Toggling layers on and off
When you select a layer checkbox in the layer picker, the transcript body gets updated to fill in annotations from that layer. Here’s that same view of CB01interview3.eaf after clicking segment in the layer picker:
A few things have happened here:
- The transcript body now includes segment annotations, colored lavender
- In the layer picker,
segment (4143)is now colored lavender, matching the annotations in the transcript body - The IPA/DISC toggle now appears to the right of
segment (4143)- This only appears for phonological layers like segment
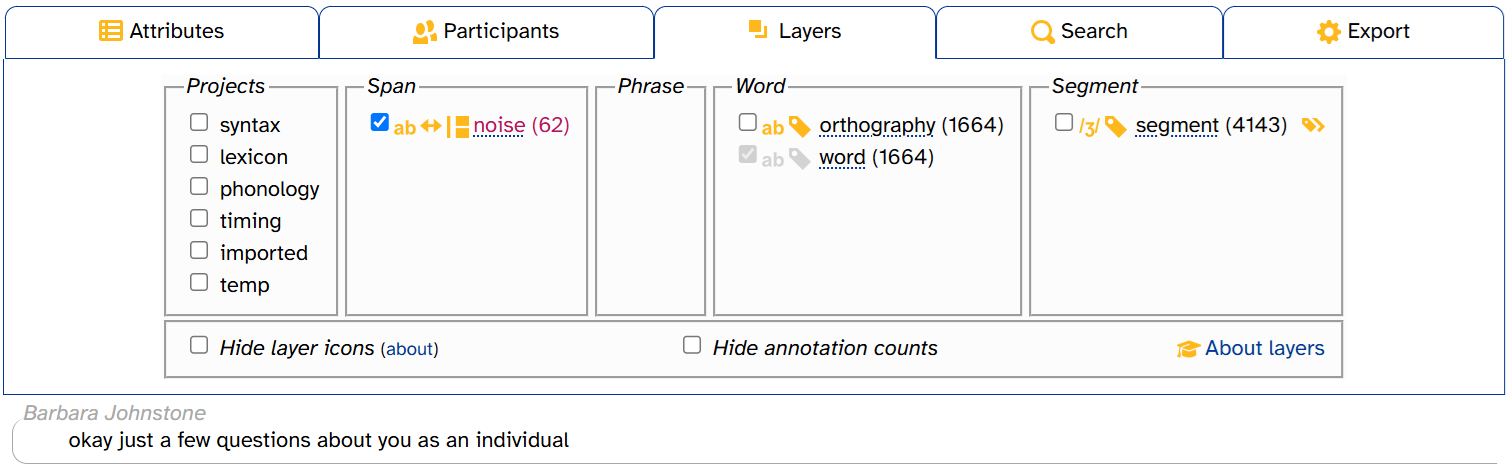
If you click segment again to deselect it, the segment annotations and the IPA/DISC toggle disappear but segment (4143) remains colored lavender:
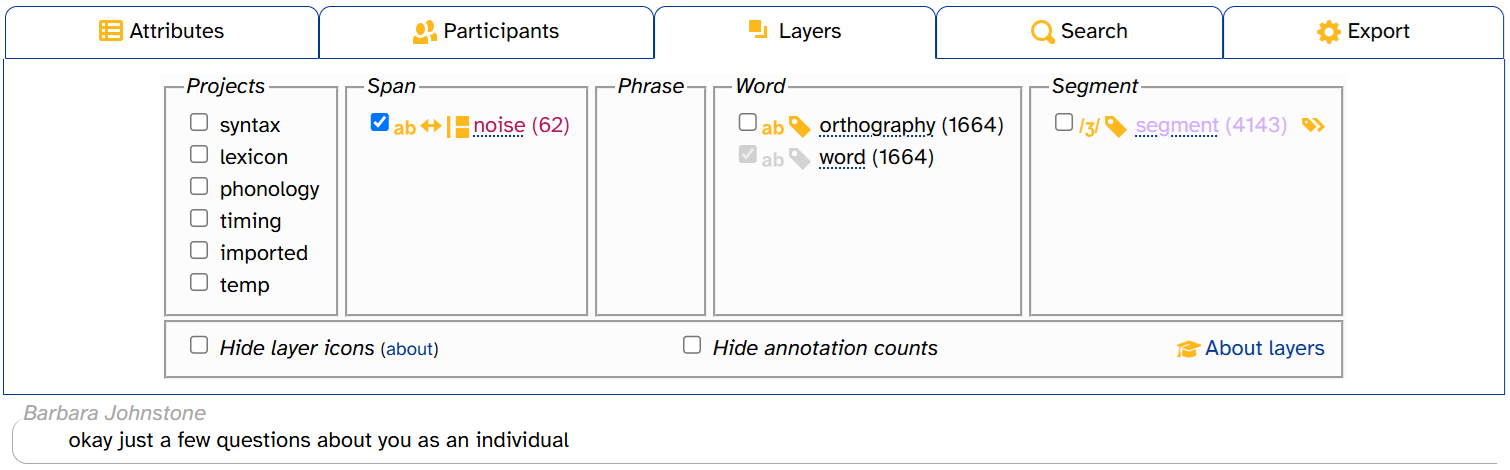
The word layer cannot be deselected, which is why its checkbox and icons are grayed-out. We’ll see something similar below when we discuss empty layers.
The noise and comment layers are also pre-selected when you load the Transcript page, but they can be turned off (unlike word). The noise is pre-selected so that utterances consisting of just noise annotations don’t look empty. The comment is pre-selected so you can read about any context the original transcribers thought was relevant.
Projects
When you first load the Transcript page, only a few layers are visible in the layer picker. To reduce visual clutter, most layers are organized into projects. For example, clicking the timing project makes three more layer checkboxes appear: overlap, speech_rate, and foll_pause:
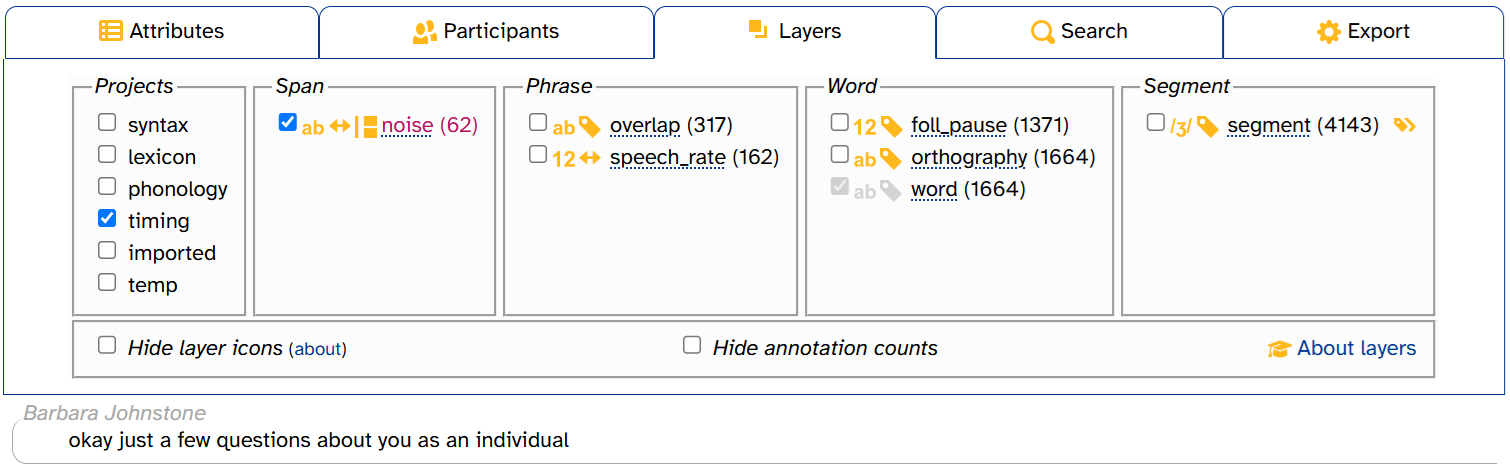
If you deselect a project, its unselected layers disappear from the layer picker. But any selected layers will remain in both the layer picker and the transcript. For example, here’s what it looks like when you select timing, then select speech_rate, then deselect timing:
For more information about projects, see the layer typology documentation page.
Information about layers
The layer picker contains several useful pieces of information about layers.
Layer description
Hovering over the layer name brings up a tooltip with the layer’s description. These descriptions often contain information that’s helpful to interpret annotations and/or understand how they were generated.
Scope
Layer scope is indicated by which column a layer is in. For more information on layer scope (including the difference between span and phrase layers), see the layer typology documentation page.
Icons
Each layer has either two or three icons to the right of its checkbox in the layer picker. These icons indicate some of the layer’s important properties. Here’s a quick key; see the layer typology documentation page for more information:
| Data type | Alignment | Vertical peers | |||
|---|---|---|---|---|---|
| Phonological | Complete interval | Allows vertical peers | |||
| Numeric | Sub-interval | (none) | Doesn't allow vertical peers | ||
| Text | |||||
This means that, for example, the segment layer has phonological data type, complete-interval alignment, and no vertical peers: ![]() .
.
If you forget what the icons mean, you can hover over them for a tooltip:
![]()
Finally, if you find the layer icons visually distracting, you can deselect Show layer icons to make them disappear. APLS will remember this setting if you navigate to other pages with layer pickers in the same browser tab.
![]()
The about link points to the page section you’re reading right now!
Annotation counts
The layer picker displays the total number of annotations for each layer in that transcript. For example, CB01interview3.eaf has 62 noise annotations, 1664 orthography & word annotations, and 4143 segment annotations:
Longer transcripts will generally have more annotations. CB01interview3.eaf is 8 and a half minutes long. By comparison, HD06interview1.eaf, one of the longest transcripts in APLS (over 37 minutes), has 390 noise annotations, 6793 orthography annotations, 6794 word annotations, and 20,269 segment annotations:
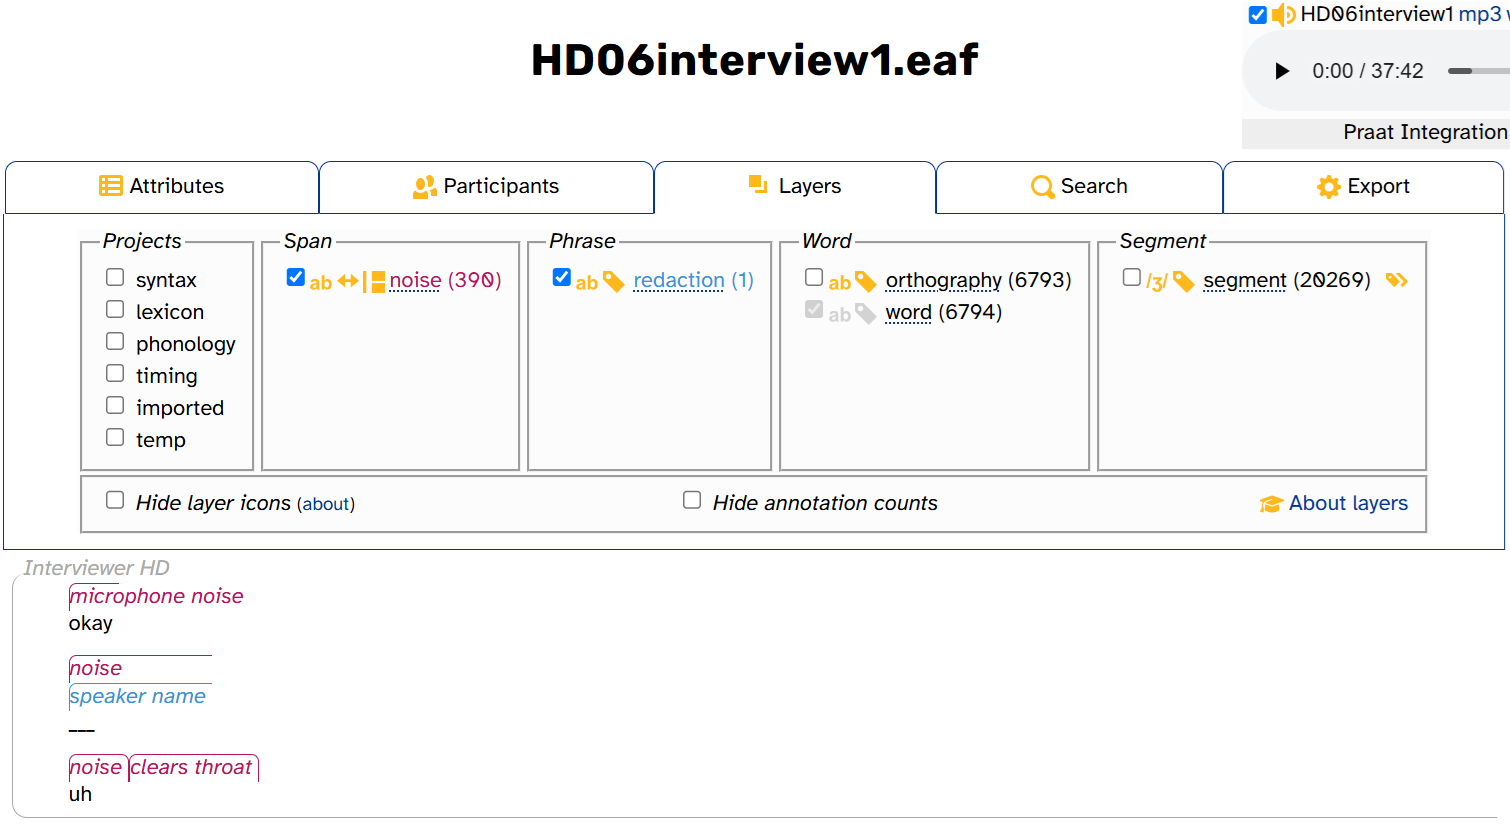
Annotation counts can give us clues about the structure of the data and how layers relate to one another. For example, HD06interview1.eaf has one fewer orthography annotation than word annotations, unlike CB01interview3.eaf. That’s because the second word of the interview is redacted—Interviewer HD says the speaker’s name (as the cornflower blue redaction annotation shows). Otherwise, every word annotation has a corresponding orthography annotation.
Like the layer picker’s icons, there’s a Show annotation counts setting, which APLS remembers if you navigate to other Transcript pages in the same browser tab. You can deselect Show annotation counts if you find them visually distracting:
While other pages have layer pickers (Transcripts, Search, Search results), only the Transcript page’s layer picker has annotation counts.
Empty layers
Some layers in some transcripts have annotation counts of 0. That is, they’re empty layers in that transcript. You’ll most often see empty layers in the imported project, as the original transcriber(s) might not have had anything to redact from the transcript (redaction), any comments to make (comment), etc. This is the case with CB01interview3.eaf, where the redaction and lexical layers are empty:
![]()
There are a few visual clues that these layers are empty:
- Their checkboxes are grayed-out and cannot be selected
- Their names and icons are grayed-out
- Their annotation counts are 0
By contrast, the word layer has a grayed-out checkbox that can’t be deselected and grayed-out icons, but word itself is in black and its annotation count isn’t 0.
Displaying phonological layers in DISC
Phonological layers like segment are displayed with IPA symbols:
However, as mentioned above, APLS stores these annotations internally in the DISC phonemic alphabet. You can choose to display these annotations in DISC instead by clicking ![]() (the IPA/DISC toggle):
(the IPA/DISC toggle):
To change back to IPA, simply click the IPA/DISC toggle again.
The IPA/DISC toggle only appears when the layer is selected, and only for phonological layers.
You can choose different settings for different phonological layers:

Don’t forget: You can also view an annotation’s DISC representation in its tooltip:
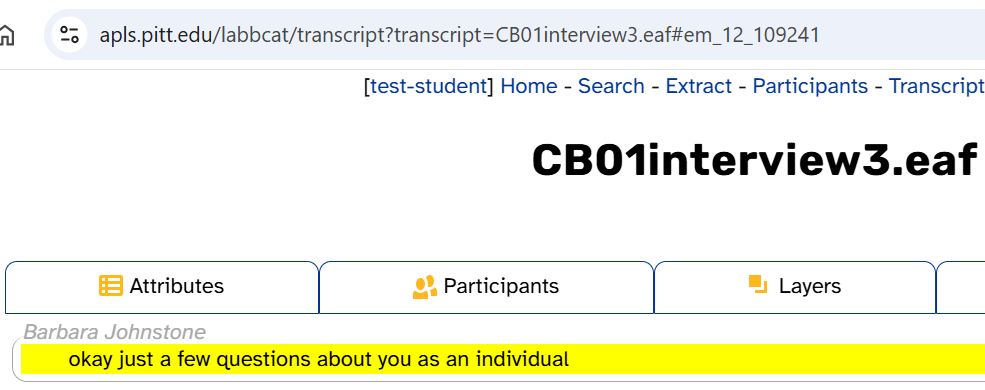
Creating permalinks
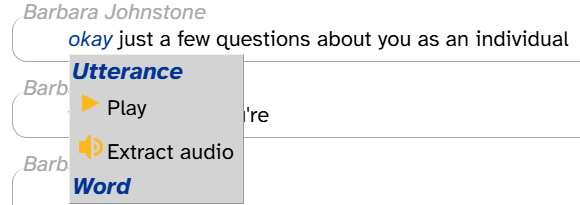
You can create permalinks for individual lines (utterances) or words in the transcript in the word menu by clicking on Utterance or Word:
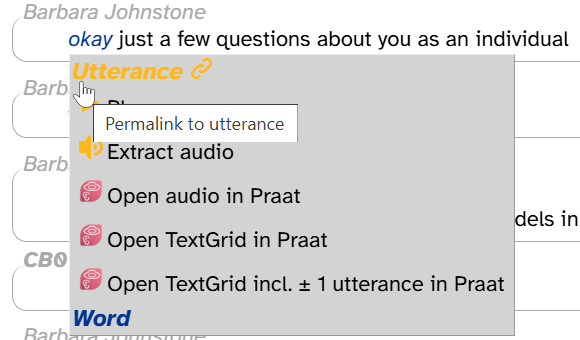
This will update the URL in the address bar and highlight the utterance/word in the transcript body:
Permalinks can be useful for sharing data with colleagues, bookmarking noteworthy moments in an interview, or sending corrections to corpus maintainers. For example, you can send someone the following permalink if you want to share an example of dude being used as a pronoun: https://apls.pitt.edu/labbcat/transcript?transcript=HD23PittsburgheseAAVE.eaf#ew_0_1354213.

You can also figure out where an utterance begins and ends by creating an utterance permalink, since this highlights the entire utterance:
A permalink ID is not a random string of characters! Here’s how to decode an ID like
em_12_109241:
estands for edge, as in graph theory. LaBB-CAT corpora like APLS are based on the annotation graph data model (Bird and Liberman 1999; Fromont 2017), which defines annotations as graph-theoretic edges.mstands for meta layer, the original term in LaBB-CAT for phrase layers, since utterance is a phrase layer. LaBB-CAT underwent some naming changes in version 20210208, but there are still vestiges of the old conventions (including for backward compatibility).12is the utterance layer layer ID. This is pre-defined in new installations of LaBB-CAT.109241is this utterance’s annotation ID in the MySQL table that stores utterance annotations.
Viewing transcript attributes
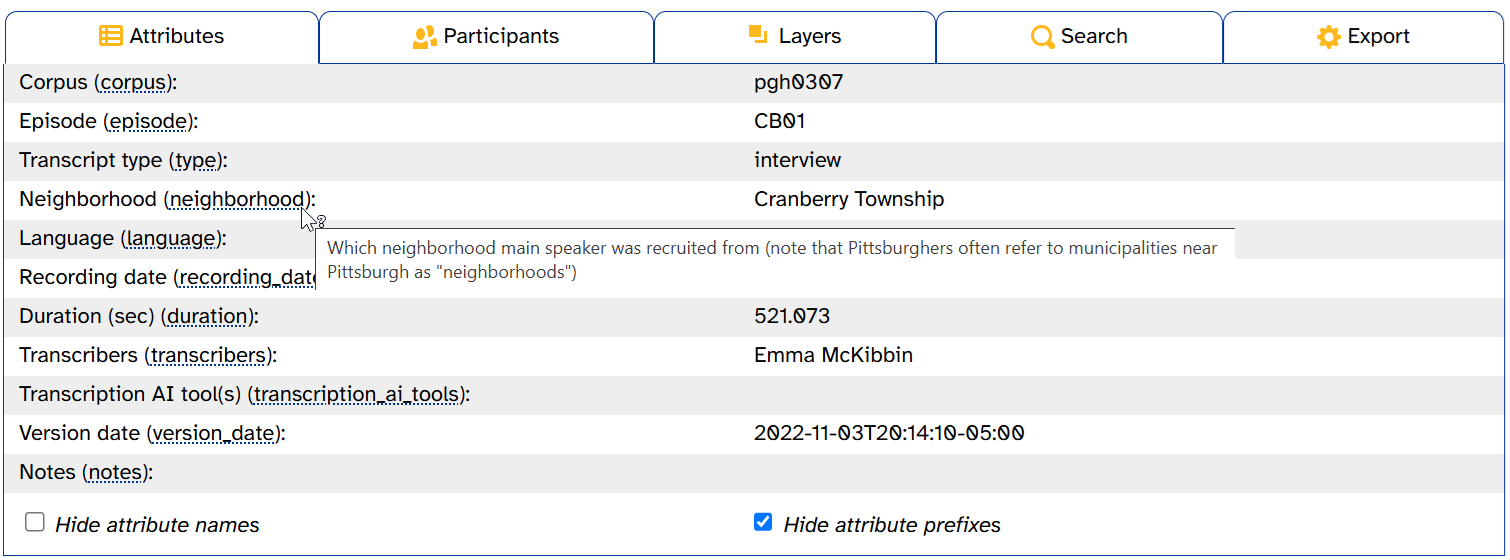
In LaBB-CAT corpora like APLS, attributes are metadata about individual transcripts or participants. You can view a transcript’s attributes by opening the Attributes tab in the transcript header. Here’s what that looks like for CB01interview3.eaf:
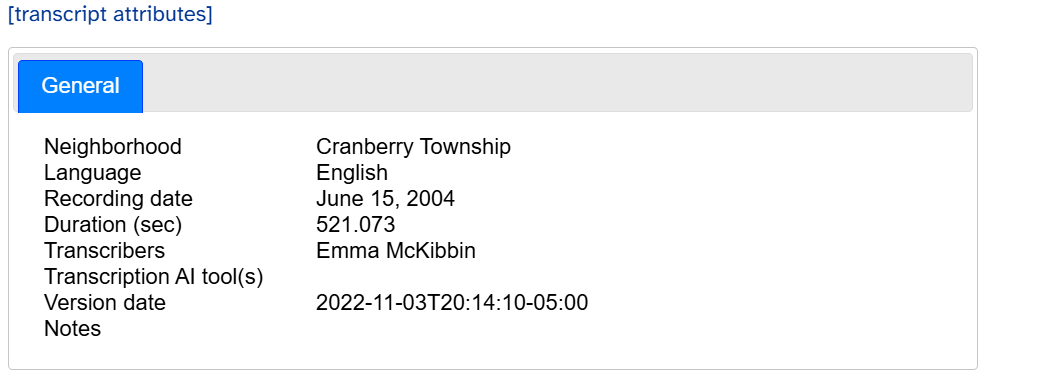
This tab looks exactly like the transcript’s Transcript attributes page. The left-hand column shows attributes’ display titles (like Duration (sec)) and names (like duration). The right-hand column shows attributes’ values (e.g., 521.073).
Most of the attributes are self-explanatory. But just like layer names in the layer picker, hovering over an attribute name will bring up a tooltip with its description:
Blanks in the right-hand column mean that this transcript doesn’t have any value for that attribute. As you can see, for example, Transcription AI tool(s) has a blank for CB01interview3.eaf (meaning its transcription_ai_tools attribute is empty). This is because no AI tools were used to transcribe CB01interview3.eaf.
To export transcript attributes to a CSV file, use the Export Attributes menu on the Transcripts page.
The two checkboxes at the bottom of this tab control how the left-hand column is displayed. If you want to see attributes’ full export names, select Show attribute prefixes:
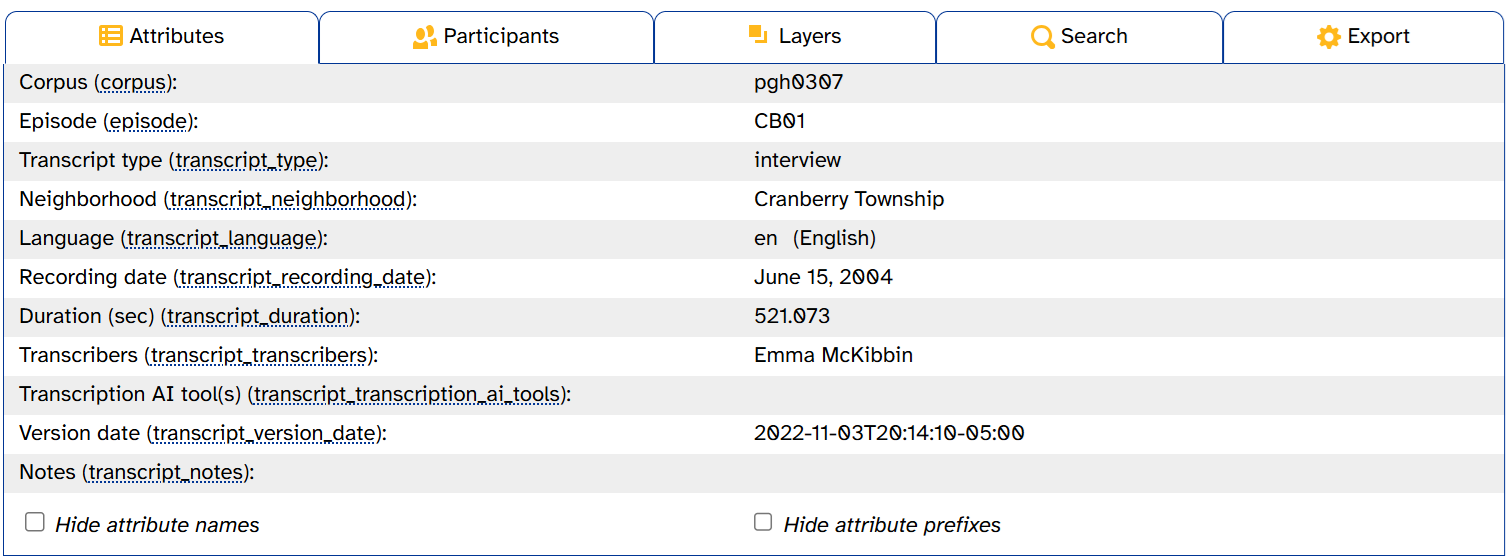
If you’re finding the attribute names visually distracting, deselect Show attribute names:
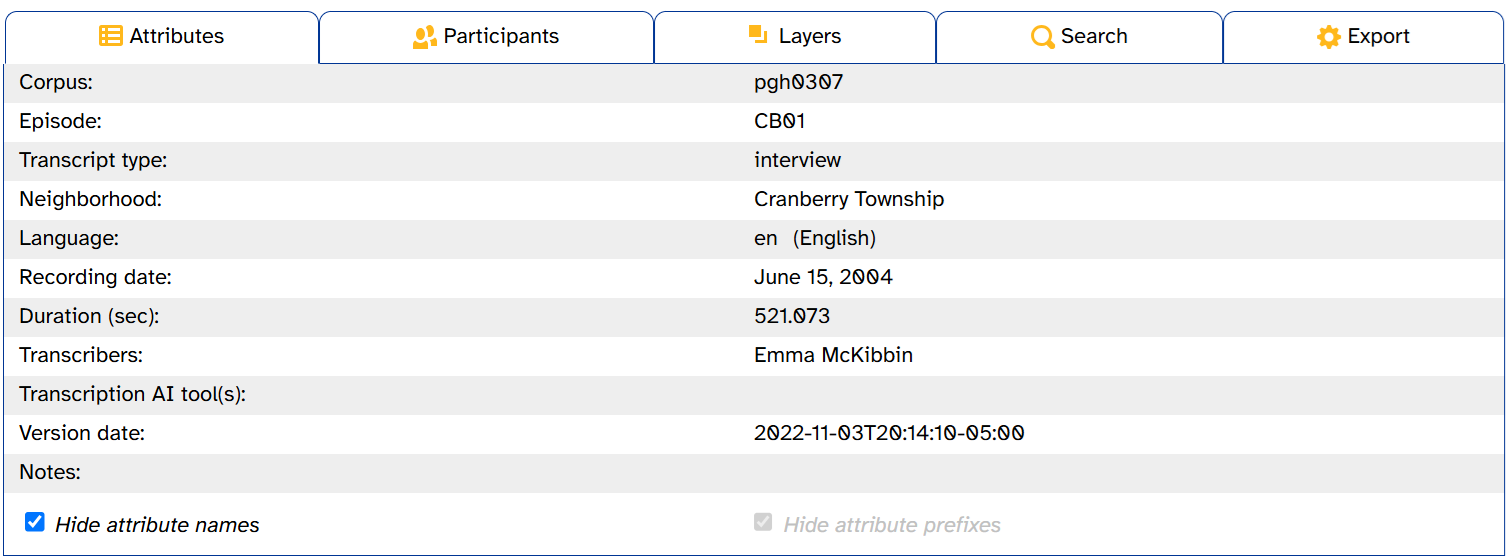
Like in the layer picker, APLS remembers these settings if you navigate to other Transcript or Transcript attributes pages in the same browser tab.
A detailed description of the different transcript attributes can be found in the field guide.
Viewing participant information
You can access information about participants by clicking the Participants tab in the transcript header. Here’s what that looks like for CB01interview3.eaf:
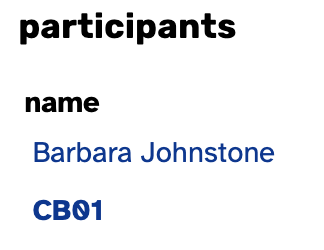
Just like in the transcript body, the Participants tab uses bold to mark the transcript’s main participant. The buttons link to other APLS pages:
- Attributes links to that participant’s Participant attributes page.
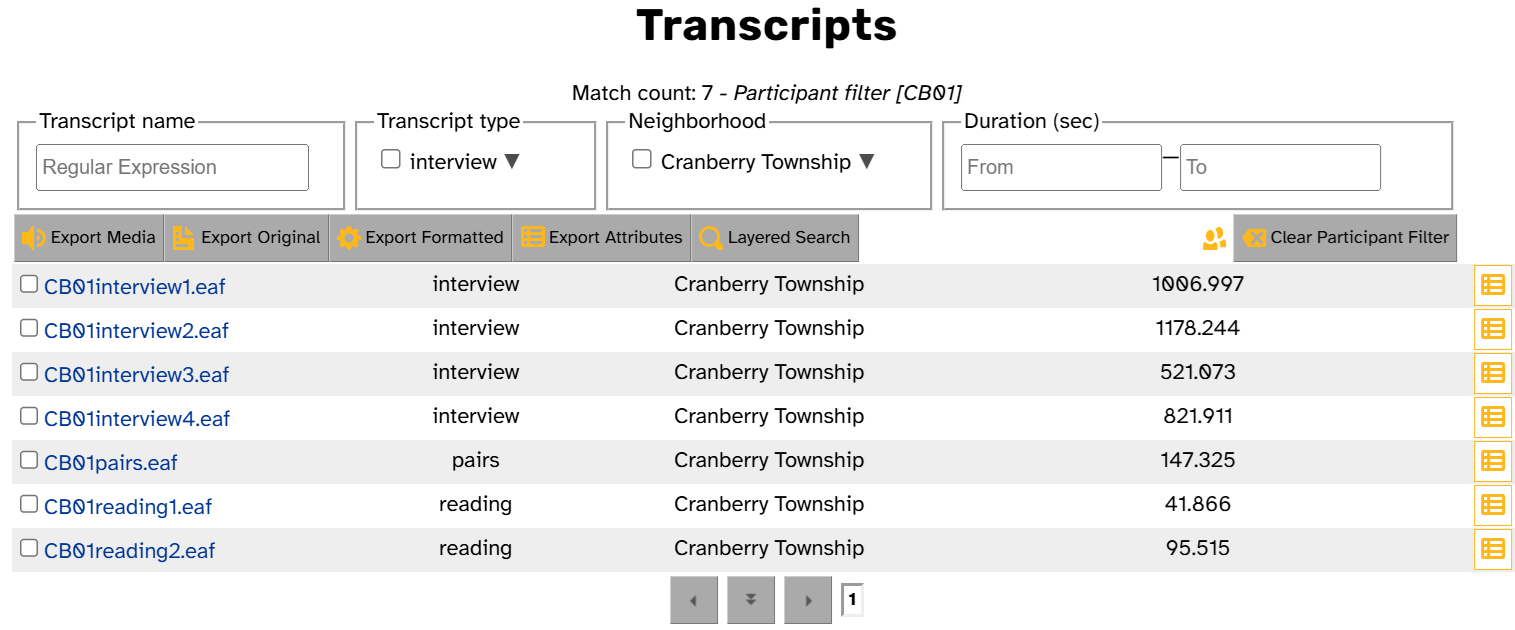
- List Transcripts displays all the transcripts for that participant on the Transcripts page. This is the equivalent of the List Transcripts button on the Participants page.
For example, here’s what it looks like if you click List Transcripts for CB01:
Searching the transcript/participants
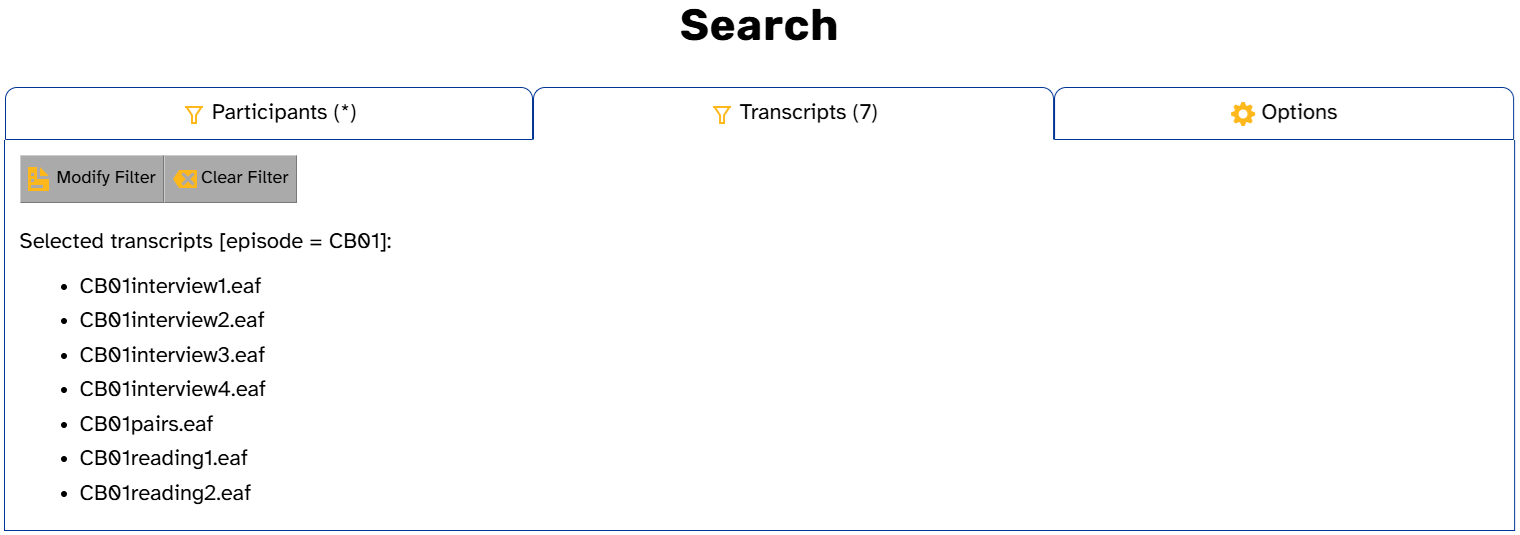
Like the Participants tab, the Search tab provides shortcuts to a different APLS page: the Search page. The buttons pre-fill transcript or participant search filters so you can quickly search for linguistic patterns in an individual transcript, the transcript’s episode (sociolinguistic interview), or all utterances from a participant (in all transcripts where they appear).

For example, here’s what it looks like if you click CB01 next to Search episode:
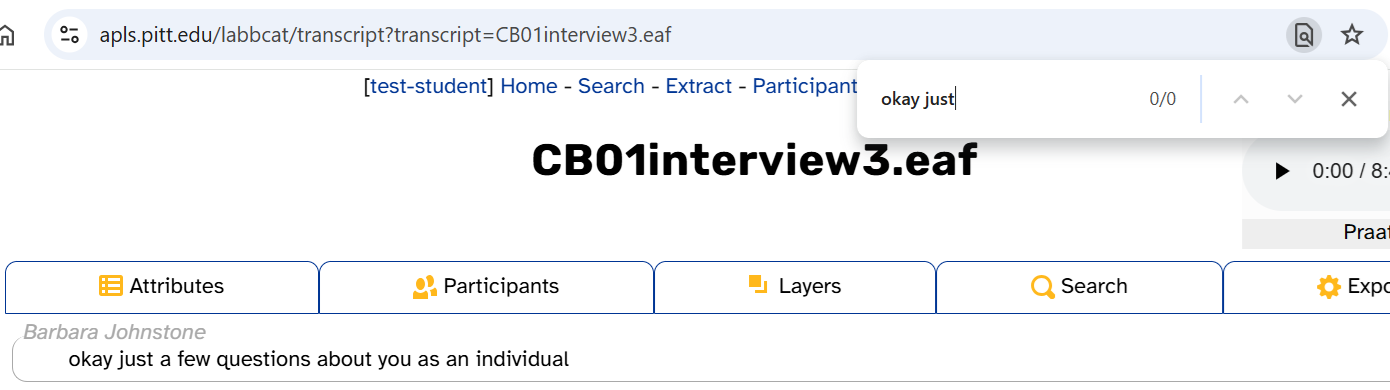
One thing that does not work for searching the transcript is <ctrl>/<cmd>+F. Because of the way the Transcript page’s HTML is structured, multi-word phrases will never match. For example, even though the first two words of CB01interview3.eaf are okay just, searching the Transcript page for okay just yields zero hits:
If you want to search for multi-word phrases, use APLS’s Search page instead.
Downloading audio
To download the audio file for the entire transcript, click mp3 or wav in the media player:
If you want to extract acoustic measurements from the audio file, an easier option is to use the Process with Praat page.
To download audio for a single line (utterance) of the transcript, use the word menu. Click on a word in the line you want to download, then click Extract audio:
As a reminder, APLS’s terms of use prohibit users from sharing audio files publicly.
Audio channels
Almost all audio files are in stereo, with the interviewer appearing on the left channel and the interviewee (main participant) on the right channel. Unfortunately, most files feature “bleed” between channels; that is, the interviewer can usually be heard in the background of the right channel, and the interviewee can usually be heard in the background of the left channel. In addition, participants with Bystander type tend to be in the background of both channels.
Some audio files don’t follow this pattern:
- Transcripts in the
CB05and06episode includeCB05on the left channel,CB06on the right channel, and the interviewer (Barbara Johnstone) on both channels.- Transcripts in the
FH05and06episode include bothFH05and the interviewer (Barbara Johnstone) on the right channel.- Transcripts in the
LV08and09episode include the interviewer (Barbara Johnstone) andLV09sharing the left channel, andLV08alone on the right channel.LV10transcripts are in mono, with both participants appearing on the single channel.
You can view information on which participant appears on which channel in the Attributes tab.
Exporting the transcript
The Export tab in the transcript header allows you to download the current transcript in any of the listed file types:
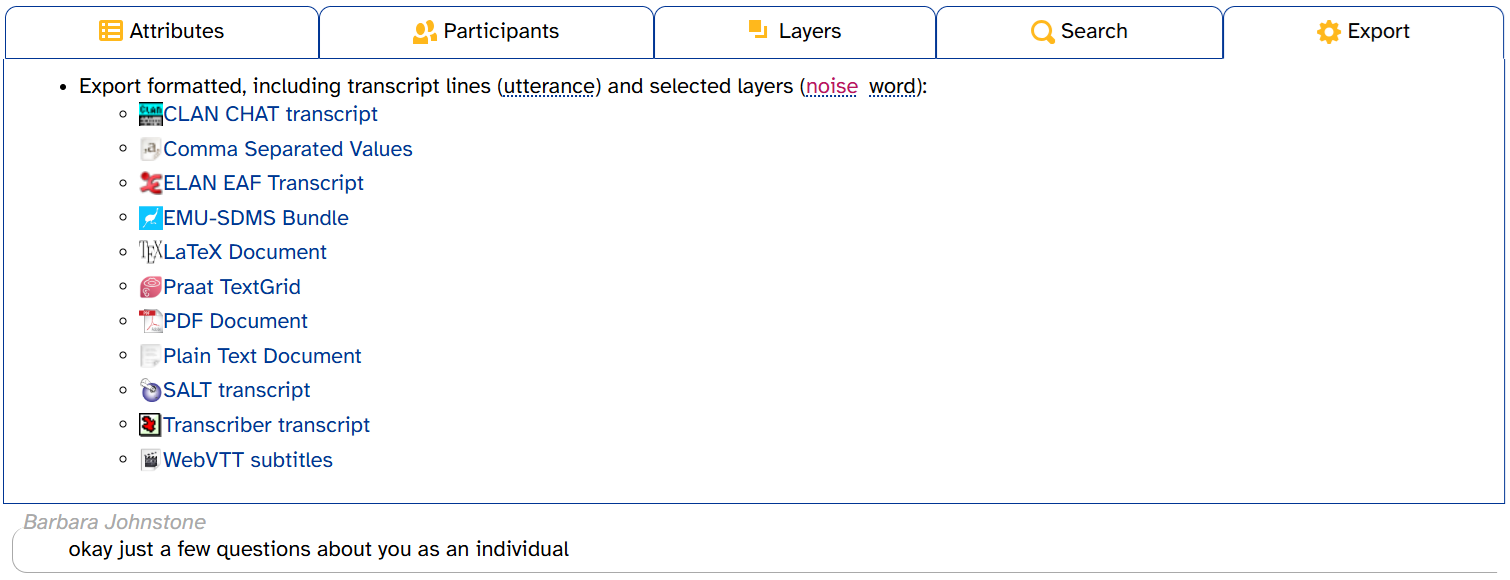
On the
CB01interview3.eafTranscript page (https://apls.pitt.edu/labbcat/transcript?transcript=CB01interview3.eaf):
- Make sure only the word layer is selected.
- Click the Export tab.
- Click Praat TextGrid.
- Open the TextGrid in Praat.
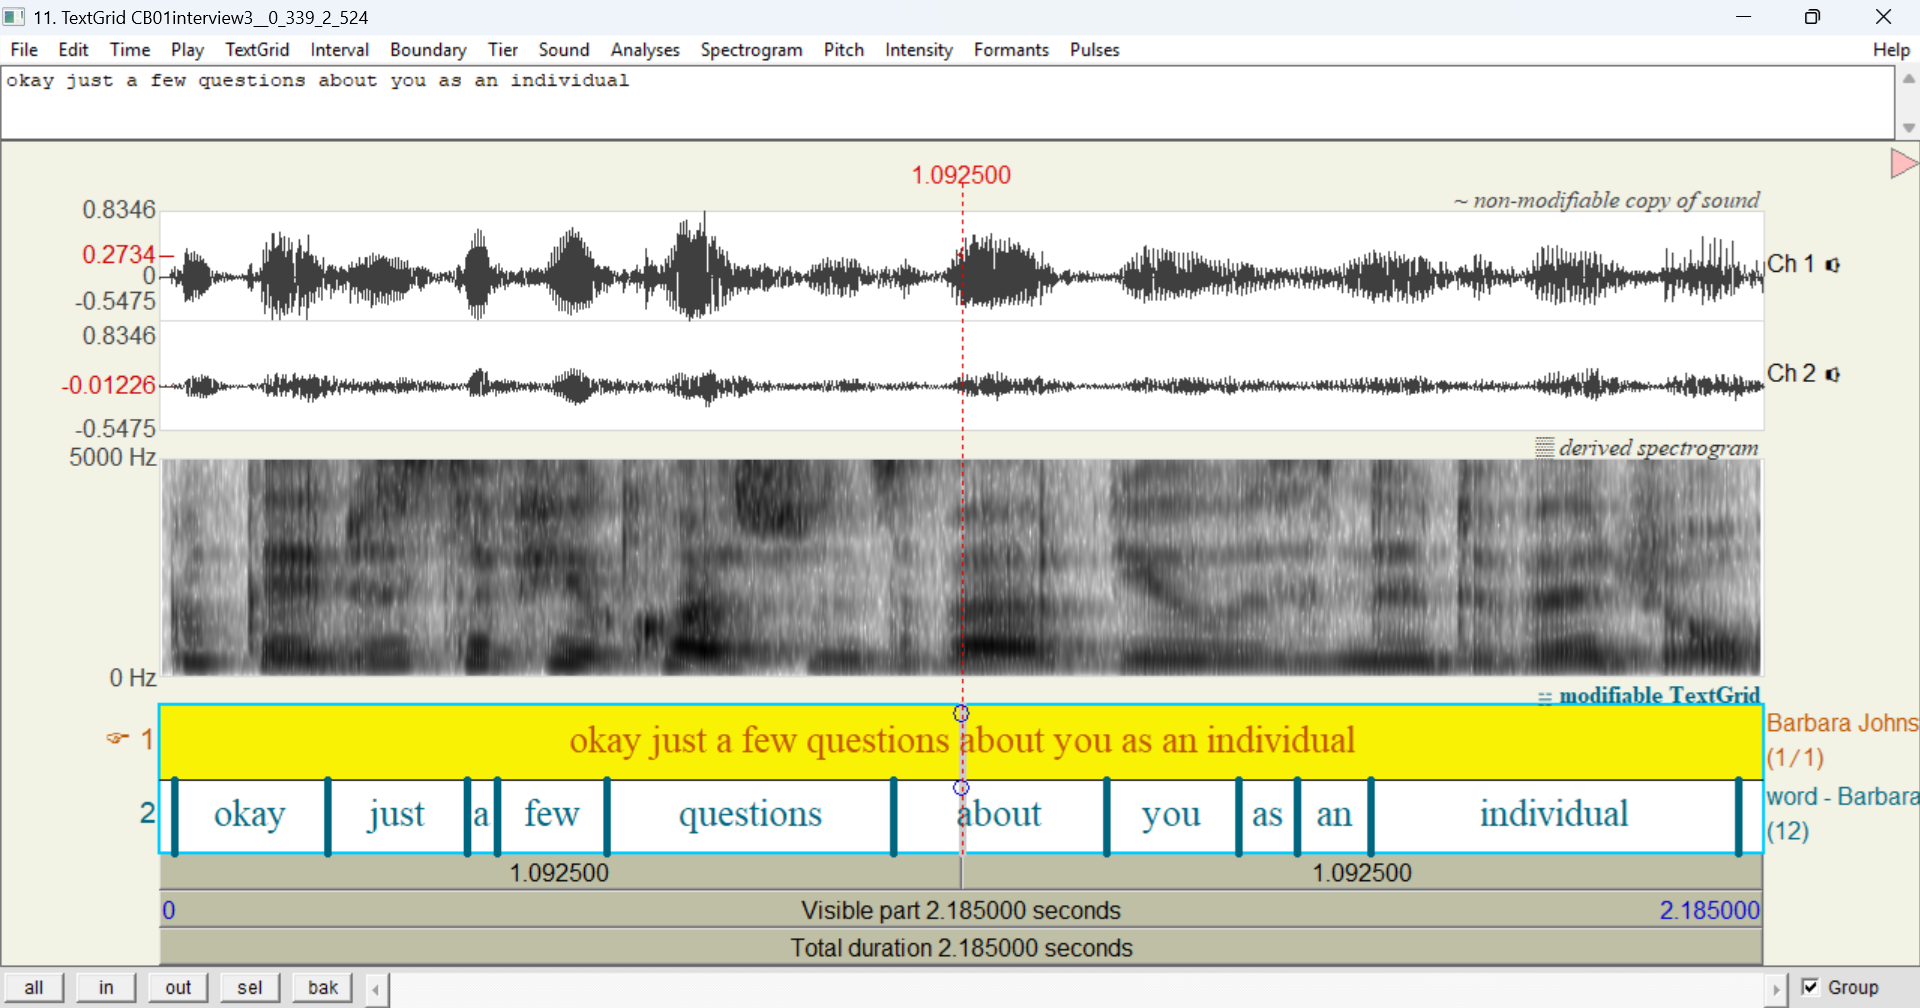
At a minimum, the exported file will include the utterance and word layers. It will also include any layers you have selected to show in the transcript body. Here’s what the exported TextGrid looks like when only the word layer is selected (noise and comment are deselected):
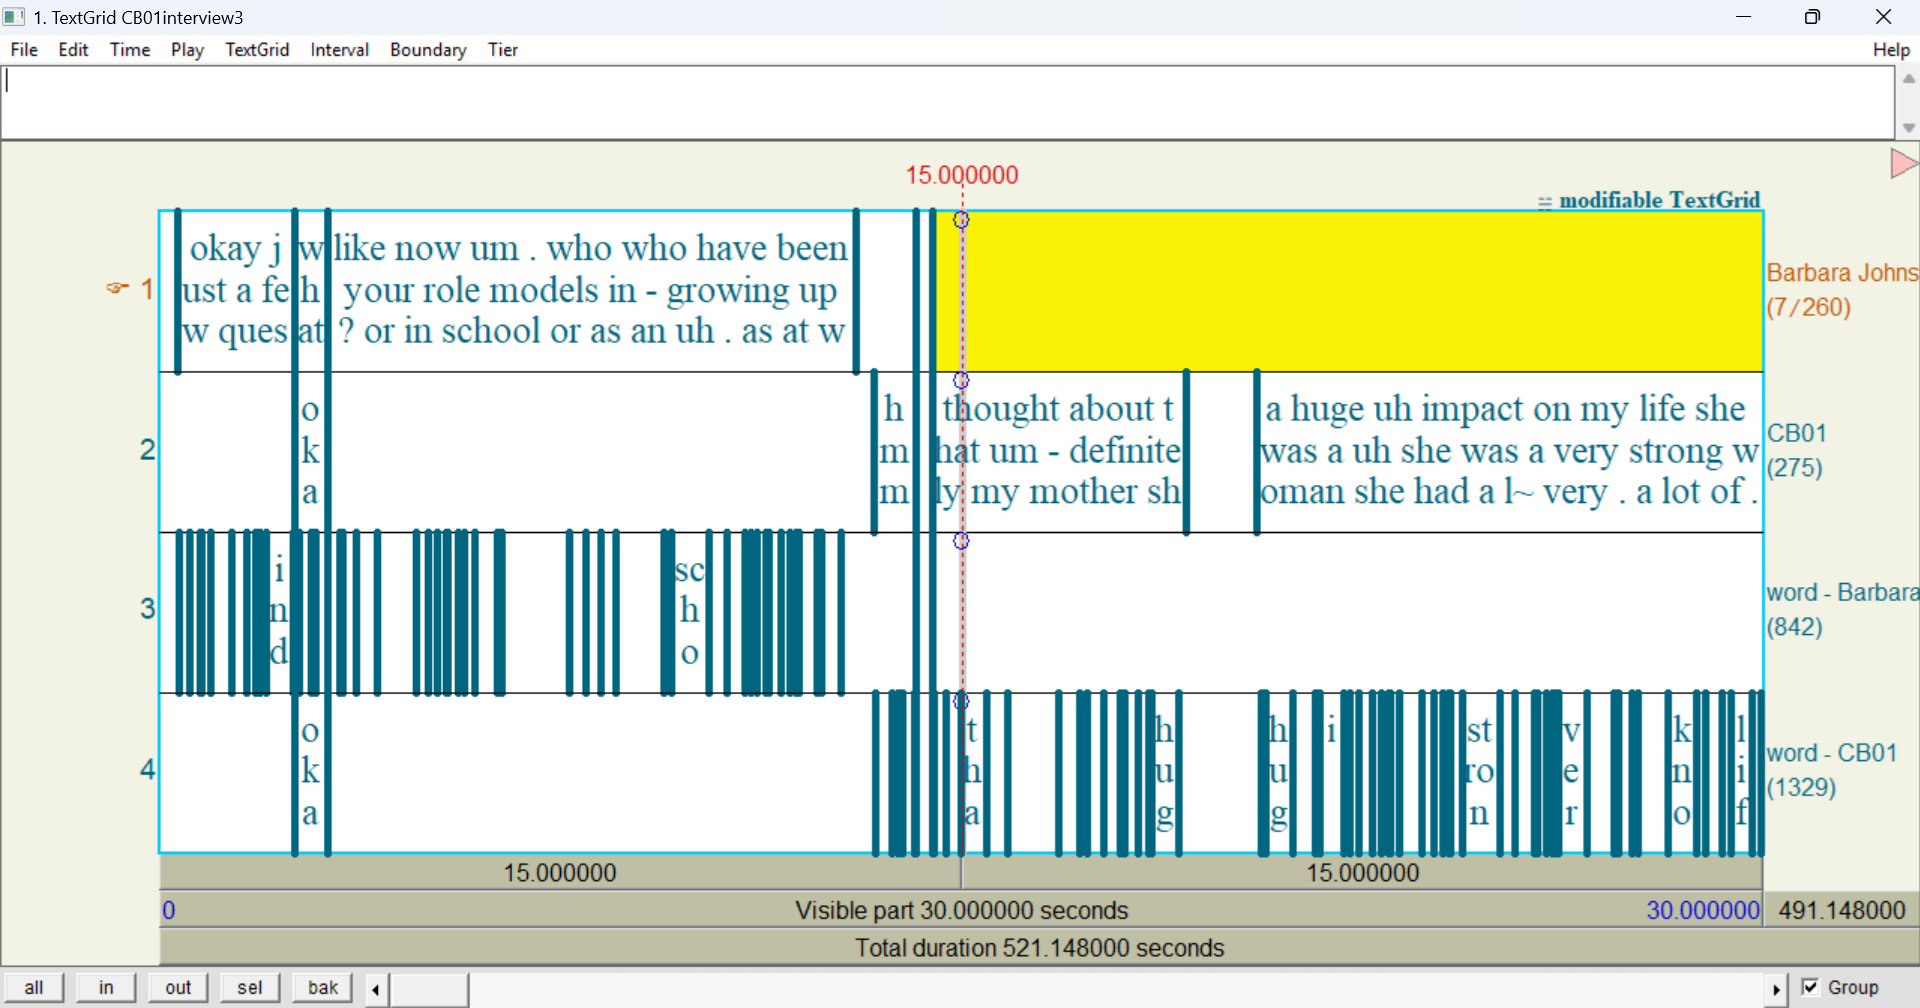
As you can see, the exported TextGrid has four tiers: Barbara Johnstone, CB01, word - Barbara Johnstone, and word - CB01. The tiers named after the participants (Barbara Johnstone and CB01) represent their utterance annotations. The tiers that start with word - represent each participant’s word annotations.
Technically speaking, the tiers named after the participants (
Barbara JohnstoneandCB01) only get their timings from the utterance layer. Both utterance and turn are timing-only layers, which means their annotations don’t have a label, only a start and end time. When APLS exports a transcript to TextGrid, it takes the timings from utterance annotations and fills them in with that participant’s word annotations within that utterance.
- Open the TextGrid from the previous try-it.
You should see four tiers, two per participant: one for each participant’s utterance annotations (labeled
Barbara JohnstoneandCB01) and one for each participant’s word annotations (labeledword - Barbara Johnstoneandword - CB01).
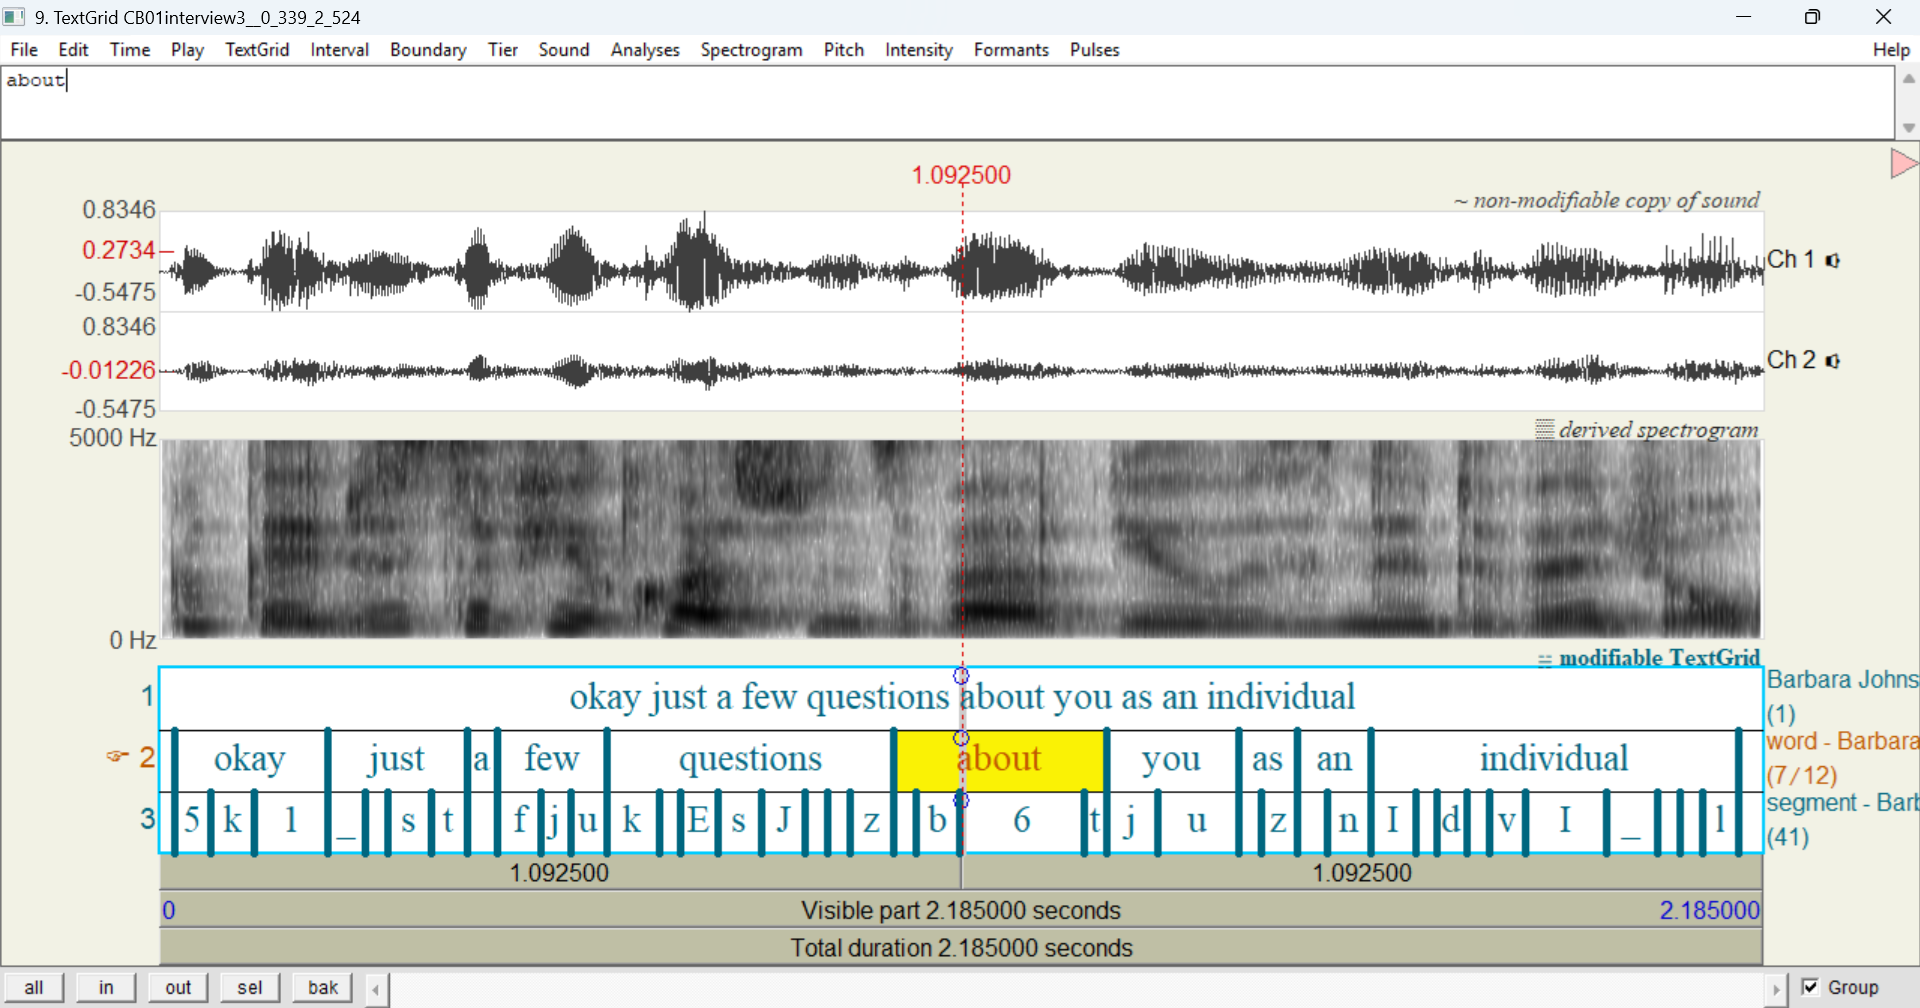
Now let’s zoom into the first Barbara Johnstone utterance (
okay just a few questions about you as an individual):
- Click that interval in the
Barbara Johnstonetier.- Either click sel in the bottom-left of the TextGrid window, or hit
<ctrl>/<cmd>+N.You should see that each of the words in the utterance has its own interval in
word - Barbara Johnstone:
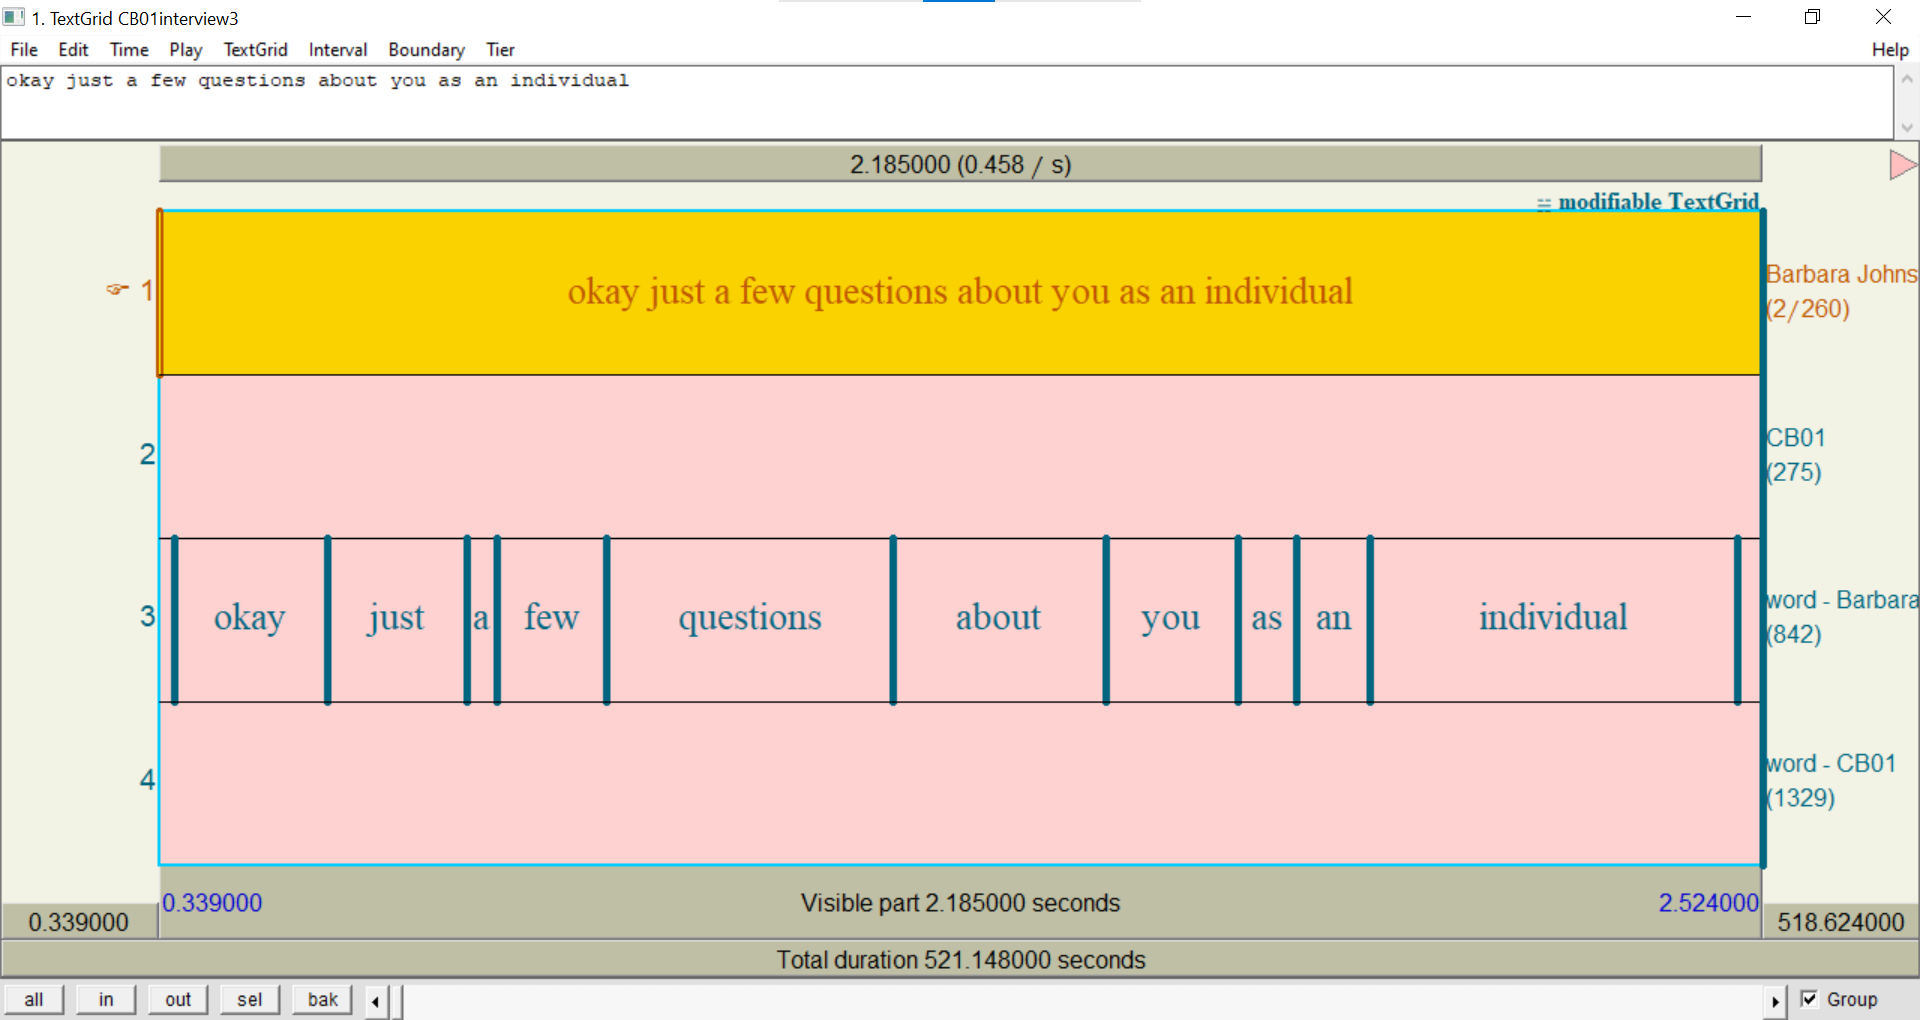
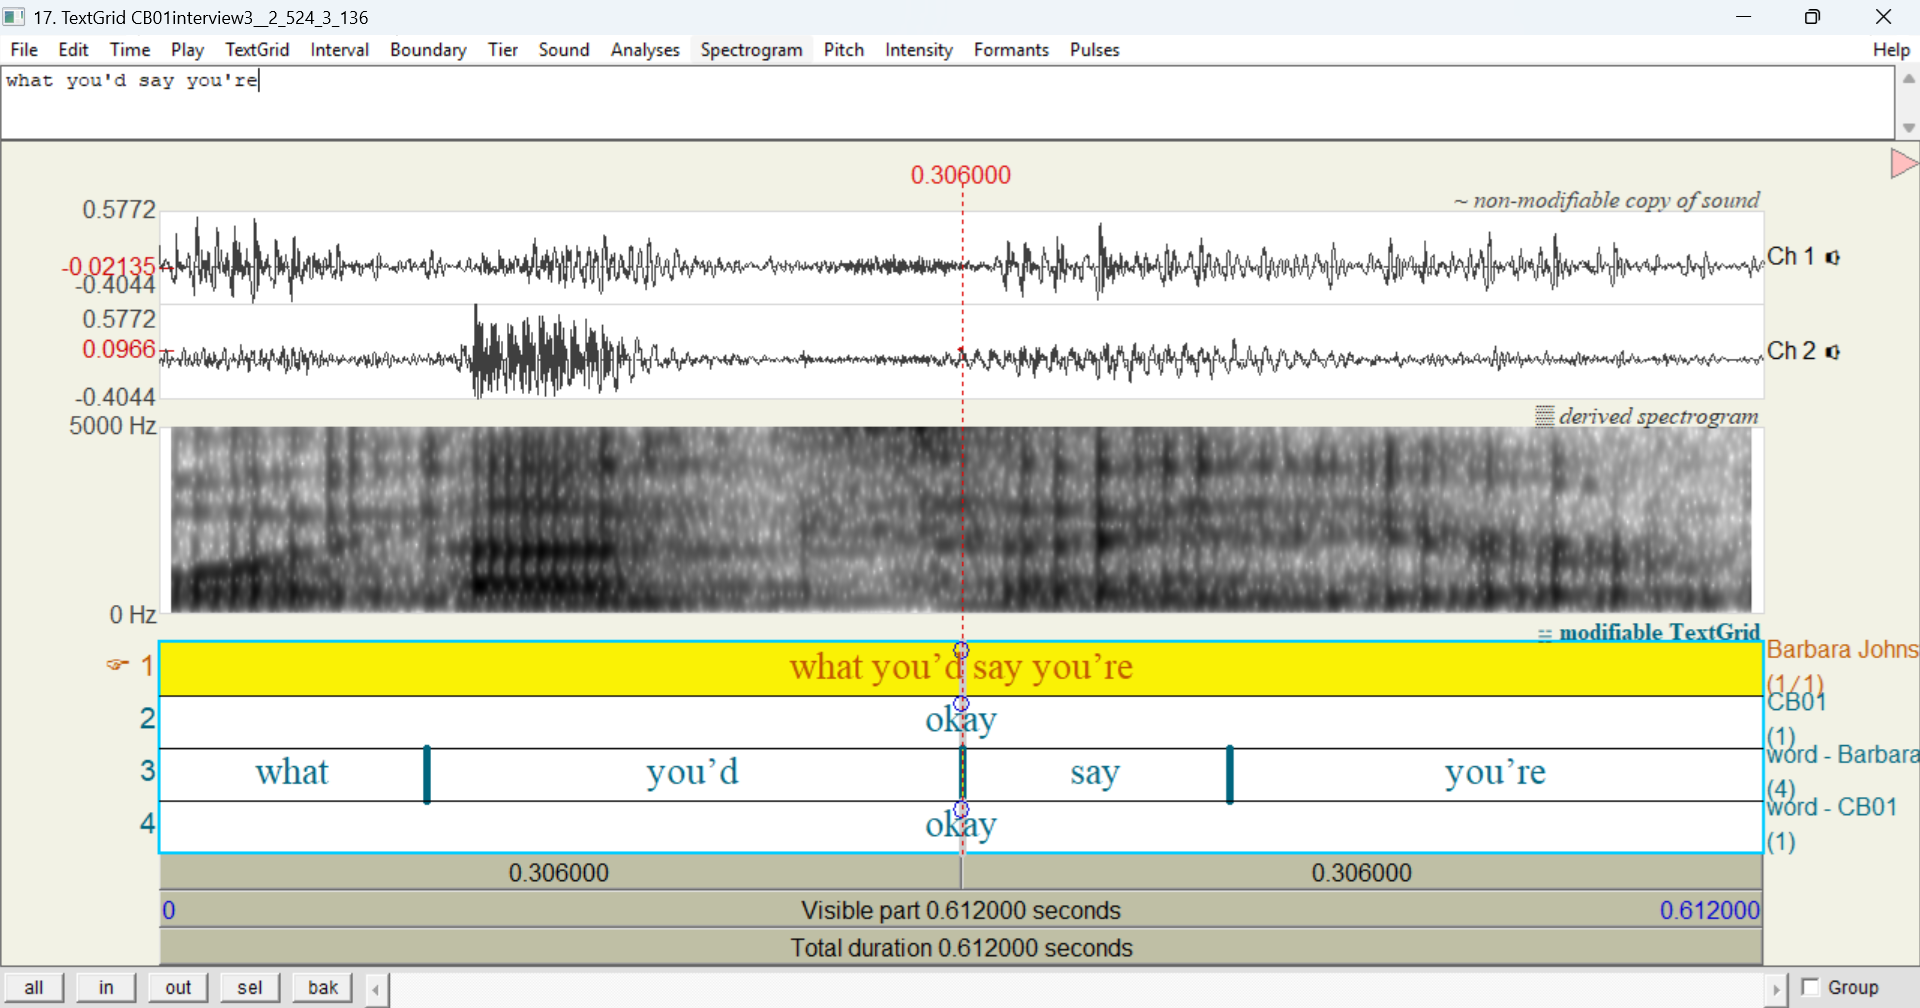
Finally, let’s see how overlaps look in an exported TextGrid. According to the Transcript page, there’s an overlap when Barbara Johnstone says
what you'd say you'reand CB01 saysokay, right after Barbara’s first utterance
- Zoom into the next
Barbara Johnstoneinterval in the TextGrid.You should see a
CB01interval that lines up with theBarbara Johnstoneinterval, plus words on both participants’word -tiers.
Exporting transcripts to TextGrid is a good way to understand some of the details of annotations (and their timing) that are hard to glean from the Transcript page. (This is true for Elan EAF transcripts, too.) In particular, if a layer allows vertical peers (![]() icon in the layer picker), the exported TextGrid may show multiple tiers per participant.
icon in the layer picker), the exported TextGrid may show multiple tiers per participant.
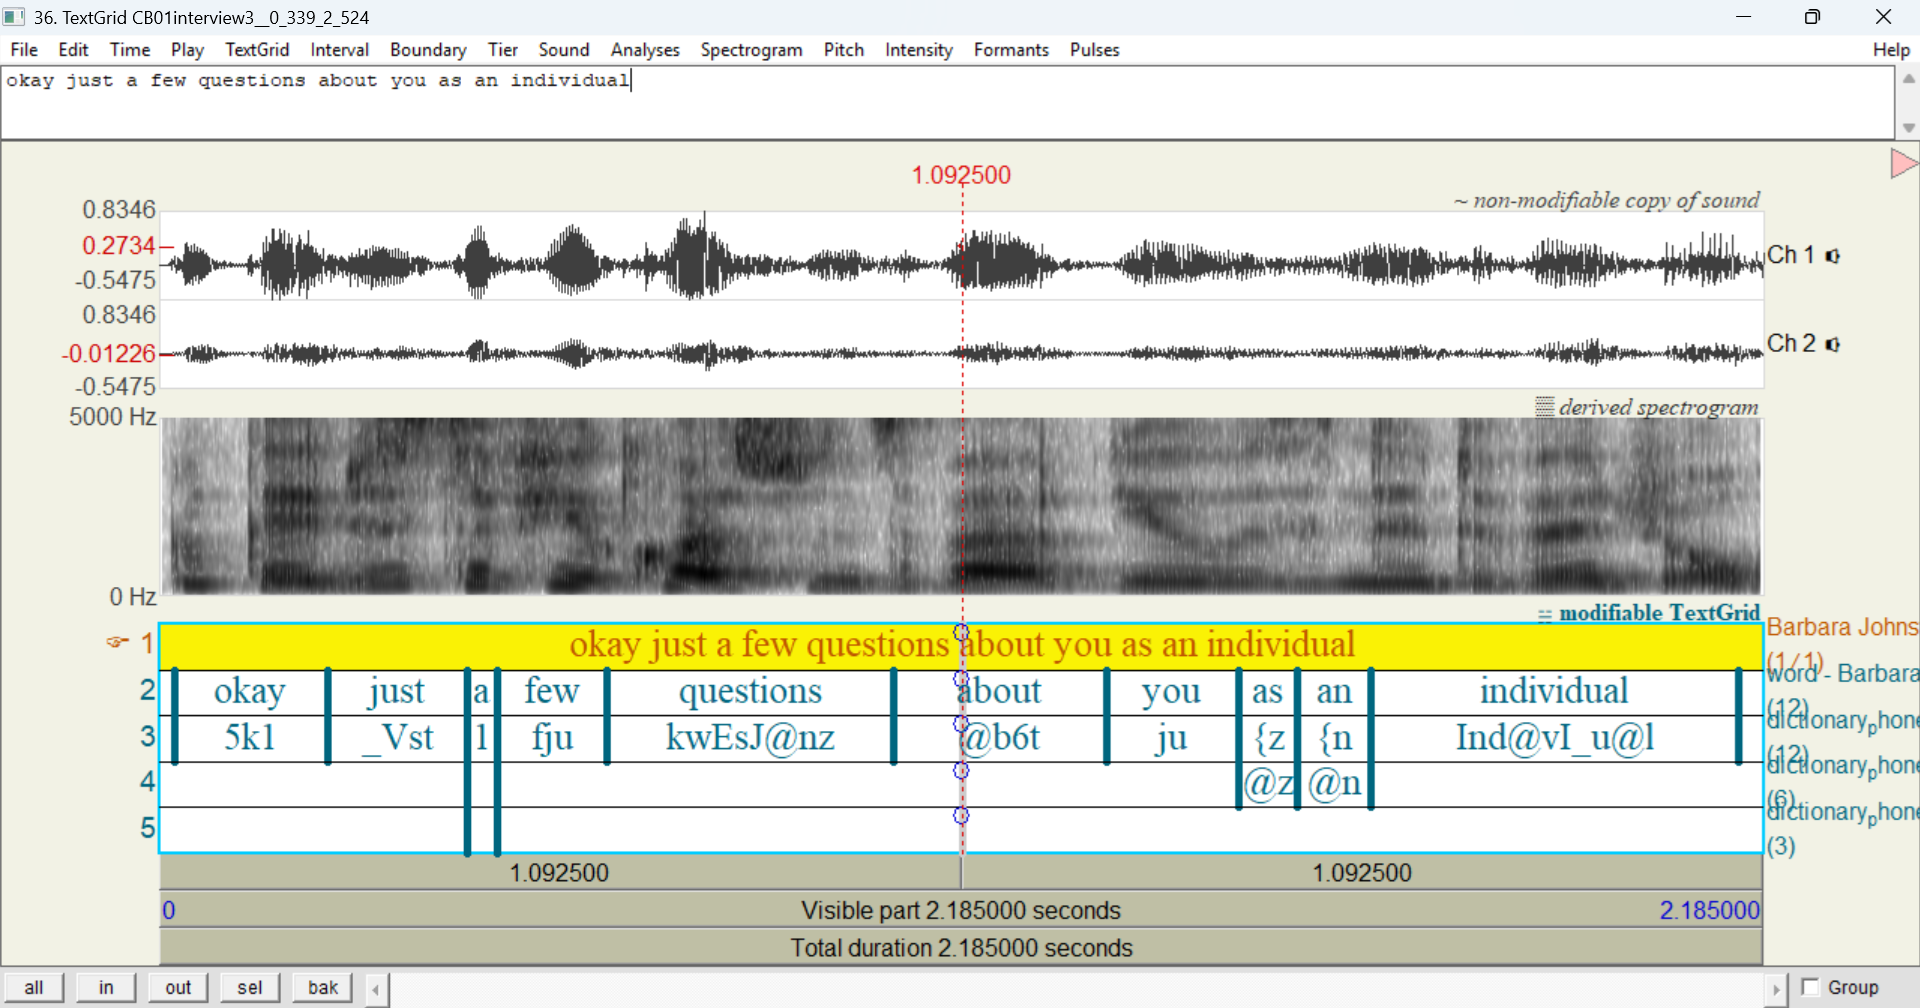
On the
CB01interview3.eafTranscript page:
- Click the Layers tab.
- Select dictionary_phonemes.
- Click the Export tab.
- Export to Praat TextGrid and open in Praat.
You should see three
dictionary_phonemes -tiers per participant. This is because some words have more than one possible phonemic representation, such as /æz/ or /əz/ for as.
Some tier names in the exported TextGrid are long enough that they get cut off in the Praat TextGrid window. In the previous try-it, you can’t tell which tiers are
dictionary_phonemes - Barbara Johnstoneand which aredictionary_phonemes - CB01. To see the full name of a TextGrid tier:
- Select the tier.
- Go to the Tier menu and click Rename tier….
Then you can see the tier’s full name (even if you don’t rename it).
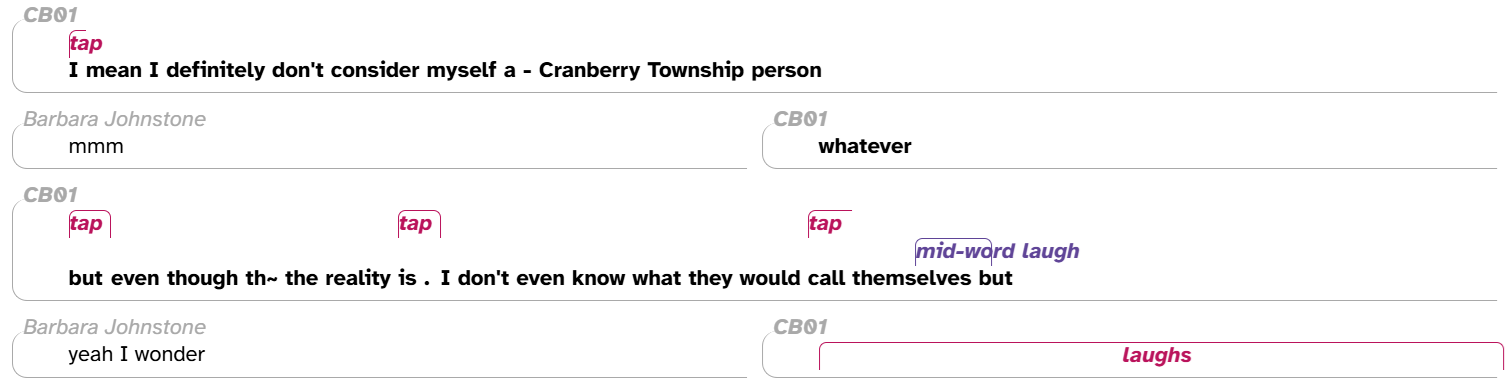
So far, we’ve only been looking at Praat TextGrids. Other file formats affect not only which layers are exported, but how they are displayed. Some transcript formats also show additional layers from the original uploaded transcription: noise, comment, and pronounce. For example, here’s an utterance from CB01interview3.eaf that includes all three of those layers, with comment in purple, noise in magenta, and pronounce in periwinkle:

Here’s what the same utterance looks like in an exported Plain Text Document:
CB01: but even though th~[D] the reality is . [tap] I don't even know what they would call [tap] themselves {mid-word laugh} but [laughs]
Unlike in Praat TextGrids and Elan EAF transcripts, where all annotations have time alignments, in Plain Text Documents and PDF Documents, utterances are separated by line breaks and words are simply listed within each utterance. That is, these annotations are not time-aligned and there’s no way to tell whether speech is overlapping. As a result, the Plain Text Documents and PDF Document formats are better for a readable or skimmable overview of who said what, and not very useful as structured linguistic data.
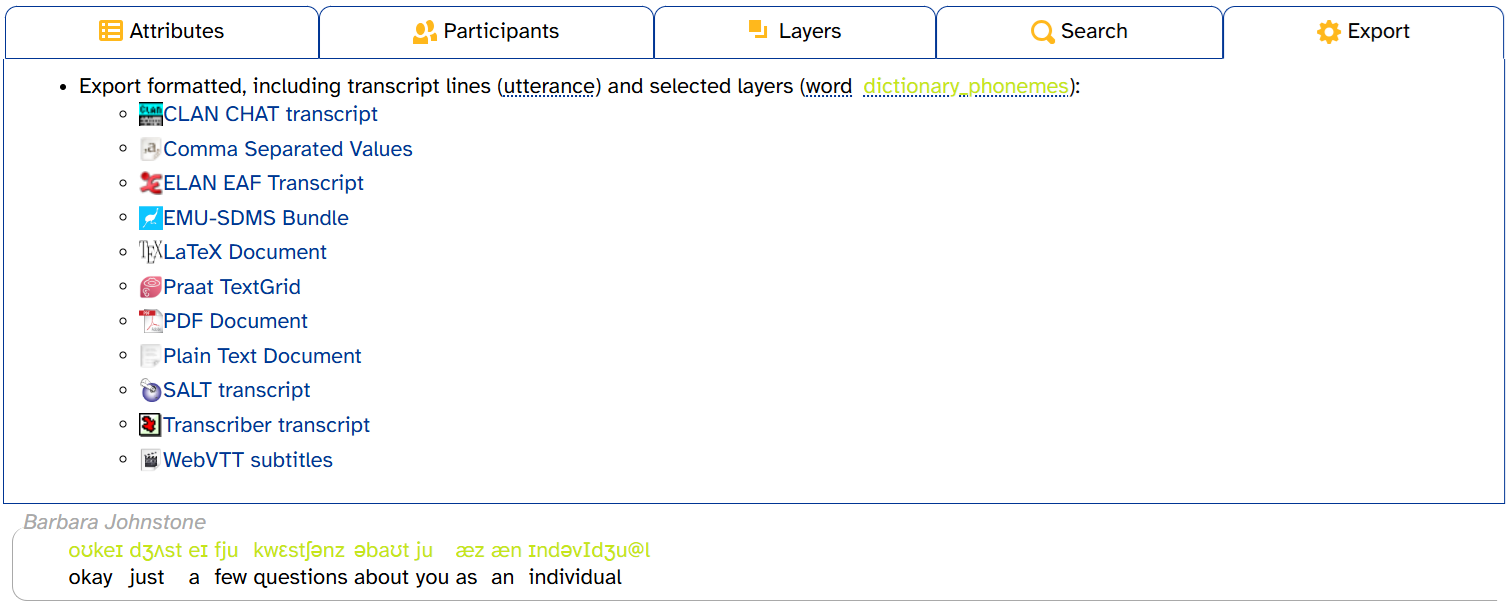
If you need greater control over which layers to export, use the Export Formatted menu on the Transcripts page.
As previously mentioned, the exported file will include any layers you have selected in the layer picker. The Export tab displays these layers on the top line:
Phonological layers (like segment) are always displayed in the DISC phonemic alphabet.
On the
CB01interview3.eafTranscript page:
- Click the Layers tab.
- Select the segment layer.
- Click the Export tab.
- Click Praat TextGrid.
- Open the TextGrid in Praat.
Compared to the previous try-it, you should see two new tiers: a
segment -tier for each participant. If you zoom in on an individual word, you should see that each of the segments has its own interval.
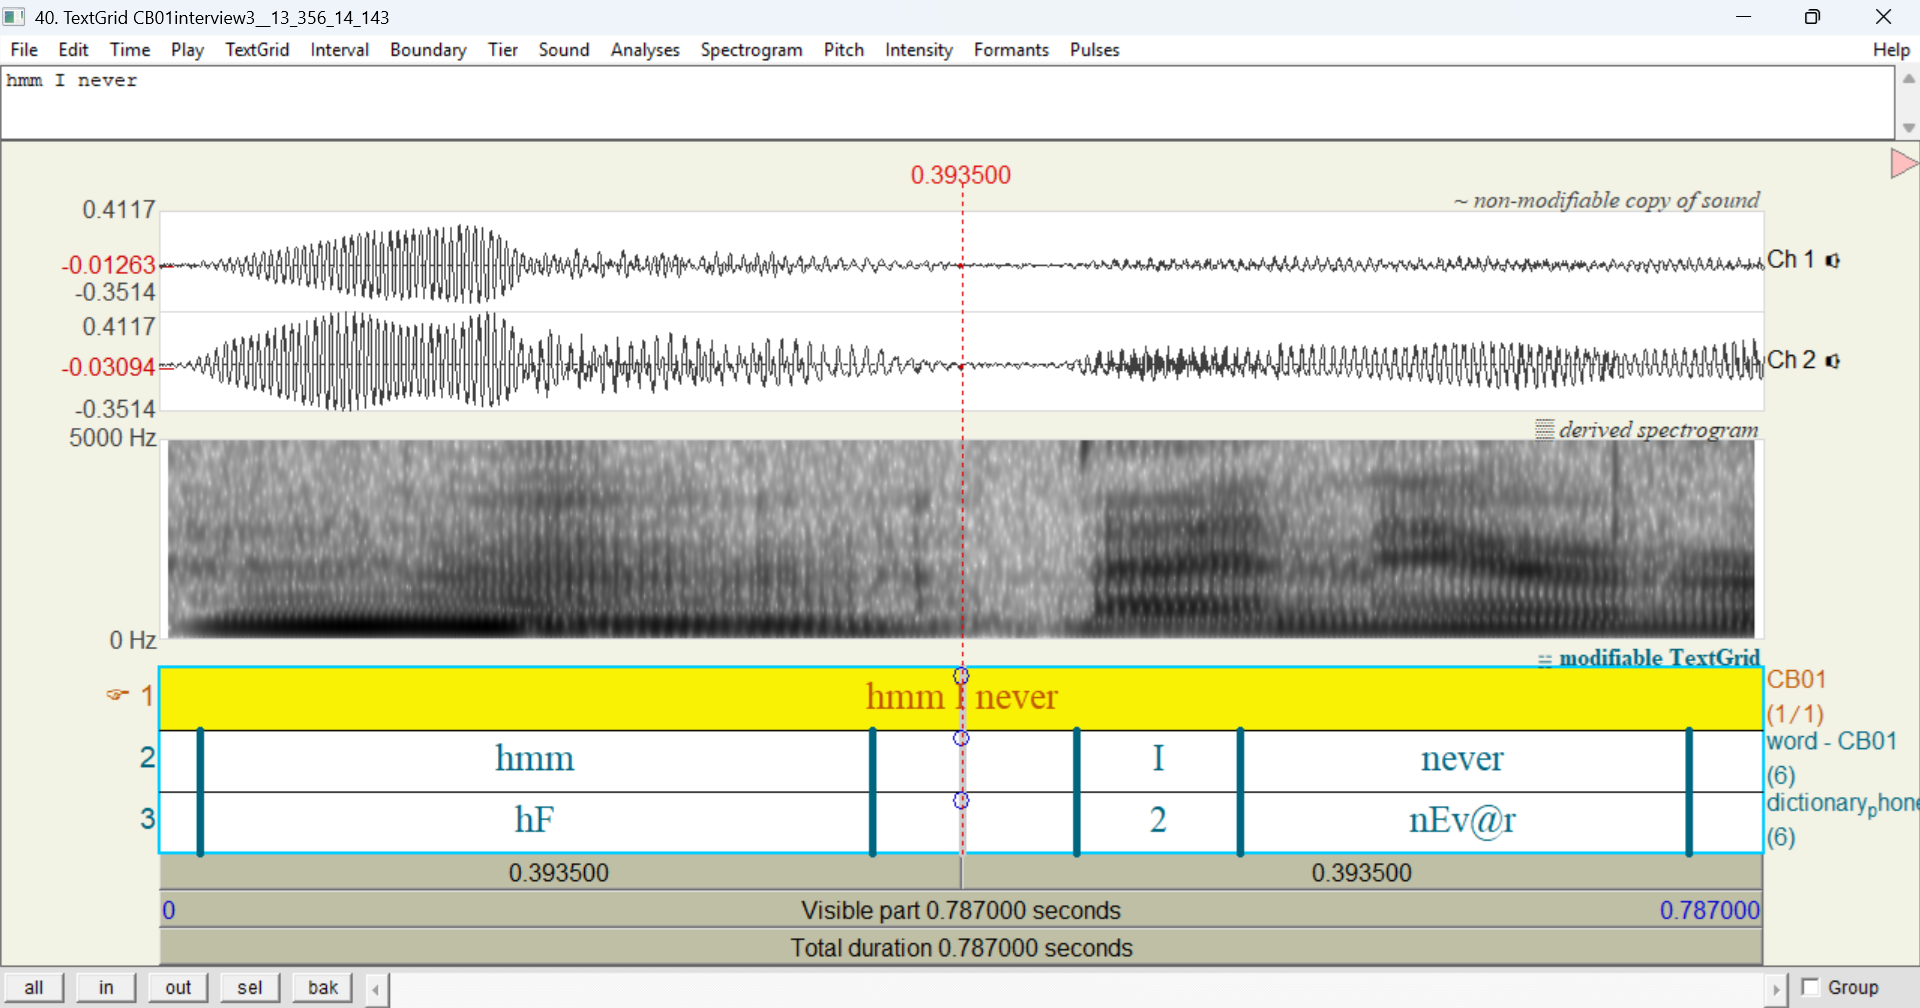
Opening utterances in Praat
Similar to downloading audio and exporting an entire transcript, you can open an individual utterance in Praat. This requires installing the Praat integration (see this page). If you’ve installed the Praat integration, you’ll see three Praat commands in the word menu that appears when you click on a word:

These commands are:
- Open audio in Praat: Open just the utterance audio in Praat (in a Sound editor window).
- Open TextGrid in Praat: Open the utterance audio and TextGrid in Praat (in a TextGrid editor window).
- Open TextGrid incl. ± 1 utterance in Praat: Same as the previous, potentially including the previous and/or next utterance.
If Praat isn’t already open on your computer, these commands will also open Praat.
Here’s what it looks like when you select Open TextGrid in Praat for the first utterance of CB01interview3.eaf when only word is selected in the layer picker:
As you can see, there are just two tiers: Barbara Johnstone and word - Barbara Johnstone. Like when you export an entire transcript on the Export tab, these tiers correspond to the utterance and word layers.
Unlike with an entire transcript, there are no tiers for CB01. That is, Open TextGrid in Praat will only include participant(s) who are speaking in that line. If you select the second line of CB01interview3.eaf instead, the exported TextGrid does include tiers for both participants due to the overlapping speech:
Like when you export an entire transcript on the Export tab, the TextGrid will include any layers that you have selected in the layer picker. Here’s the result of Open TextGrid in Praat for the first utterance of CB01interview3.eaf with segment selected in the layer picker:
If you’re exporting a layer that allows vertical peers, the exported TextGrid will include additional tiers to accommodate vertical peers (again, like with an entire transcript):
However, it will only include as many tiers as needed within that utterance:
As mentioned above, the Open TextGrid incl. ± 1 utterance in Praat command may include the previous and/or next utterance. However, the adjacent utterance(s) will only be included if they’re within the same turn. This means that if there’s a time gap between the utterance you selected and its adjacent utterance, the adjacent utterance won’t be included. If you need adjacent utterances, export the entire transcript to TextGrid and manipulate the TextGrid as needed.
Finally, the Praat integration downloads these files to a temporary folder. If you want to save them to your computer, use the Save menu on the Praat Objects window.
Accessing Transcript pages
There are multiple ways to reach a Transcript page in APLS:
- The Transcripts page at https://apls.pitt.edu/labbcat/transcripts, as described on the Browsing transcripts documentation page.
Go to the Transcripts page (https://apls.pitt.edu/labbcat/transcripts) and click on CB01interview3.eaf to view that transcript.
- Via the Transcript page’s URL, which is in the form of
https://apls.pitt.edu/labbcat/transcript?transcript=followed by the transcript’s name.Click the URL https://apls.pitt.edu/labbcat/transcript?transcript=CB01interview3.eaf. This will take you directly to the Transcript page for
CB01interview3.eaf. - Via a permalink to a line or word in the transcript.
- Once you have a Transcript page open, you can use navigation arrows to move to a different transcript, as described above.
In addition, there are two ways to access transcripts from the results of a search (see Searching the corpus):
- Through the Search results page by clicking on hyperlinked text. This will load the Transcript page and scroll directly to the search result you clicked.
- If you export search results to CSV (see Exporting data), the
URLcolumn has links that load the Transcript page and scroll directly to the search result corresponding to each row.