
Setting up Praat integration
A useful feature of APLS is its in-browser integration with the speech analysis software Praat. By setting up Praat integration for APLS, you can open audio clips and their accompanying TextGrids in Praat directly from APLS webpages. Praat integration is supported when viewing Transcript pages.
Praat integration is supported for Google Chrome, Mozilla Firefox, and Chromium-based browsers such as Microsoft Edge. Praat integration does not work with Safari, due to Safari no longer supporting Java.
On this page, we cover the configuration steps for Praat integration depending on the web browser you are using. If you are looking for information about interpreting the exported TextGrids, go to the Exporting data documentation page.
On this page
How to check if the Praat integration is set up
If your media player is displaying a small Praat logo (as shown below), this indicates that you do not have the Praat integration set up.

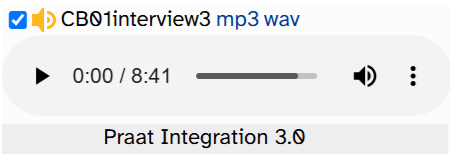
Once the Praat integration is set up, the media player will read Praat integration 3.3:
Then you should be able to do the following:
- Open a Transcript page and click on any word in the transcript body.
- The word menu should display options to open files in Praat.
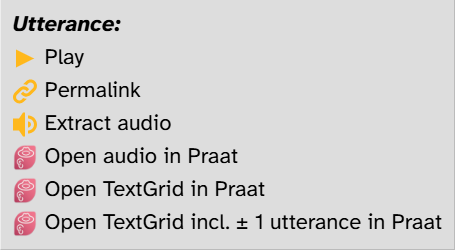
- If you do not see Praat options in the word menu, this most likely means there is an issue with the web browser extension installation.
- Clicking Open audio in Praat should open the utterance’s audio file in your local version of Praat.
- If the Praat integration options are available in the word menu but clicking them does not open the utterance in Praat, this most likely means there is an issue with the
jsendpraat.jarinstallation.
- If the Praat integration options are available in the word menu but clicking them does not open the utterance in Praat, this most likely means there is an issue with the
Required software for all users
Regardless of the web browser you are using to access APLS, there are two pre-requisites you must have installed on your local computer to use Praat integration:
- Praat (your Praat installation must be at least version 6.2.05 or newer)
- Java (Java is used to send the files from your web browser to Praat)
Configuration steps for Google Chrome (and Chromium-based browsers)
Praat integration for Google Chrome and Chromium-based browsers requires two components to be installed:
- The Praat Integration extension, available on the Chrome Web Store.
- The Praat Native Messaging Host, which is included in the Praat Integration Chrome extension but requires separate installation.
The steps to install these are:
- Navigate to the Praat Integration extension page on the Chrome Web Store, either through this link or by clicking the Praat icon in the upper-right corner of the APLS media player.
- On the Praat Integration extension page, click the button that says “Add to Chrome” (or “Add to [BROWSER NAME]”).

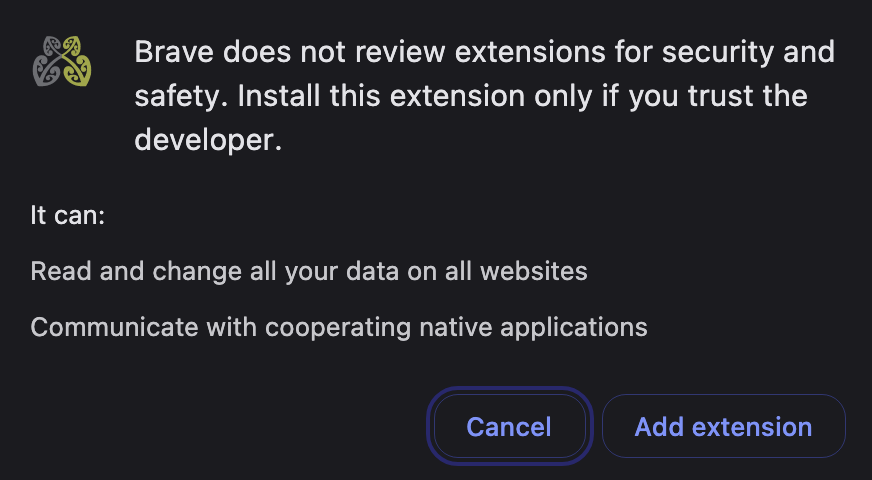
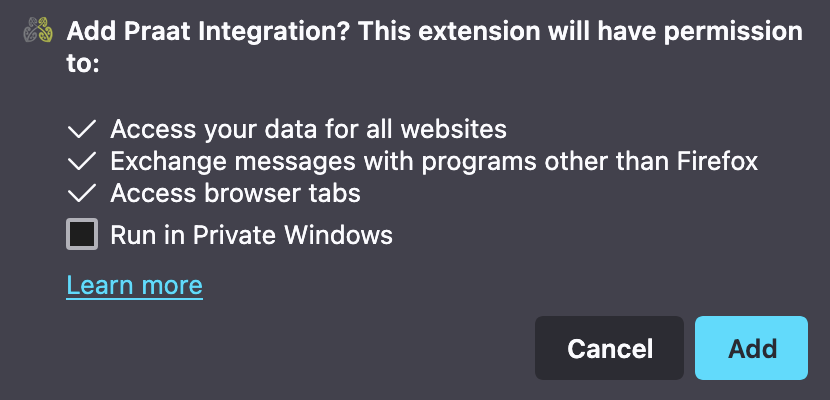
- A message will appear asking if you want to add the Praat integration extension. Click the “Add extension” button.
- Download and save the file
install-jsendpraat.jar - Click on the
install-jsendpraat.jarfile to open it. (macOS users may receive a message saying the file can’t be opened. Steps for resolving this are included in the Note for macOS users section.) - Click the “Install” button that appears in the application window.
- Once
jsendpraatis successfully installed, you can delete theinstall-jsendpraat.jarfile. - Refresh your APLS webpage and enjoy the Praat integration functionality on Transcript pages!
Configuration steps for Mozilla Firefox
Praat integration for Firefox requires two components to be installed:
- The Praat integration Firefox extension.
- The Praat Native Messaging Host, which is included in the Praat integration Chrome extension but requires separate installation.
The steps to install these are:
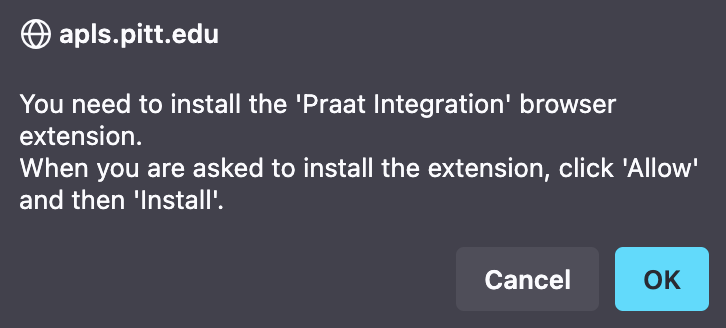
- Click the Praat icon in the upper-right corner of the APLS media player, which will open a pop-up prompt saying you need to install the ‘Praat integration’ browser extension. Click “OK”.
- Firefox will display a pop-up asking if you want to allow apls.pitt.edu to install an add-on. Click “Continue to installation”.

- Another pop-up message will appear asking if you want to add the Praat integration extension. Click the “Add” button.
- Download and save the file
install-jsendpraat.jar - Click on the
install-jsendpraat.jarfile to open it. (macOS users may receive a message saying the file can’t be opened. Steps for resolving this are included in the Note for macOS users section.) - Click the “Install” button that appears in the application window.
- Once
jsendpraatis successfully installed, you can delete theinstall-jsendpraat.jarfile. - Refresh your APLS webpage and enjoy the Praat integration functionality on Transcript pages!
Note for macOS users
When attempting to install install-jsendpraat.jar, you may receive a system message saying that the file can’t be opened. If this occurs, follow these steps:
- Click “Done” to dismiss the message.
- Go to your computer’s “System Settings” and navigate to “Privacy & Security”
- Click the “Open Anyway” button under the Security heading.
- Click the “Open Anyway” button in the system message pop-up.
- Proceed with the rest of the Praat integration configuration steps.
Checking if Praat integration is set up correctly
To verify that the Praat integration functionality is correctly installed:
- Open the Transcript page for
CB01interview1.eaf - Click on the first word in the transcript body (manipulate).
- The word menu should display options to open files in Praat.
- If you do not see Praat options in the word menu, this most likely means there is an issue with the web browser extension installation.
- Clicking Open in Praat should open the utterance’s audio file in your local version of Praat.
- If the Praat integration options are available in the word menu but clicking them does not open the utterance in Praat, this most likely means there is an issue with the
jsendpraat.jarinstallation.
- If the Praat integration options are available in the word menu but clicking them does not open the utterance in Praat, this most likely means there is an issue with the