
Browsing transcripts
The primary way to browse transcripts in APLS is via the Transcripts page: https://apls.pitt.edu/labbcat/transcripts.
The Transcripts page not only lists all the transcripts in APLS and their attributes (metadata), but it also offers useful tools for filtering and exporting transcripts. On this documentation page, we cover the functionality and layout of the Transcripts page.
On this page
What you can do on the Transcripts page
The Transcripts page allows you to…
- Browse transcripts available in APLS
- View transcript attributes
- Export transcript attributes to CSV files
- Filter transcripts according to their attributes
- Export transcripts in a variety of formats
- Export transcript audio files
- View participants for selected transcripts
- Search transcripts with the Search page
Page layout
The following image shows the top of the Transcripts page when you first load it:
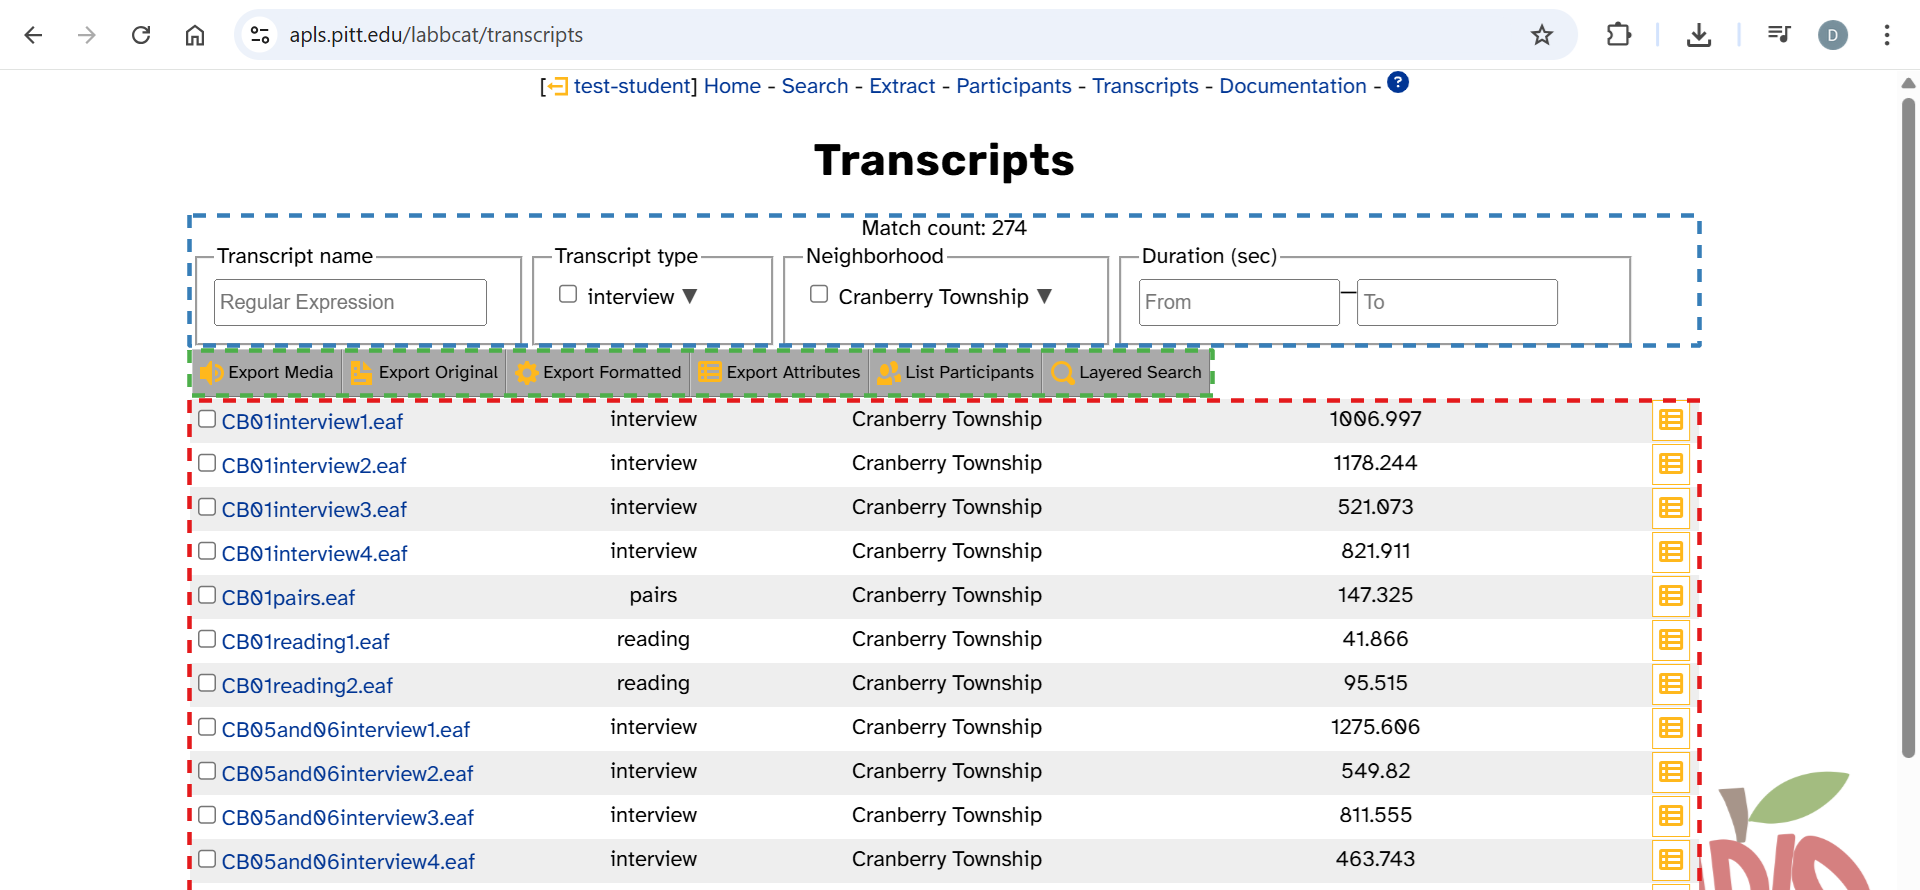
- The transcript list (highlighted in red above) continues all the way down the page. This is where you can…
- Browse transcripts available in APLS
- View transcript attributes
- The filters (highlighted in blue above). This is where you can…
- Filter transcripts according to their attributes
- The export menu (highlighted in green above). The buttons each have their own function:
- Export Media: Export transcript audio files
- Export Original and Export Formatted: Export transcripts in a variety of formats
- Export Attributes: Export transcript attributes to CSV files
- List Participants: View participants for selected transcripts
- Layered Search: Search transcripts with the Search page
Export menu selection rules
Each of the actions in the export menu (highlighted in green above) applies to whichever transcripts you’ve selected:
- No filters selected, no checkboxes selected: The action will apply to all transcripts in APLS.
- At least one filter selected, no checkboxes selected: The action will apply to all transcripts matched by the filter.
- At least one checkbox selected: The action will apply to all checked transcripts.
- You can select a range of checkboxes by clicking the first one you want to include, holding the
Shiftkey, and clicking the last one you want to include.
- You can select a range of checkboxes by clicking the first one you want to include, holding the
For example, if you want to export audio files for all reading-passage transcripts from Cranberry Township, you can click reading under Transcript type and Cranberry Township under Neighborhood, then Export Media.
Expandable elements
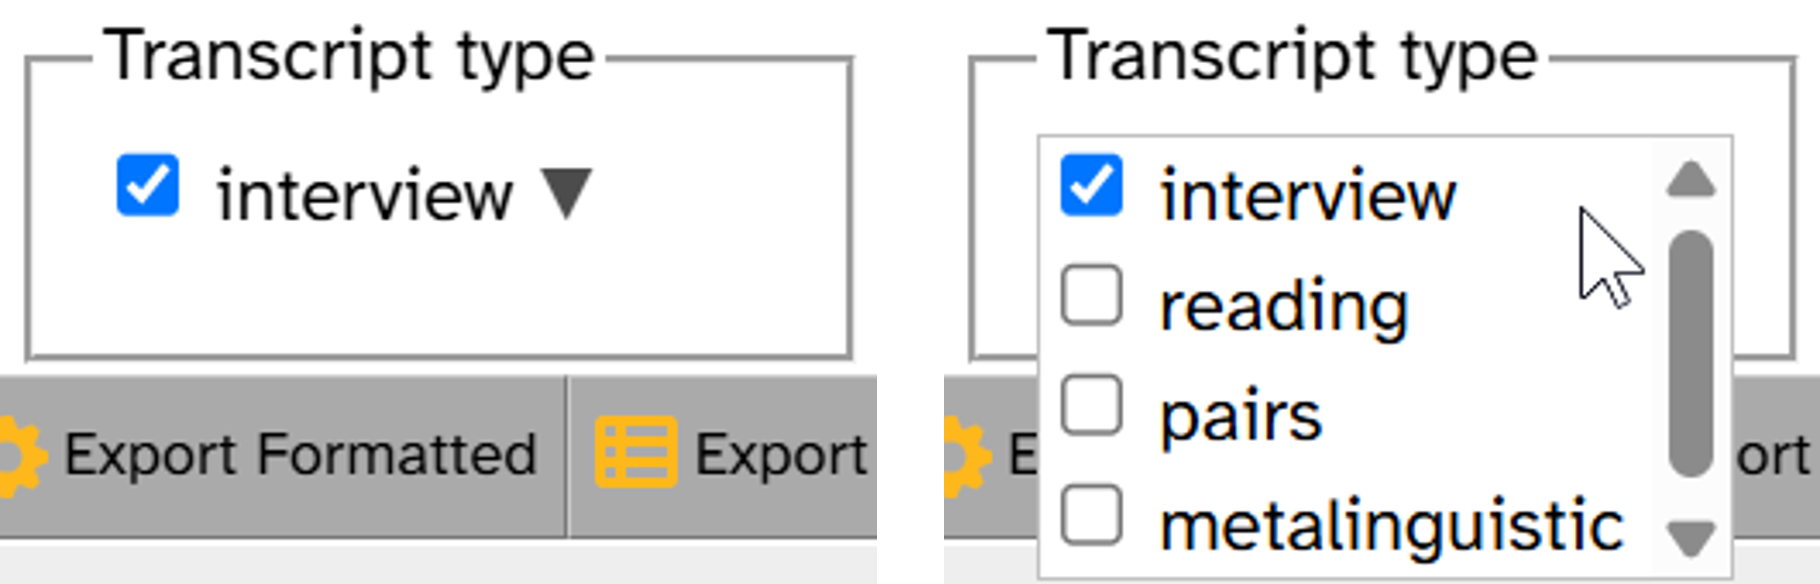
Several elements on the page have ▼ symbols (multi-select filters and the Export Attributes menu). For these elements, you can hover over them to view more options to select:
Browsing transcripts
When you first load the Transcripts page, the transcript list displays all the transcripts in APLS (broken up into several pages):
Clicking on a transcript name will load the corresponding Transcript page.
Go to the Transcripts page and click CB05pairs.eaf to view that transcript’s Transcript page.
Viewing transcript attributes
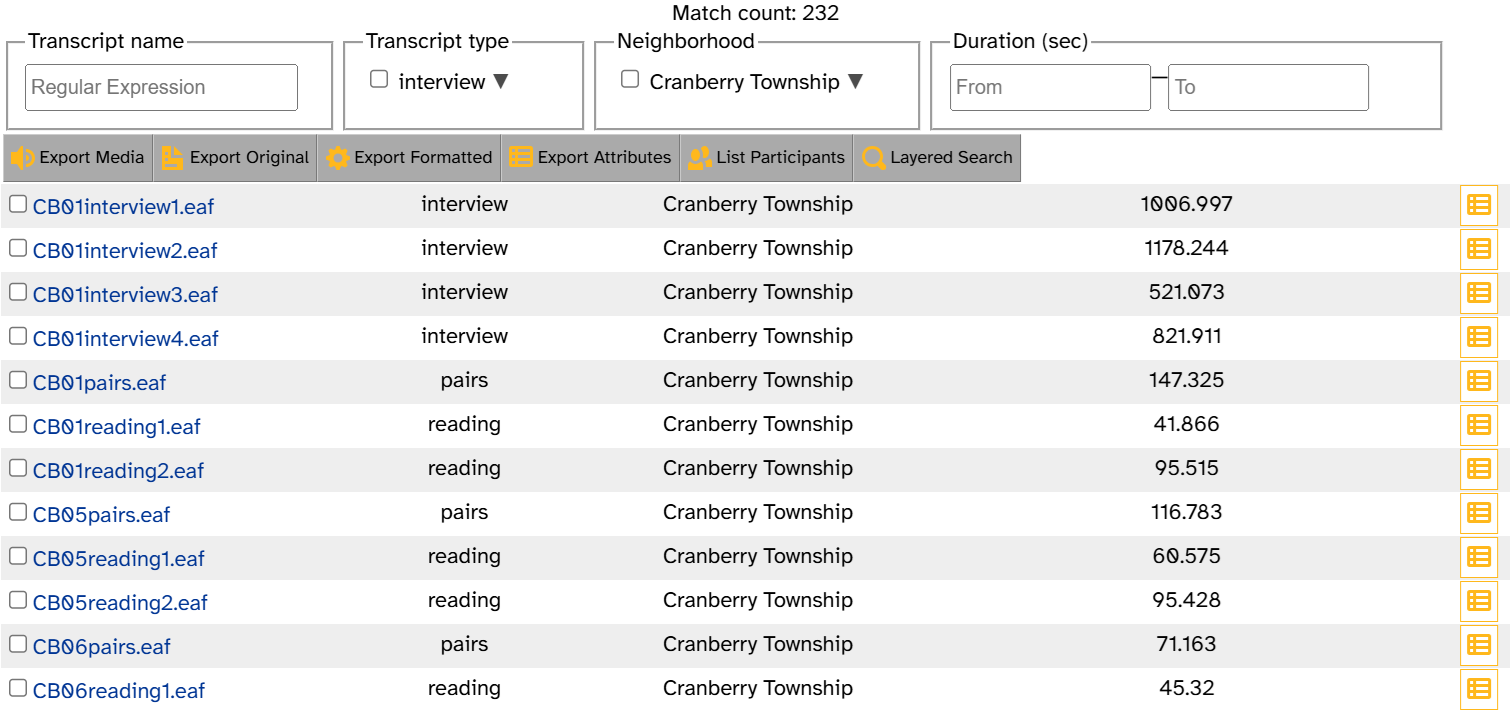
In the transcript list, to the right of the transcript names are three columns. These each correspond to a transcript attribute:
Transcript type(type): Sociolinguistic interview sectionNeighborhood(neighborhood): Which Pittsburgh neighborhood the main participant was recruited fromDuration (sec)(duration): Duration in seconds
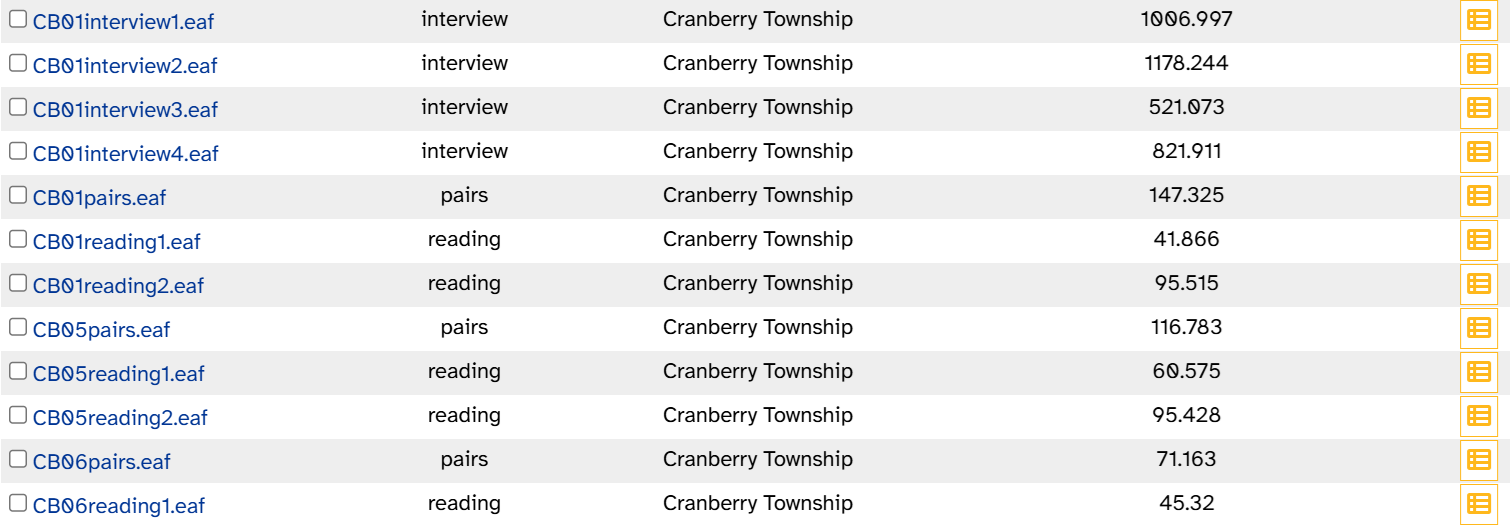
For example, in the following image, CB01reading1.eaf has a duration of 41.866 seconds:
You can read more about how attributes work on the attribute typology documentation page and the transcript attributes field guide.
Transcript attributes pages
To save space, the Transcripts page omits several attributes: episode, corpus, language, left_channel_participants, notes, recording_date, right_channel_participants, single_channel_participants, transcribers, transcription_ai_tools, and version_date. To view all attributes for a transcript, click ![]() on the right-hand side to open its Transcript attributes page. For example, here’s the Transcript attributes page for
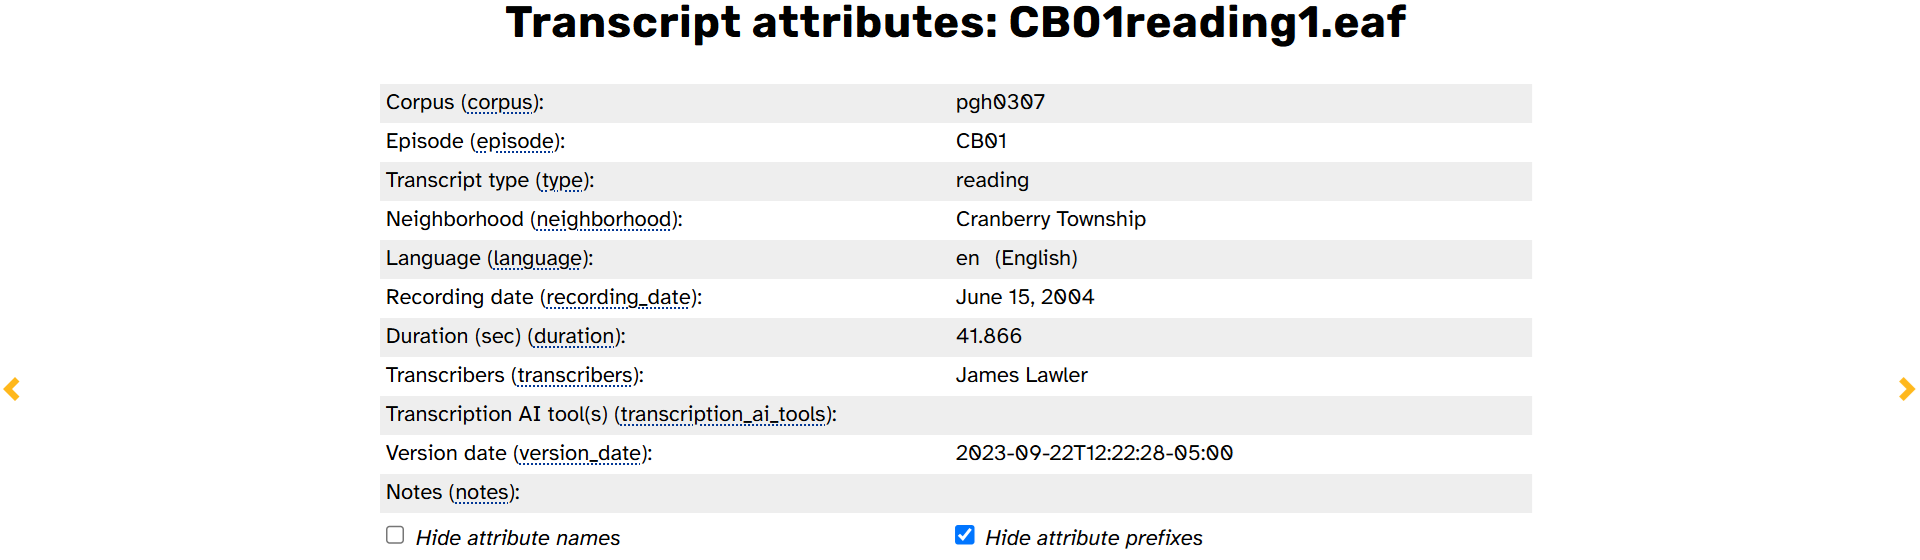
on the right-hand side to open its Transcript attributes page. For example, here’s the Transcript attributes page for CB01reading1.eaf:
- Go to the Transcripts page: https://apls.pitt.edu/labbcat/transcripts.
- Click the
icon for
CB01reading1.eafto view that transcript’s Transcript attributes page.
This page is useful for viewing attributes for individual transcripts. If you want to treat transcript attributes as data, use the Export Attributes button instead.
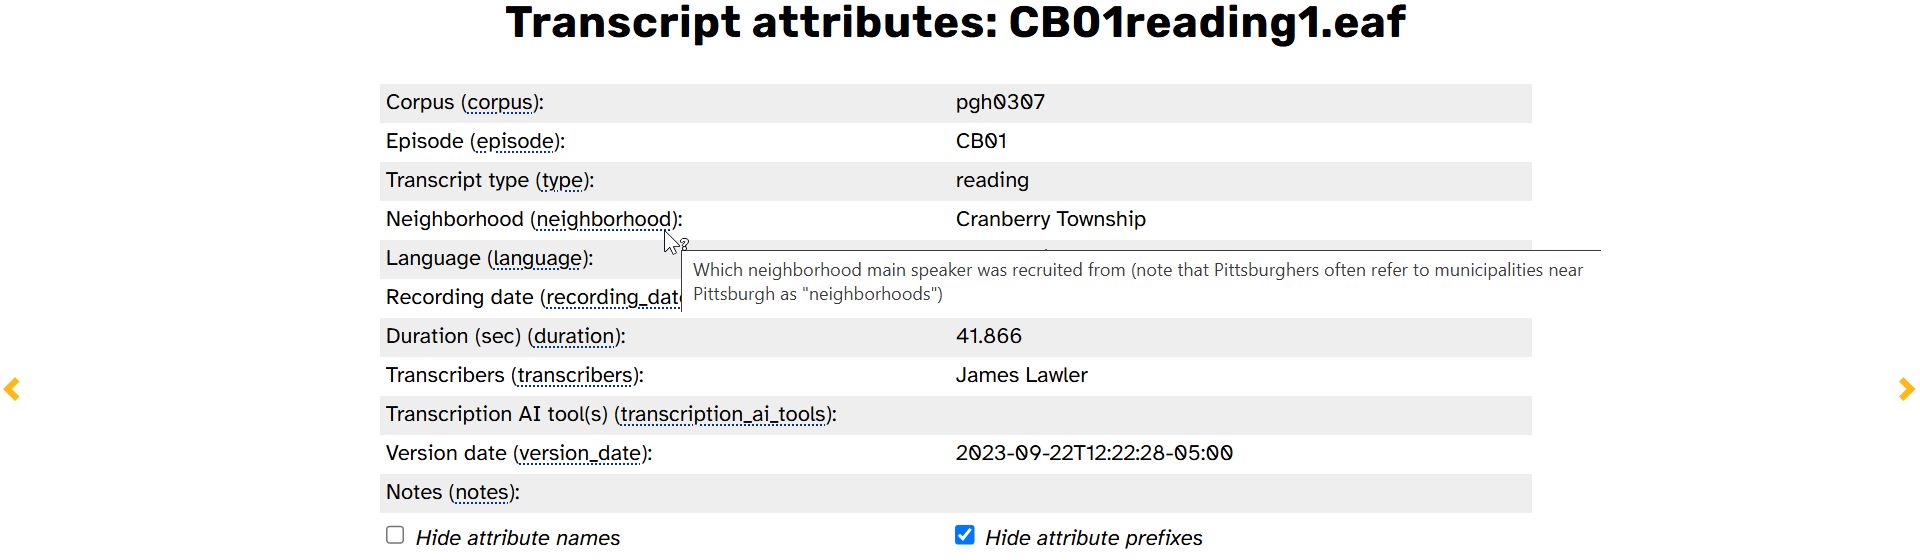
This page looks exactly like the Attributes tab on the Transcript page. The left-hand column shows attributes’ display titles (like Recording date) and names (like recording_date). The right-hand column shows attributes’ values (e.g., June 15, 2004). You can hover over an attribute name to bring up a tooltip with its description:
Blanks in the right-hand column mean that this transcript doesn’t have any value for that attribute. As you can see, for example, Transcription AI tool(s) has a blank for CB01reading1.eaf (meaning its transcription_ai_tools attribute is empty). This is because no AI tools were used to transcribe CB01reading1.eaf.
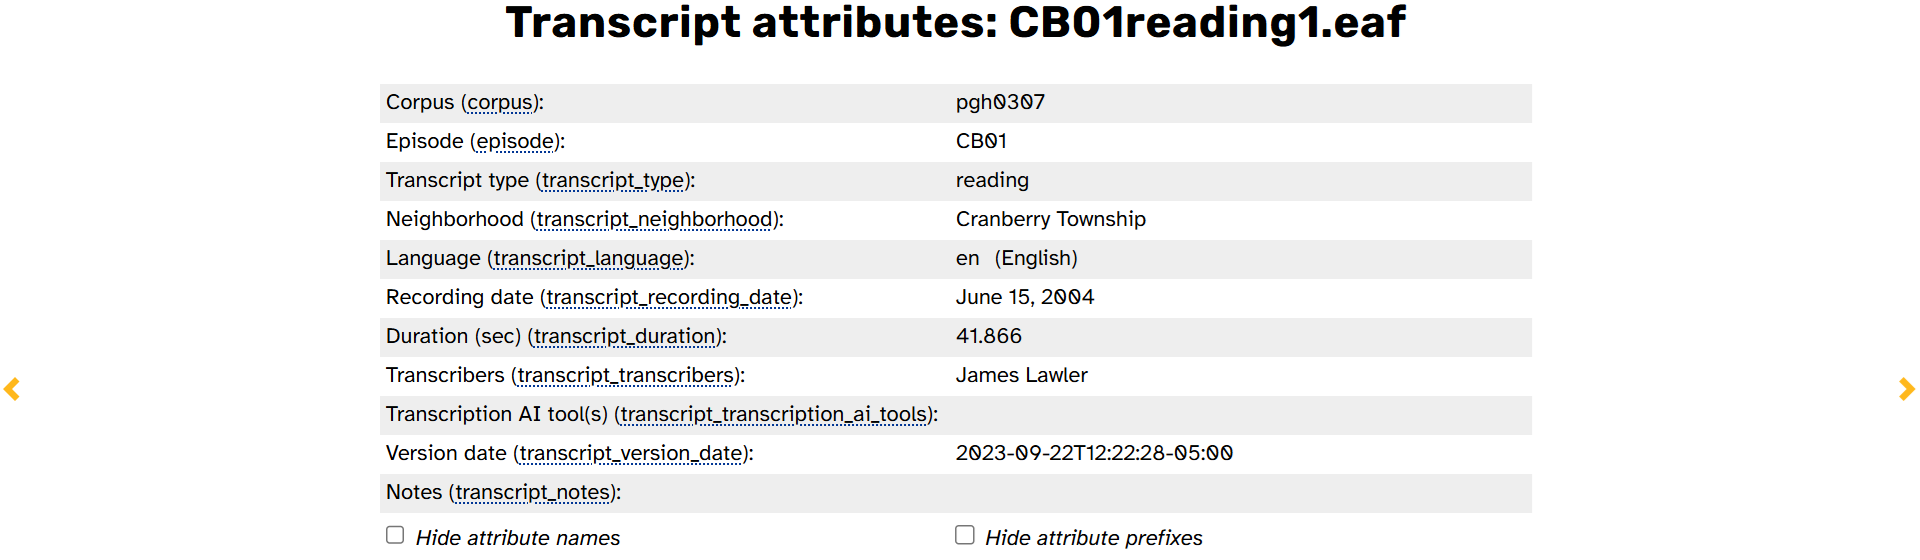
The two checkboxes at the bottom of this tab control how the left-hand column is displayed. If you want to see attributes’ full export names, select Show attribute prefixes:
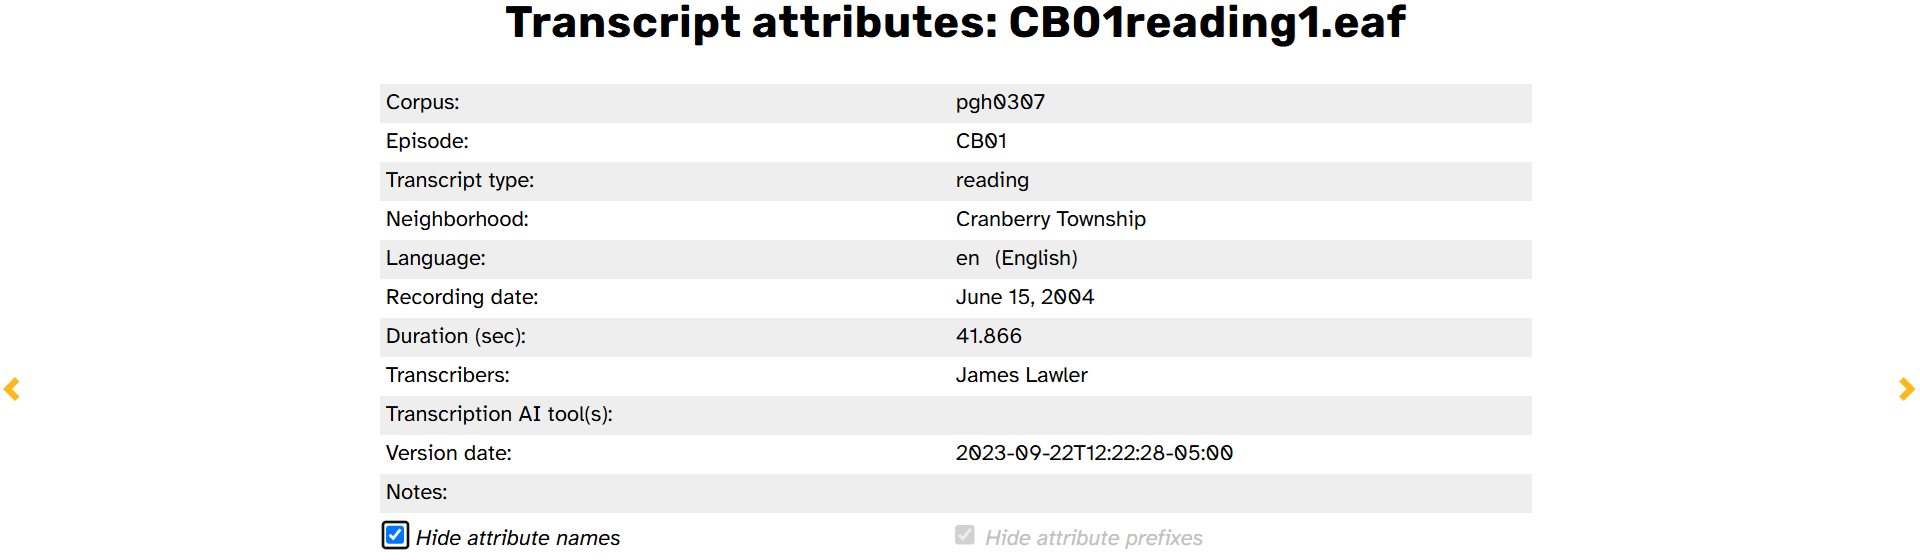
If you’re finding the attribute names visually distracting, deselect Show attribute names:
APLS remembers these settings if you navigate to other Transcript or Transcript attributes pages in the same browser tab.
Just like the Transcript page, the Transcript attributes page has navigation arrows that allow you to move to the previous or next transcript in the interview. These arrows are hidden if you are looking at the first or last transcript in the interview.
Exporting transcript attributes
The Export Attributes button allows you to download transcript attributes as a .csv file. Clicking the Export Attributes button will bring up a multi-select menu. You can hover over the menu to expand it:

After selecting the attributes you would like to export (see export menu selection rules), click the Export Attributes button again to download the .csv file. For example, here’s what it looks like when you select transcript, episode, and recording_date:
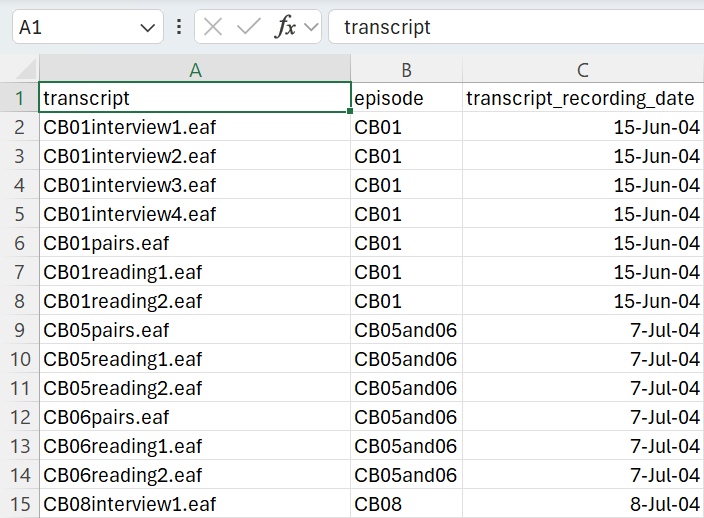
As you can see, the .csv file has one row per transcript (plus the header row) and one column per attribute. The header row has attributes’ export names, so recording_date is transcript_recording_date.
Your computer probably opens
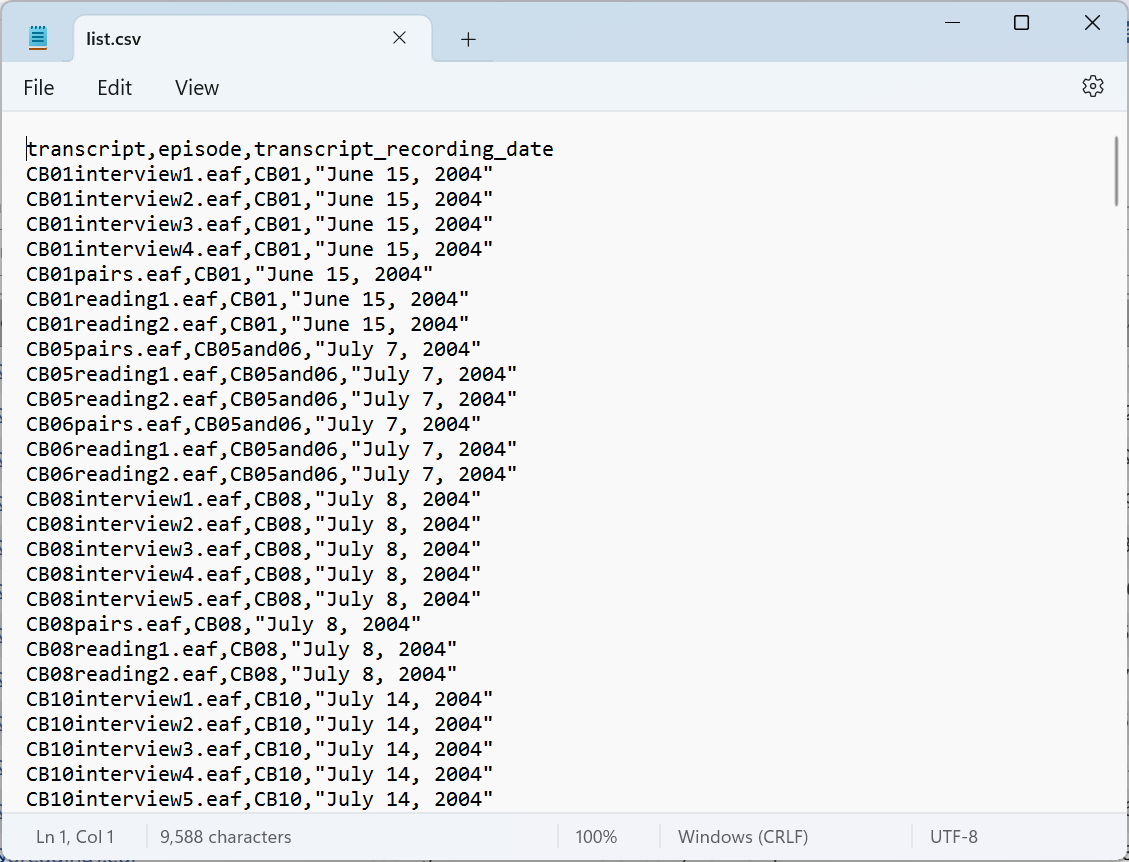
.csvfiles by default in a spreadsheet program like Microsoft Excel or Apple Numbers. These programs sometimes format data for display, which makes it look different than how the data is actually stored in APLS. For example, the image above (from Excel) displaysCB01interview1.eaf’s recording_date as15-Jun-04, but it’s actuallyJune 15, 2004. To view attribute data as they’re actually stored, open the exported.csvfile in a text editor like Notepad or TextEdit. This will display the file as raw text data:
If you haven’t selected any filters, the .csv file will include all transcripts in APLS. If you have selected filters, the .csv file will include all filtered transcripts. You can also select individual transcripts to include in the .csv file by clicking the checkboxes next to those transcripts; you can select a range of checkboxes by clicking the first one you want to include, holding the Shift key, and clicking the last one you want to include.
Descriptions of the different transcript attributes can be found in the field guide.
Filtering transcripts
The filters at the top of the Transcripts page let you find transcripts that match selected transcript attributes. You can then use this filtered list of transcripts to export attributes, export transcripts or audio files, view participants, or search transcripts.
When you first load the Transcripts page, no filters are applied, so all 274 transcripts in APLS are displayed:
As you can see, the page displays Match count: 274 above the filters. This count will decrease as you specify more filters.
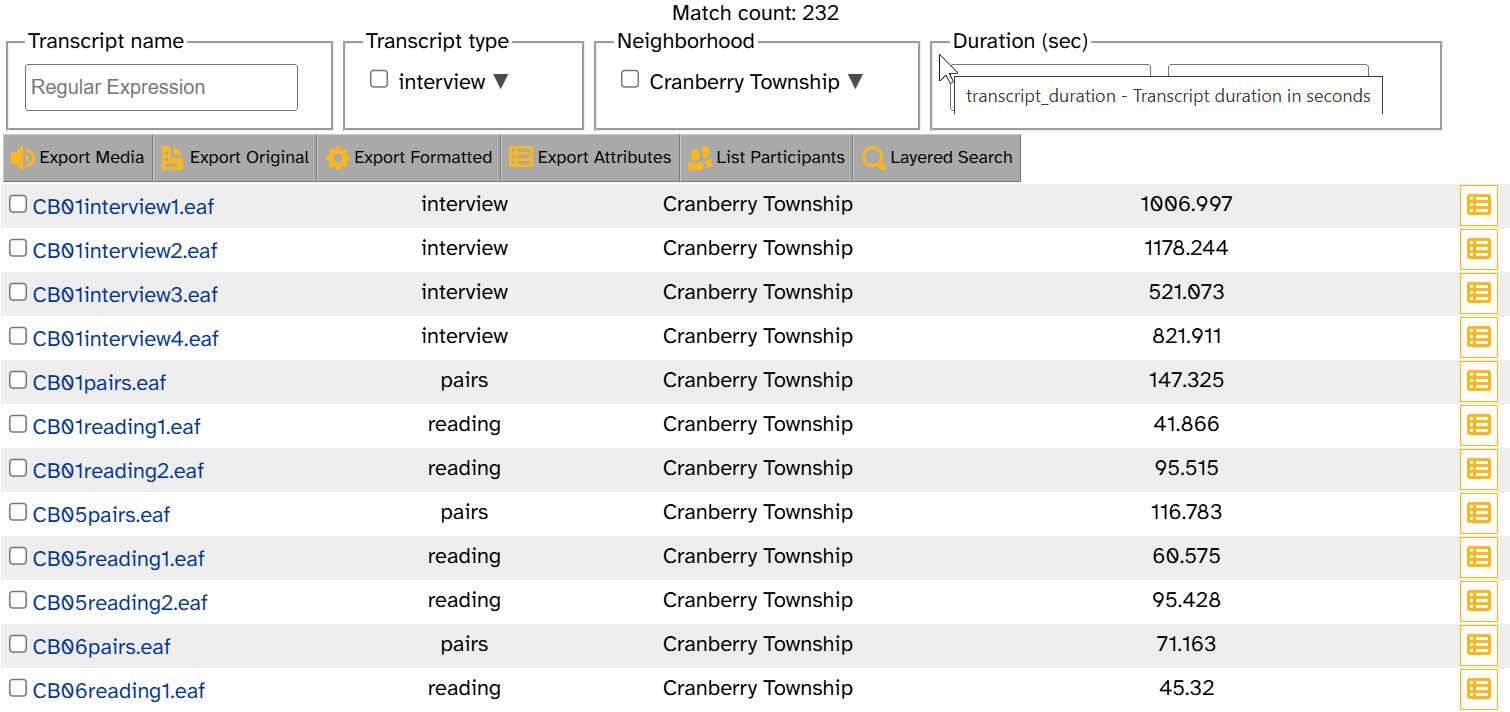
Each filter corresponds to a transcript attribute, listed by its display title (such as Duration (sec)). You can hover over the filter to see the attribute’s export name (transcript_duration) and description (Transcript duration in seconds):
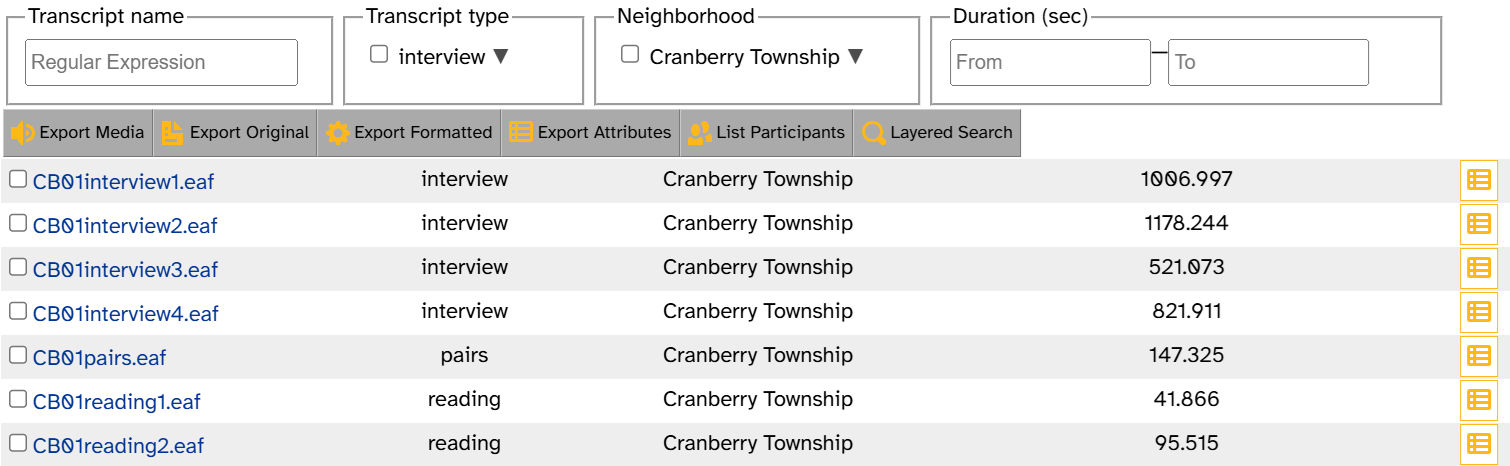
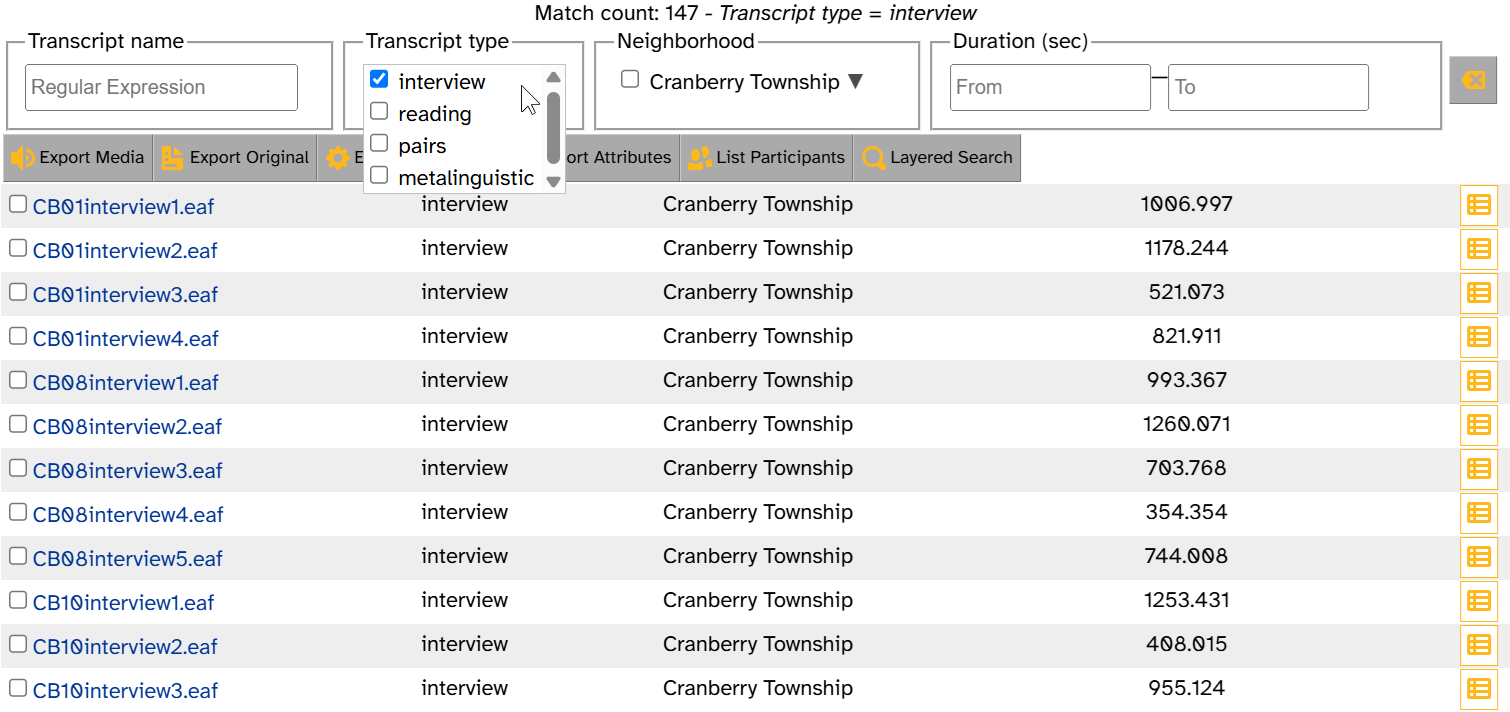
To filter by an attribute, select at least one checkbox (for Transcript type and Neighborhood) or enter text into a textbox (for Transcript name and Duration (sec)). For example, if you want to see all transcripts with type “interview”, you can select the interview checkbox under Transcript type:

As you can see, the top line shows that Match count is down to 178 transcripts and describes the filter: Transcript type = interview. The transcript list no longer displays transcripts like CB01pairs.eaf that have a type other than “interview”. In addition, the ![]() button appears to the right of the filters; this button clears filters from all attributes.
button appears to the right of the filters; this button clears filters from all attributes.
To select a different type instead, hover over the Transcript type box to expand the list of type options. The same goes for the other multi-select filter, Neighborhood:
For multi-select filters, you can choose multiple options. For example, you can select interview and reading to include these two types and exclude others:
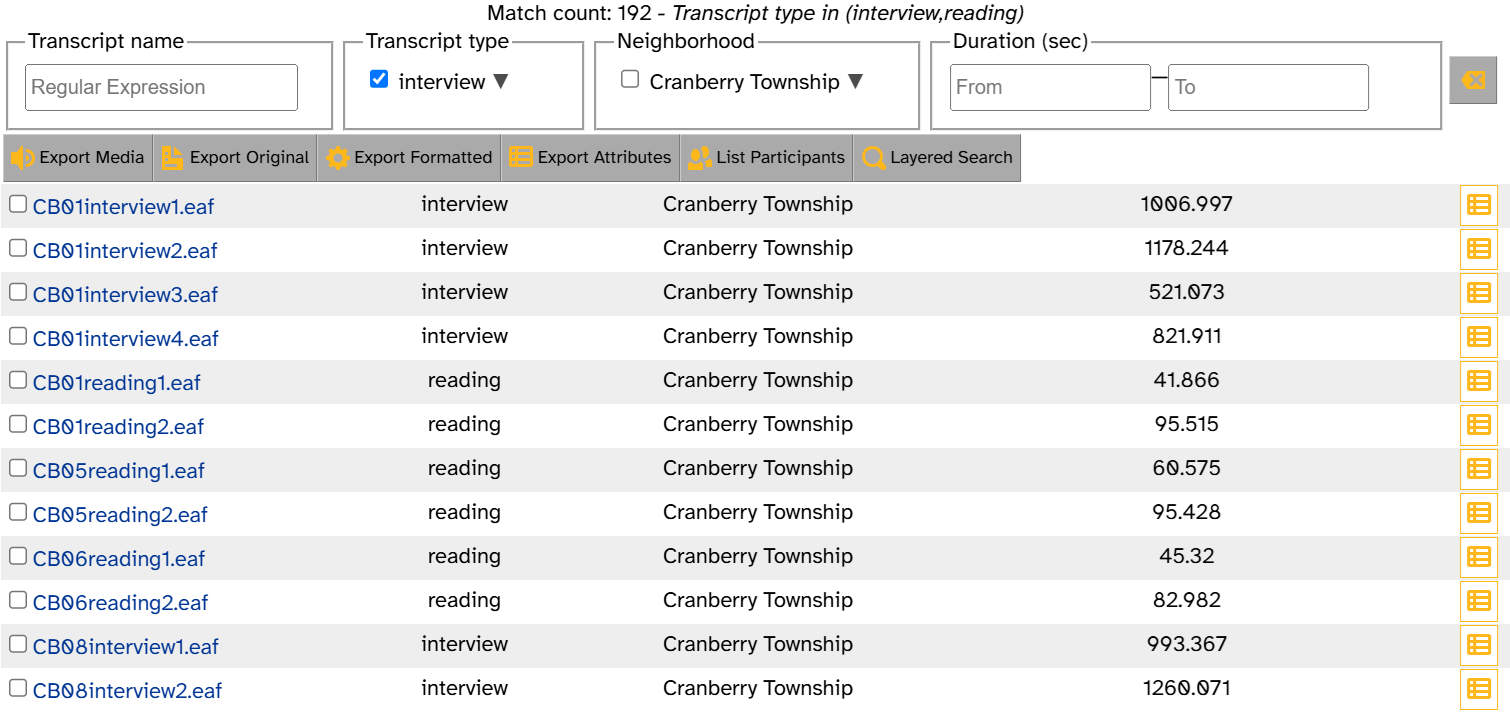
As you can see, the Match count has now increased to 228, the filter is now described as Transcript type in (interview,reading), and the transcript list displays “reading” interviews again.
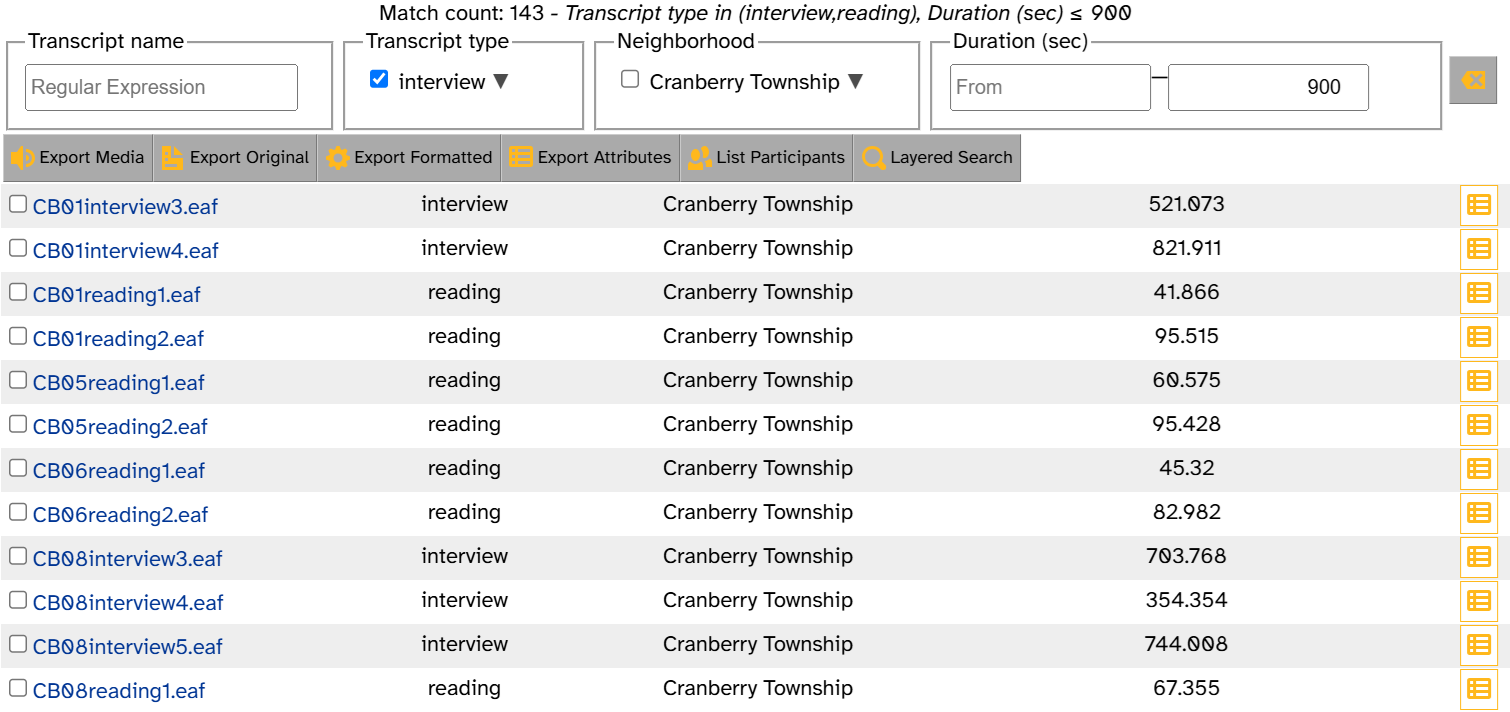
You can also filter by multiple attributes at the same time. For example, to narrow down the list of “interview” and “reading” transcripts to only include those that are at most 15 minutes long, you can type 900 (that is, 15×60) into the To box under Duration (sec):
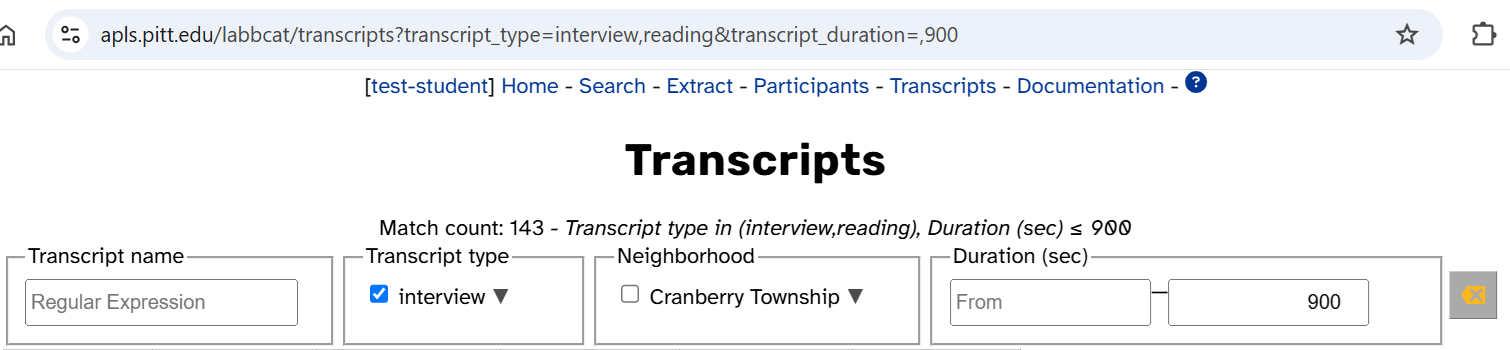
When you specify a filter, the URL changes to match it. For example, the filter in the previous image has the URL https://apls.pitt.edu/labbcat/transcripts?transcript_type=interview,reading&transcript_duration=,900:
You can use this URL as a permalink to access the same filtered transcript list again in the future.
Finally, if you navigate to a different APLS page and then back to the Transcripts page in the same browser tab, APLS will reload the last filter you set. If you want to reset the Transcripts page to its default unfiltered view, you can use the ![]() button to clear all filters.
button to clear all filters.
Filters in brief
This section is a cliffs-notes version of the previous section. If you need a walkthrough of how filters work, read the previous section instead.
The four filters correspond to the columns in the transcript list below the export menu:
- The
Transcript namebox filters transcripts by name and supports regular expressions. -
The
Transcript typemulti-select menu filters transcripts by their type of content.Because transcript type is determined by the content of the transcript, it makes it easy for researchers to filter for certain types of speech. To view all transcripts with higher attention to speech, go to the Transcripts page and select reading and pairs from the Transcript type drop-down list.
- The
Neighborhoodmulti-select menu filters transcripts according to the Pittsburgh neighborhood where the participant was recruited from. - The
Duration (sec)boxes filter transcripts by their duration in seconds.- To view transcripts that are…
- at least
Xseconds long: enterXin the From box (leave To blank) - at most
Yseconds long: enterYin the To box (leave From blank) - between
XandYseconds long (inclusive): enterXin the From box andYin the To box
- at least
Go to the Transcripts page and enter
50into the From box and leave the To box blank. This will show all transcripts that are at least 50 seconds in duration.In the same way, you can leave the From box blank and enter
300in the To box to show all transcripts that are 300 seconds or less in duration. - To view transcripts that are…
Clearing filters
To stop filtering by a single attribute, deselect all its checkboxes or clear its text box(es). This will make the filter inactive, just like it was when the page was first loaded.
To stop filtering by all attributes, click ![]() to the right of the filters.
to the right of the filters.
Filters that don’t match any transcripts
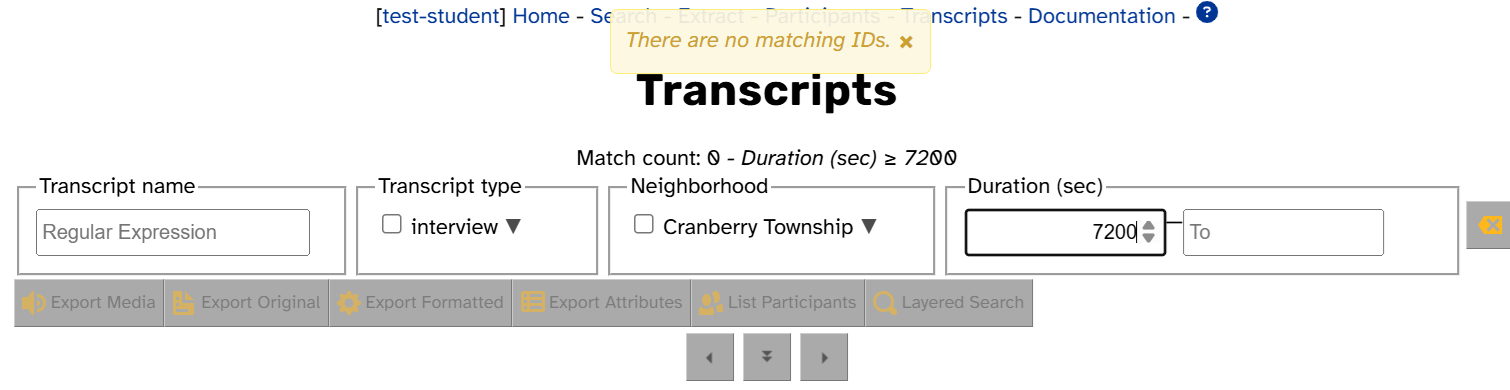
It is possible to specify a filter that doesn’t match any transcripts in APLS. For example, there aren’t any APLS transcripts that are 2+ hours in duration, so typing 7200 into the From box under Duration (sec) will match 0 transcripts. The Transcripts page will also display the message There are no matching IDs.:
Filtering by attributes not on the Transcripts page
As mentioned above, the Transcripts page omits several attributes to save space: corpus, language, left_channel_participants, notes, recording_date, right_channel_participants, single_channel_participants, transcribers, transcription_ai_tools, and version_date. To include these attributes in your filter, do the following:
- Export attributes for all transcripts to a
.csvfile using Export Attributes (see above). - Filter the
.csvfile using your favorite tool for managing spreadsheets (e.g., Excel, R). - Then, if you want to…
- … view transcript attributes: Browse the filtered spreadsheet.
- … export transcripts or audio or view participants:
- Generate a regular expression that describes all filtered transcripts:
- In Excel: Use the following formula in any cell not in column A:
=TEXTJOIN("|",TRUE,A:A). - In R: If your data frame is named
df, use the following:paste(df$transcript, collapse="|").
- In Excel: Use the following formula in any cell not in column A:
- Paste it into the Regular Expression box under
Transcript name. - Then you can use Export Media, Export Original, Export Formatted, or List Participants like you normally would.
- Generate a regular expression that describes all filtered transcripts:
- … search transcripts: Upload the filtered
.csvto the Transcripts tab on the Search page.
Exporting transcripts and audio files
Three buttons in the export menu allow you to export transcript data in a variety of formats: Export Media, Export Original, and Export Formatted.
As a reminder, these buttons use the export menu selection rules.
Export Media and Export Original
The most straightforward export options are Export Media and Export Original.
- Export Media will download the audio for the selected transcripts as
.wavfiles (packaged in a.zipfile if more than one transcript is selected). - Export Original will download the original ELAN transcripts for the selected transcripts as
.eaffiles (packaged in a.zipfile if more than one transcript is selected).
Export Formatted
The Export Formatted option allows you to download attribute and layer data from transcripts in a variety of file types. Clicking on Export Formatted once brings up options; clicking on Export Formatted again exports the file. Here’s what the options look like:

Let’s break down what we’re looking at:
- The layer picker (highlighted in red) controls which attributes and layers are included in the exported transcript.
- The format picker (highlighted in blue) controls the file format for the exported transcript. (There are also layer pickers on the Transcript, Search, and Search results pages, all slightly different in appearance.)
The attribute typology and field guides provide descriptions of transcript attributes and participant attributes. The layer field guide documentation page provides descriptions of all layers in APLS.
This layer picker works similarly to the one on the Transcript page, with a few differences:
- Attributes can be selected in addition to layers
- Unlike the Transcript page, turn and utterance can be selected, and word can be deselected
- There are no projects, so all attributes and layers are displayed
- The attributes and layers don’t change color when selected
- There are no annotation counts or IPA/DISC toggles
- There’s a Show attribute prefixes checkbox (similar to Transcript attributes pages)
- The Show layer icons checkbox is deselected by default to save space
The following formatted file types are available with Export Formatted:
- CLAN CHAT transcript (
.cha) - Comma Separated Values (
.csv) - ELAN EAF Transcript (
.eaf) - EMU-SDMS Bundle (
.json) - LaTeX Document (
.tex) - Praat TextGrid (
.TextGrid) - PDF Document (
.pdf) - Plain Text Document (
.txt) - SALT transcript (
.slt) - Transcriber transcript (
.trs) - WebVTT subtitles (
.vtt)
For more information about what exported transcripts look like and how layers are represented in different file formats, see the “Viewing a transcript” documentation page.
After selecting your desired layers and file format type, click the Export Formatted button again to export the transcripts. If more than one transcript is selected, the exported files will be packaged in a single .zip file.
Layer picker icons
If Show layer icons is selected, each layer will have either two or three icons to the right of its checkbox in the layer picker. These icons indicate some of the layer’s important properties. Here’s a quick key; see the layer typology documentation page for more information:
| Data type | Alignment | Vertical peers | |||
|---|---|---|---|---|---|
| Phonological | Complete interval | Allows vertical peers | |||
| Numeric | Sub-interval | (none) | Doesn't allow vertical peers | ||
| Text | |||||
| Timing-only | |||||
This means that, for example, the segment layer has phonological data type, complete-interval alignment, and no vertical peers: ![]() .
.
The about link points to the page section you’re reading right now!
Viewing participants in a transcript
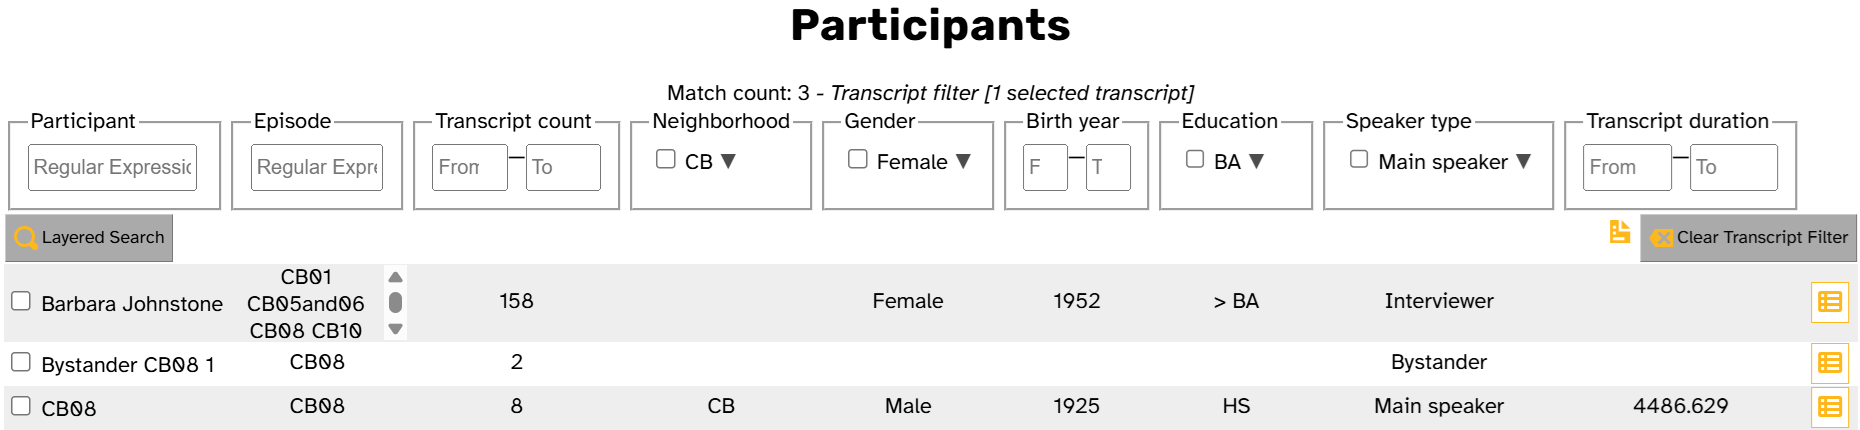
To view all participants in a single transcript, select its checkbox, then click List Participants. This will open the Participants page with a transcript filter pre-loaded. For example, to view all participants in CB08interview2.eaf, select its checkbox then click List Participants. Here’s the result:
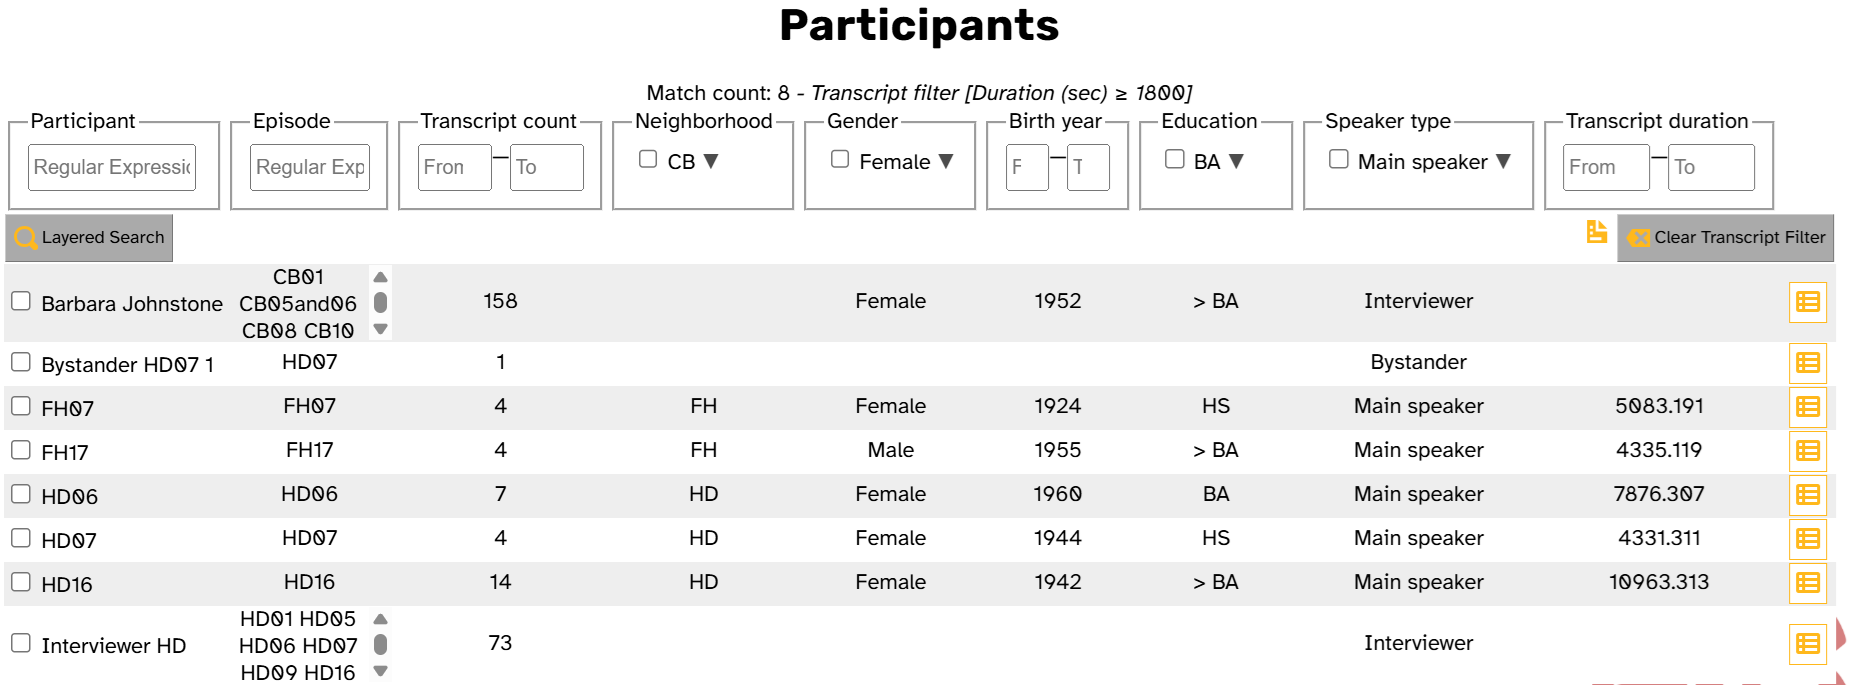
You can also view participants for multiple transcripts (see export menu selection rules). For example, to view all participants in transcripts that lasted at least half an hour, type 1800 into the From box under Duration (sec), then click List Participants. Here’s the result:
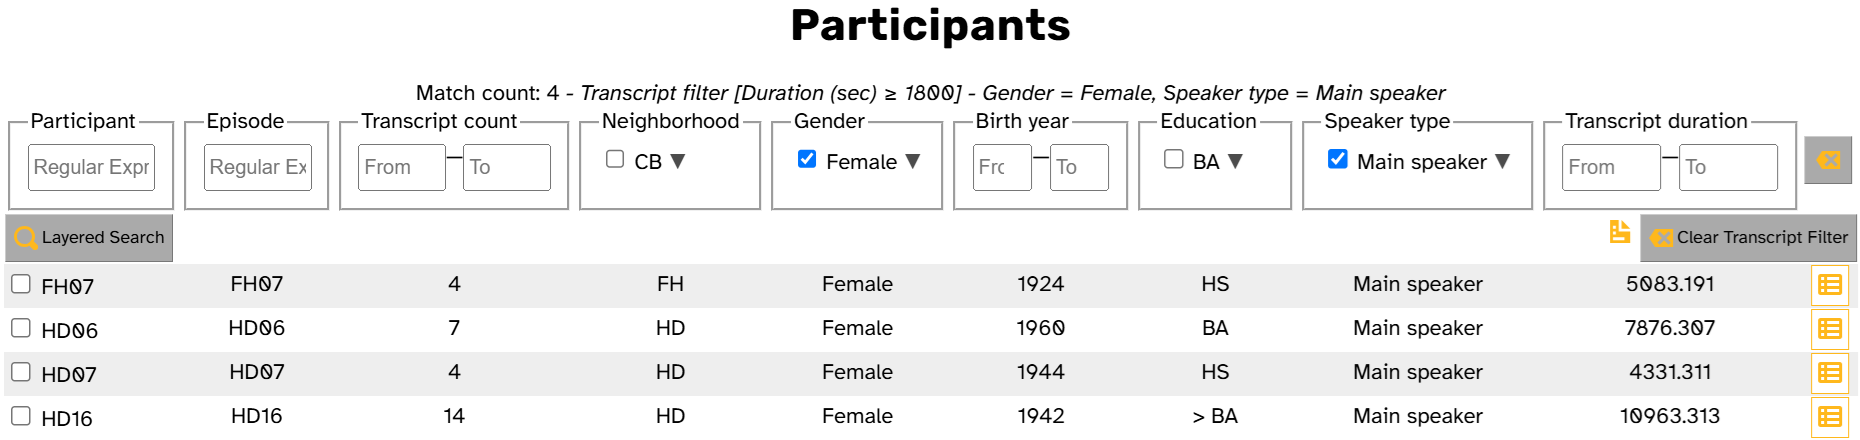
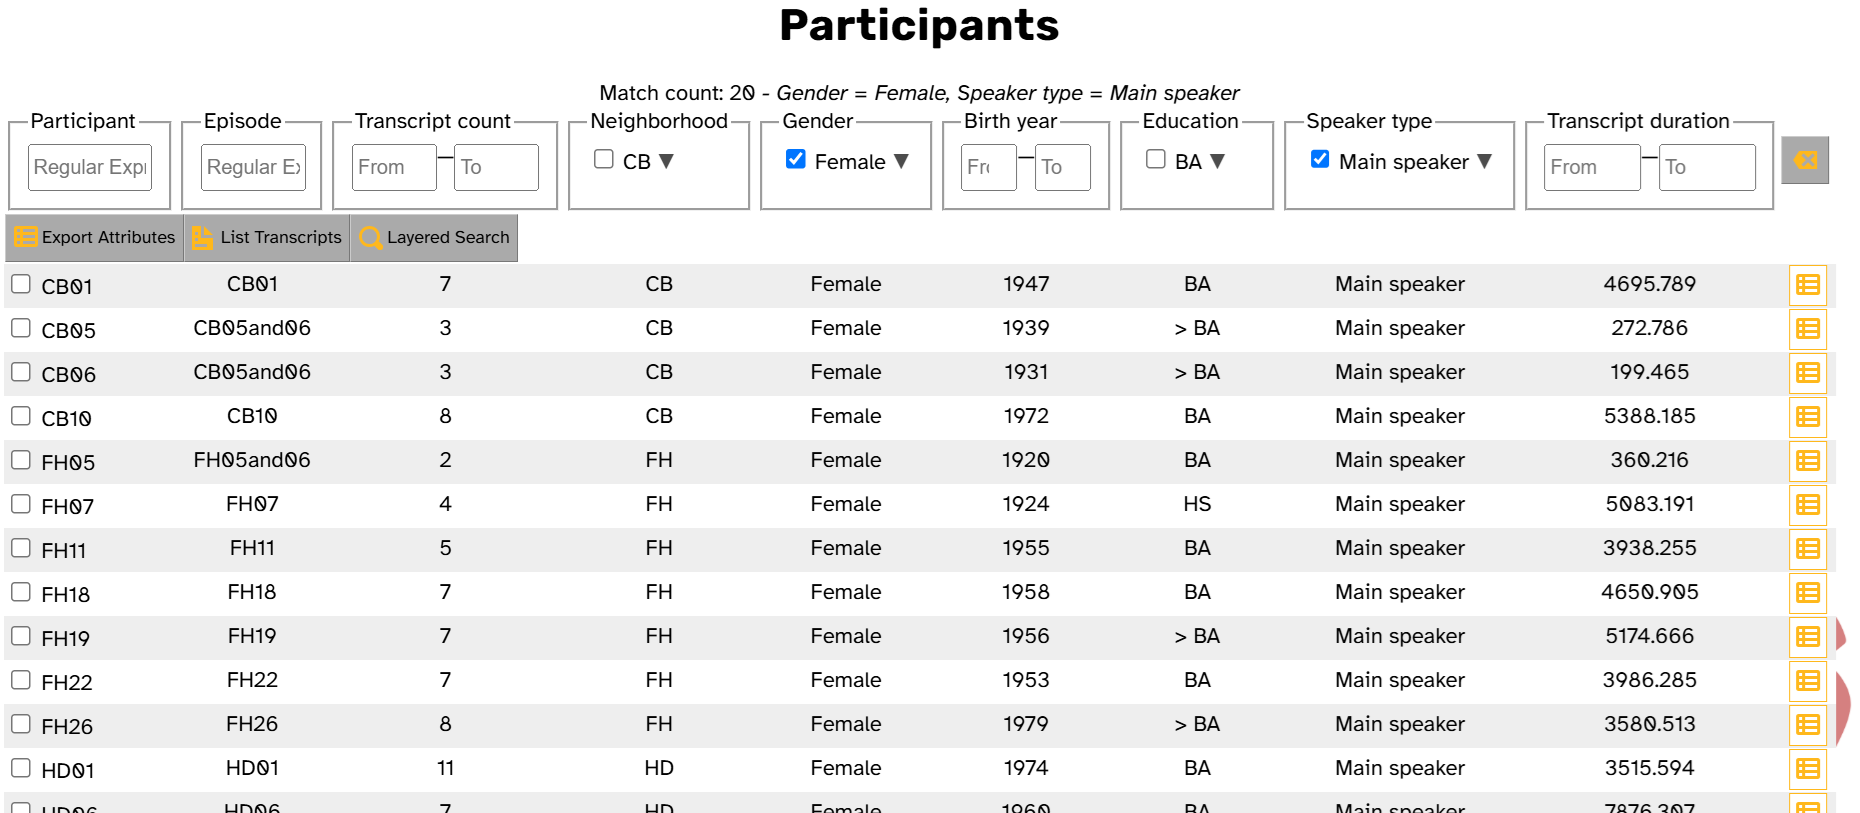
As you can see from these images, List Participants includes all three participant types: Main speakers, Interviewers, and Bystanders. The default for the Participants page is to only show Main speakers, but List Participants overrides this default filter. However, once you click List Participants, you can select participant filters to further narrow down the participant list. This is useful if you want to filter participants by both transcript and participant attributes. For example, you can get a list of all female main-speaker participants in transcripts that lasted at least half an hour:
If you want to undo the transcript filter, click Clear Transcript Filter. This will leave in place any participant filter(s). Here’s what it looks like if you click Clear Transcript Filter based on the previous image:
Searching transcripts
The Layered Search button opens the Search page with the selected transcripts filled into the Transcripts tab. (Keep in mind the export menu selection rules.) For example, here’s what it looks like when you click reading under Transcript type and Cranberry Township under Neighborhood, then Layered Search:
![]()
Let’s find all tokens of the word steel in the CB01 transcripts
- Go to the Transcripts page.
- Type
CB01into the box underTranscript name. This will select all CB01 transcripts.- Click Layered Search to open the Search page.
- Enter
steelinto the Regular expression box in the orthography section and click Search.- Click Display results to view all utterances of the word
steelin the CB01 transcripts.
You can achieve the same result by starting on the Search page and selecting Filter Transcripts on the Transcripts tab.